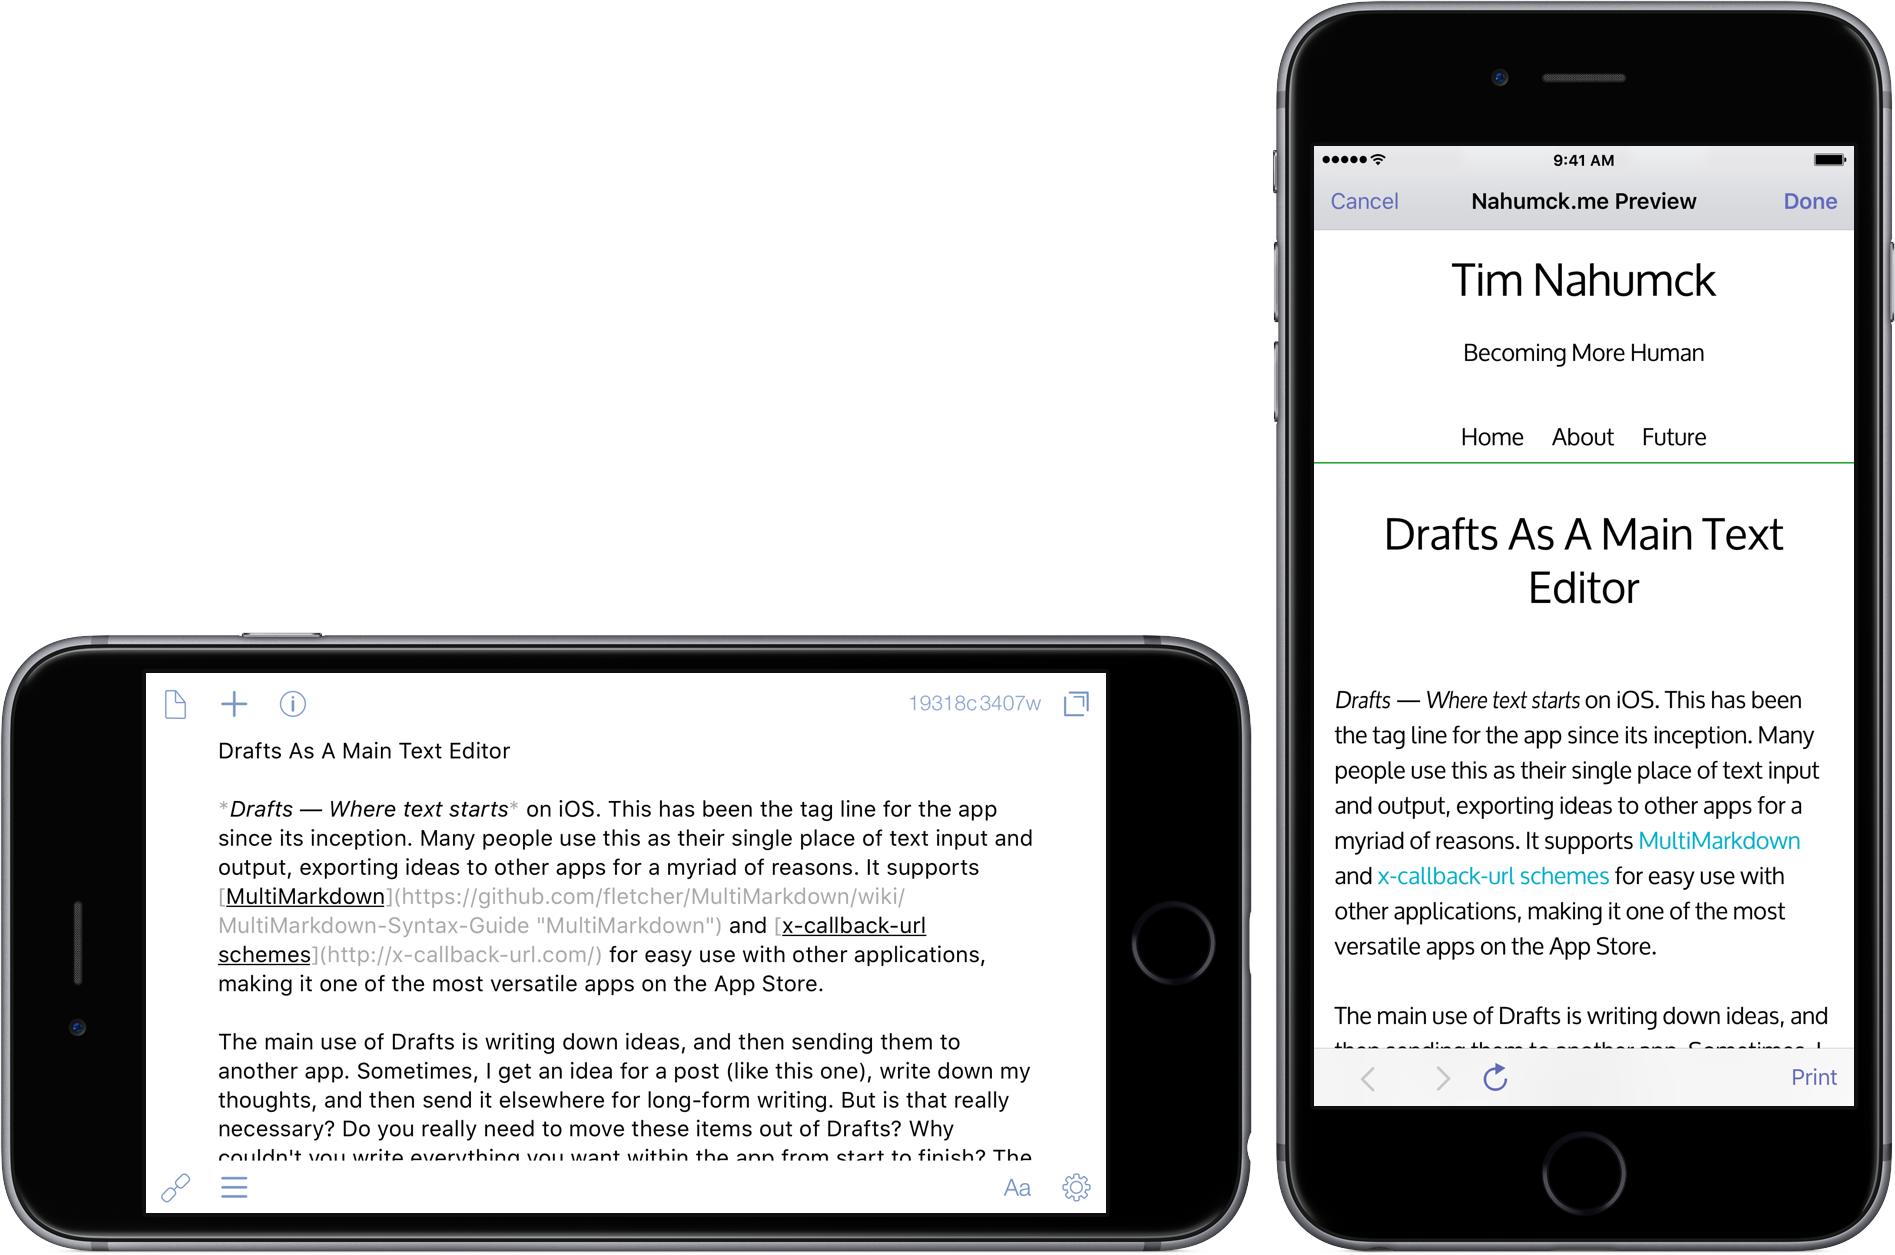
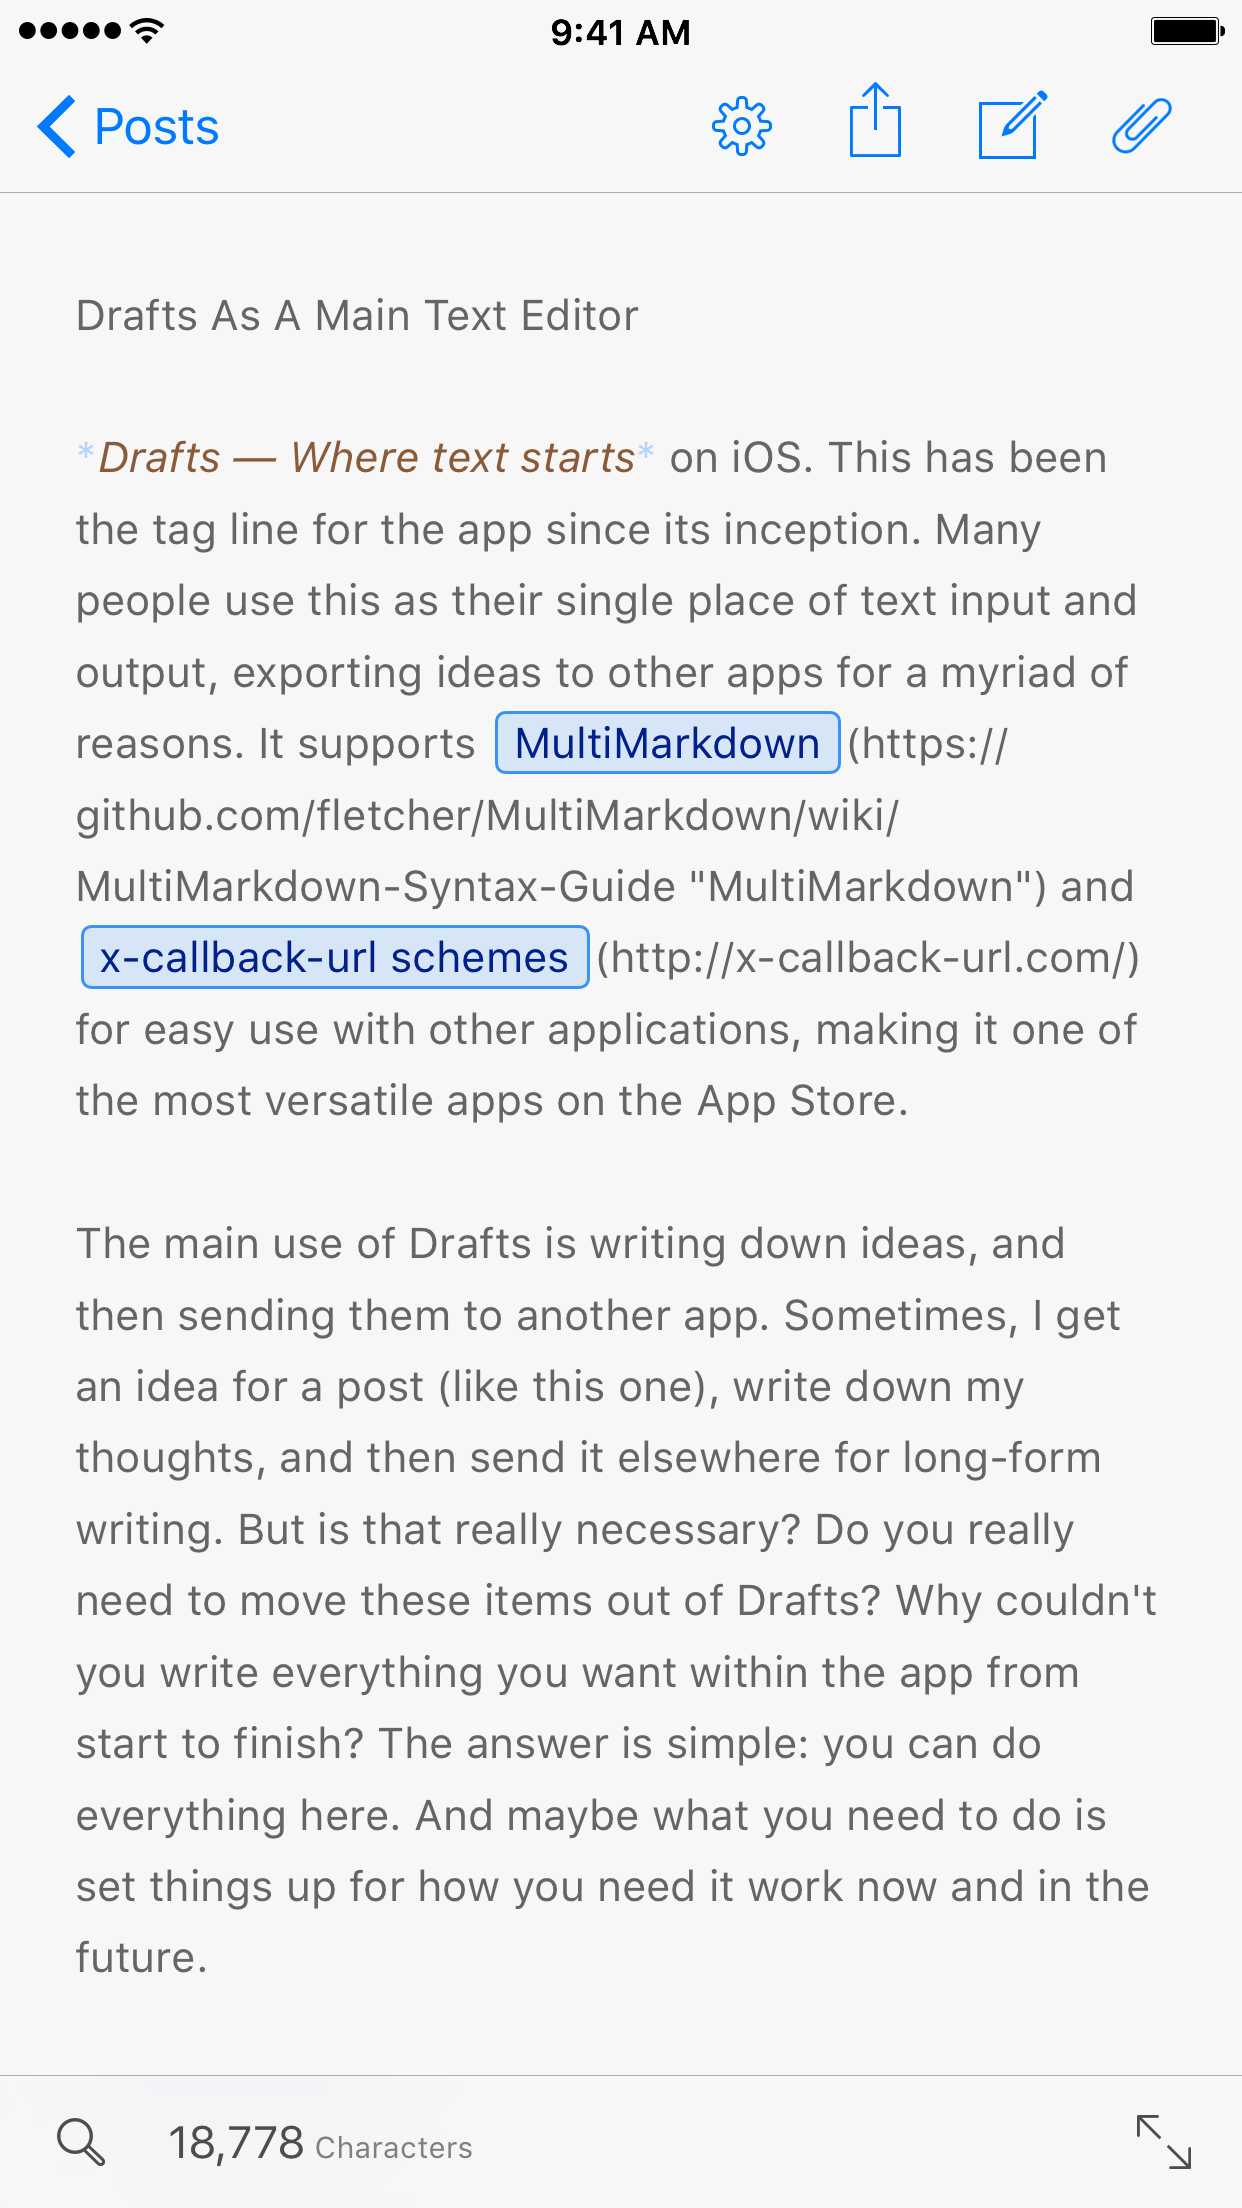
Drafts — Where text starts on iOS. This has been the tag line for the app since its inception. Many people use this as their single place of text input and output, exporting ideas to other apps for a myriad of reasons. It supports writing styles like MultiMarkdown; it supports scripting via JavaScript and x-callback-url schemes for easy use with other applications, making it one of the most versatile apps on the App Store.
The main use of Drafts is writing down ideas, and then sending them to another app. Sometimes, I get an idea for a post (like this one), write down my thoughts, and then send it elsewhere for long-form writing. But is that really necessary? Do I really need to move these items out of Drafts? Why couldn’t I write everything I want within the app from start to finish? The answer is simple: I can do everything here. And maybe what you need to do to use Drafts as a main text editor is set things up for how you need it to work now and in the future.
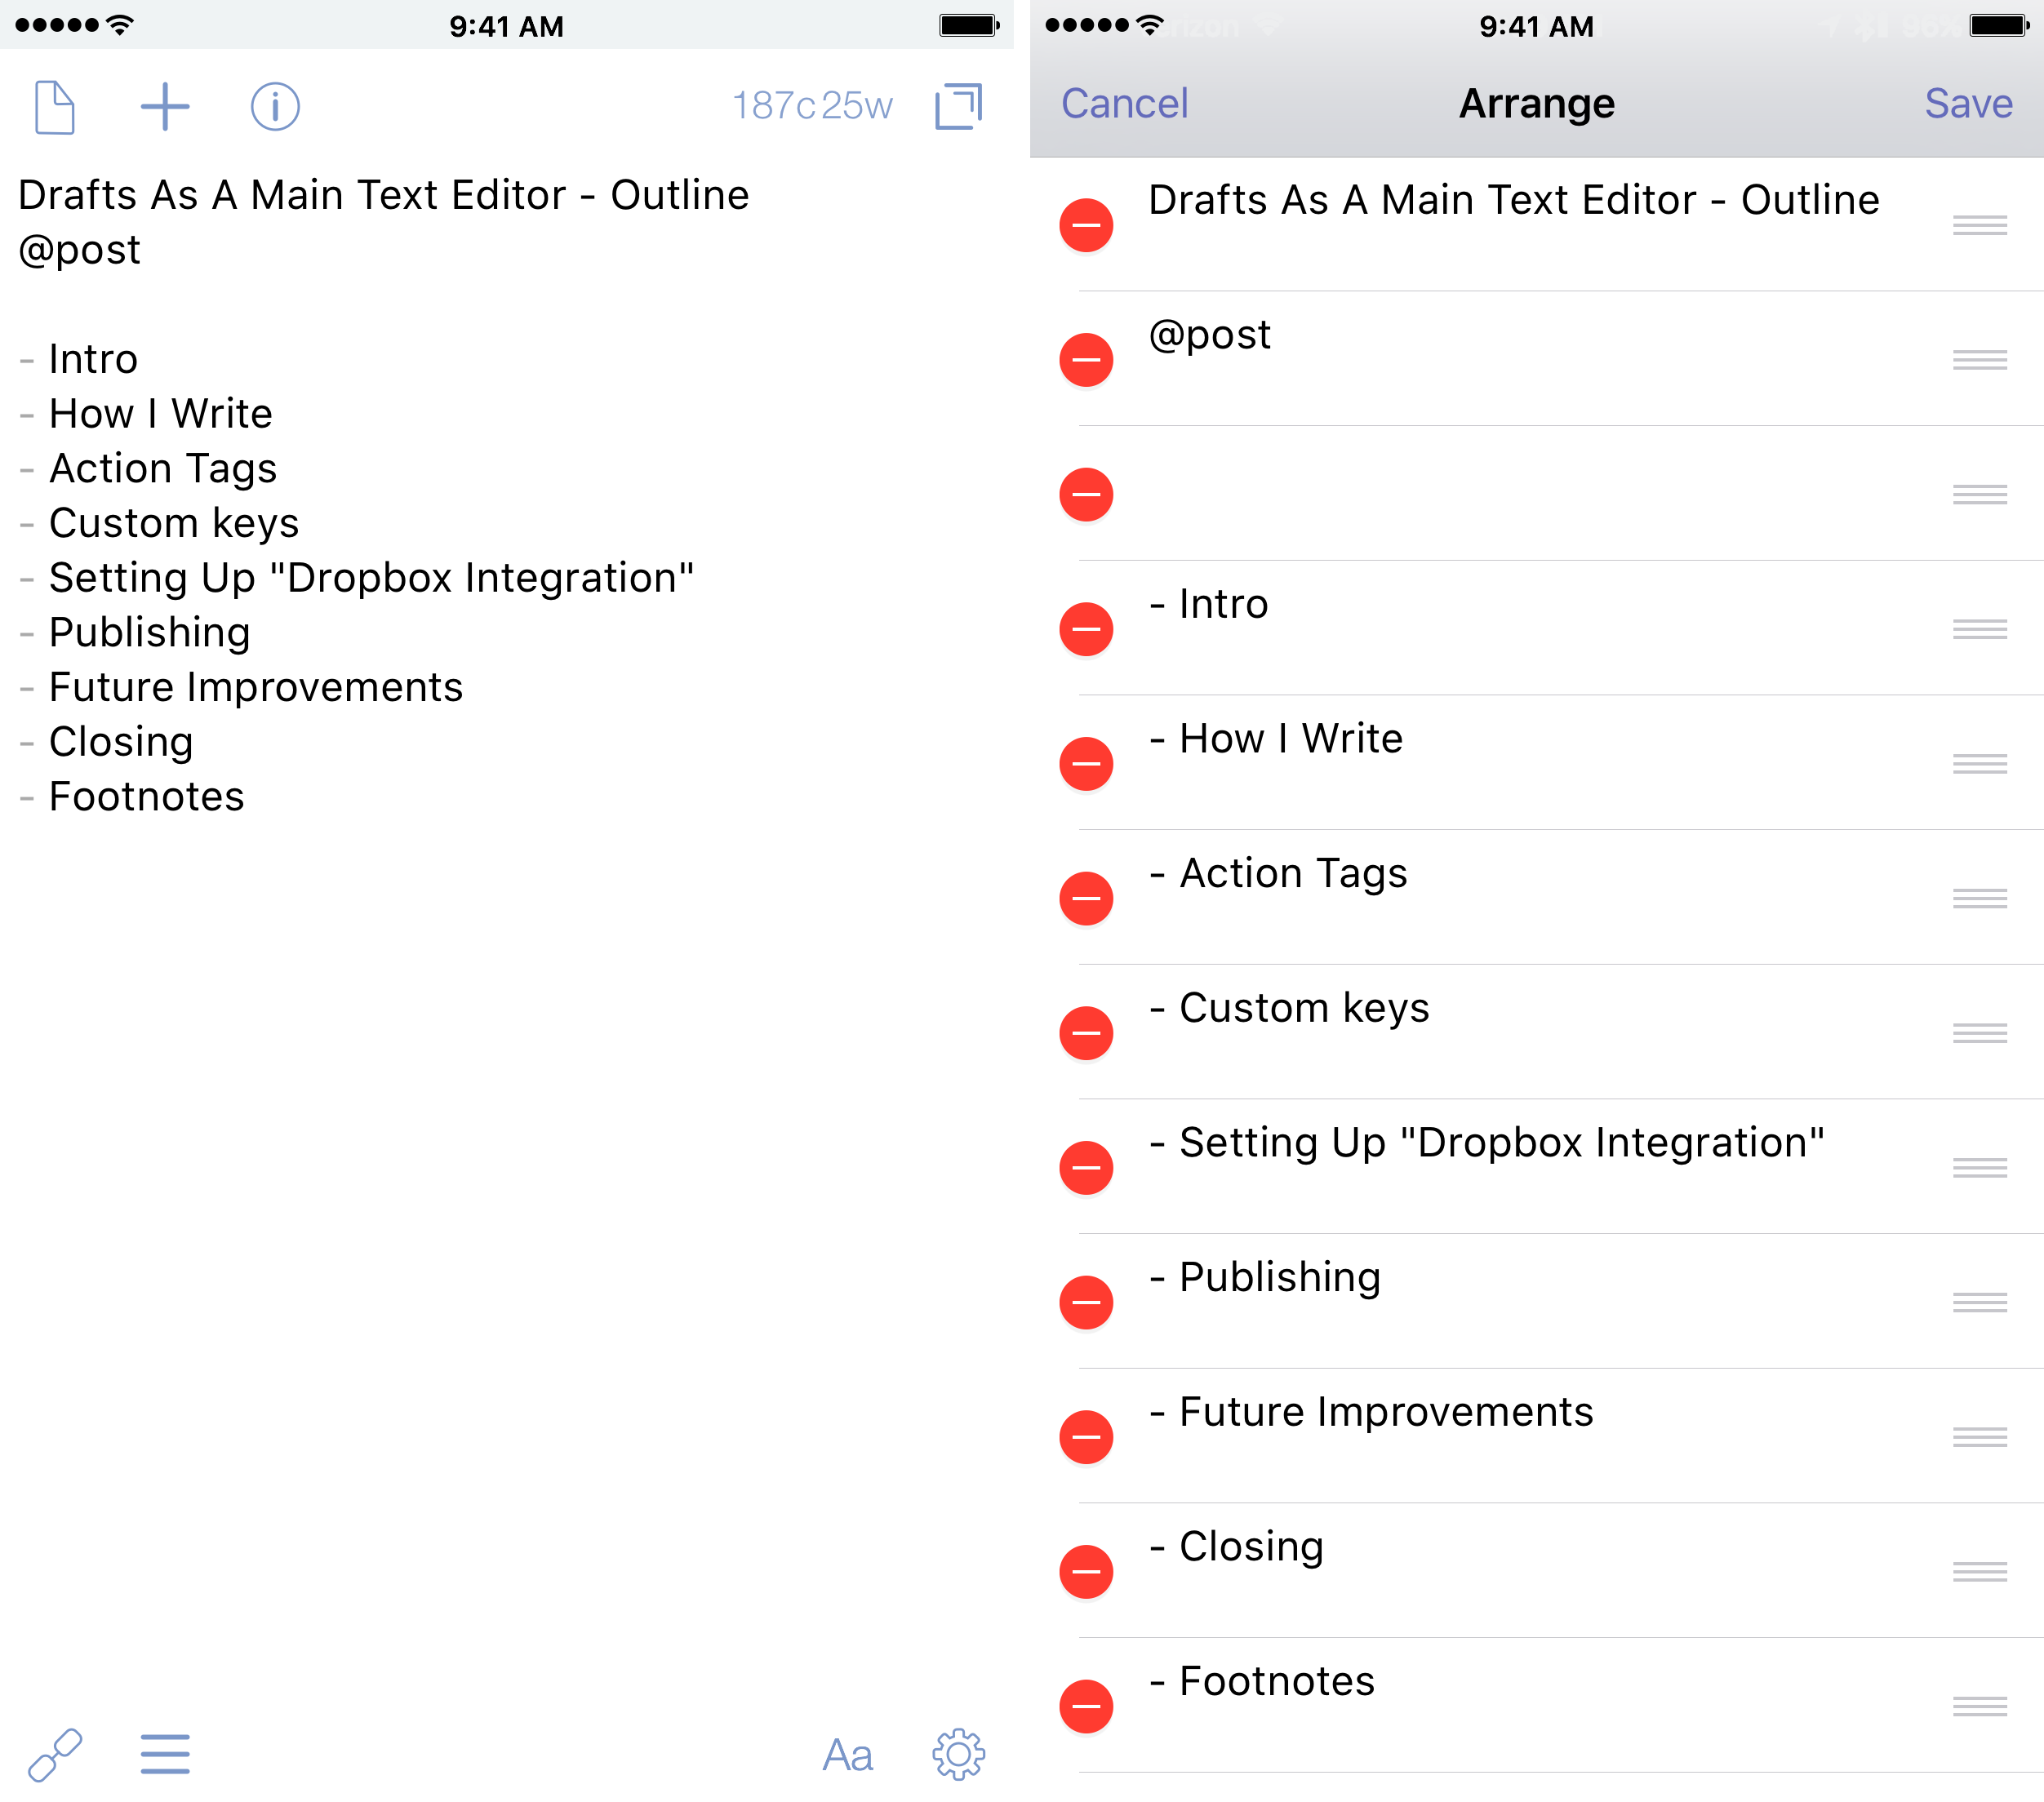
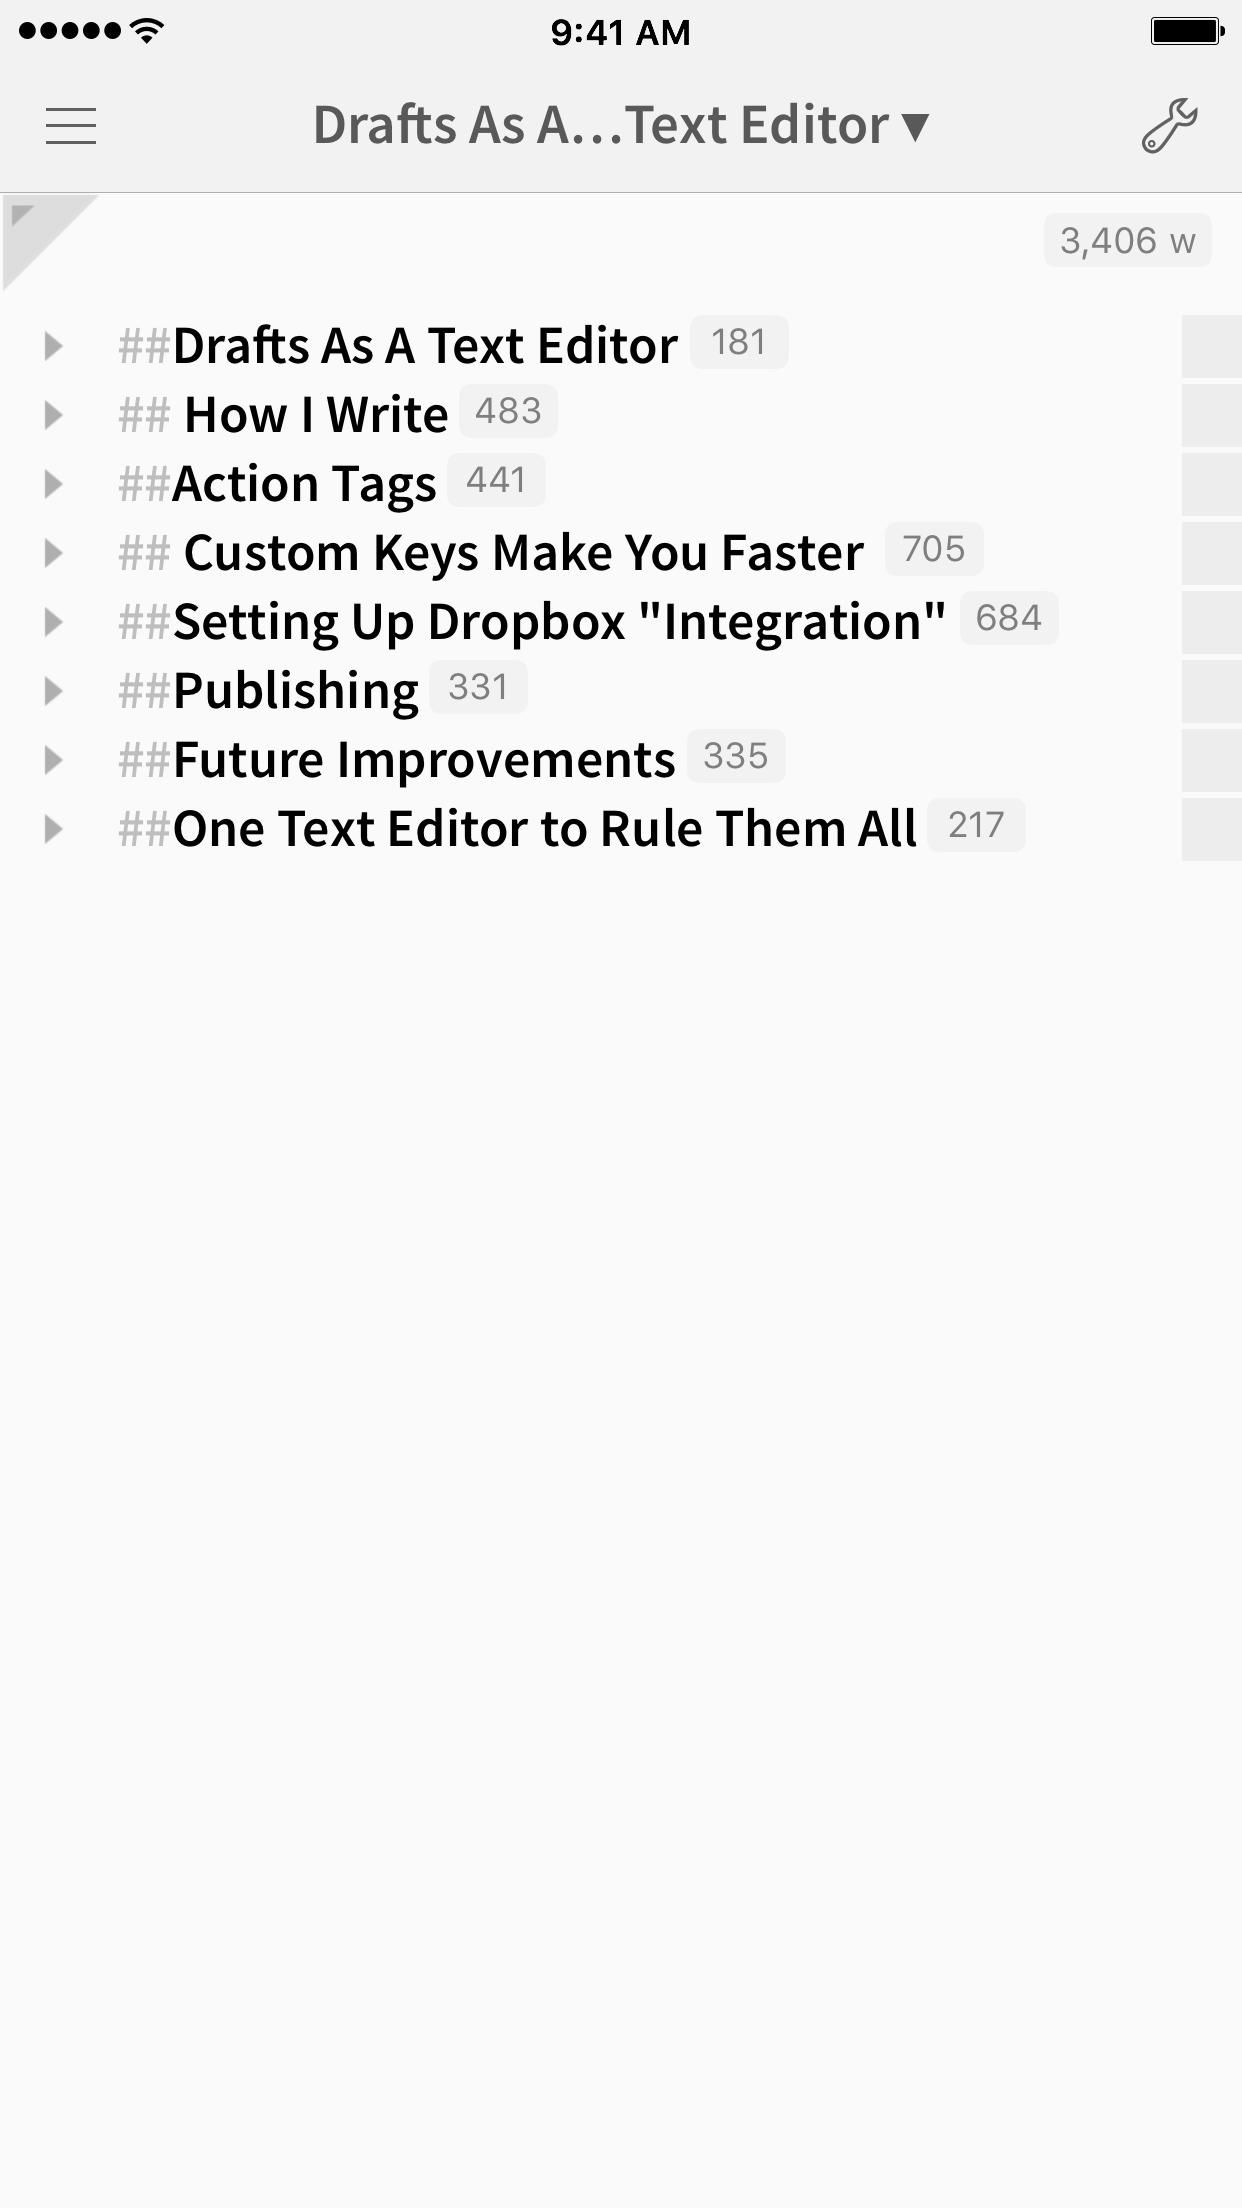
I usually start a post with an outline; it helps me formulate where I want to take a post, and also helps to keep me focused over the time it takes me to complete it. I have a temporary name for the post as the first line (this is the [[title]] tag I’ll cover below), then use an unordered list to capture major points; the reason I use an unordered list is so that I can use the arrange mode in Drafts to reorder points if I feel like I want to move topics around. If I want to expand a thought more, I’ll use an indented list for clarity; if the mood strikes me, I’ll just start writing my thoughts.
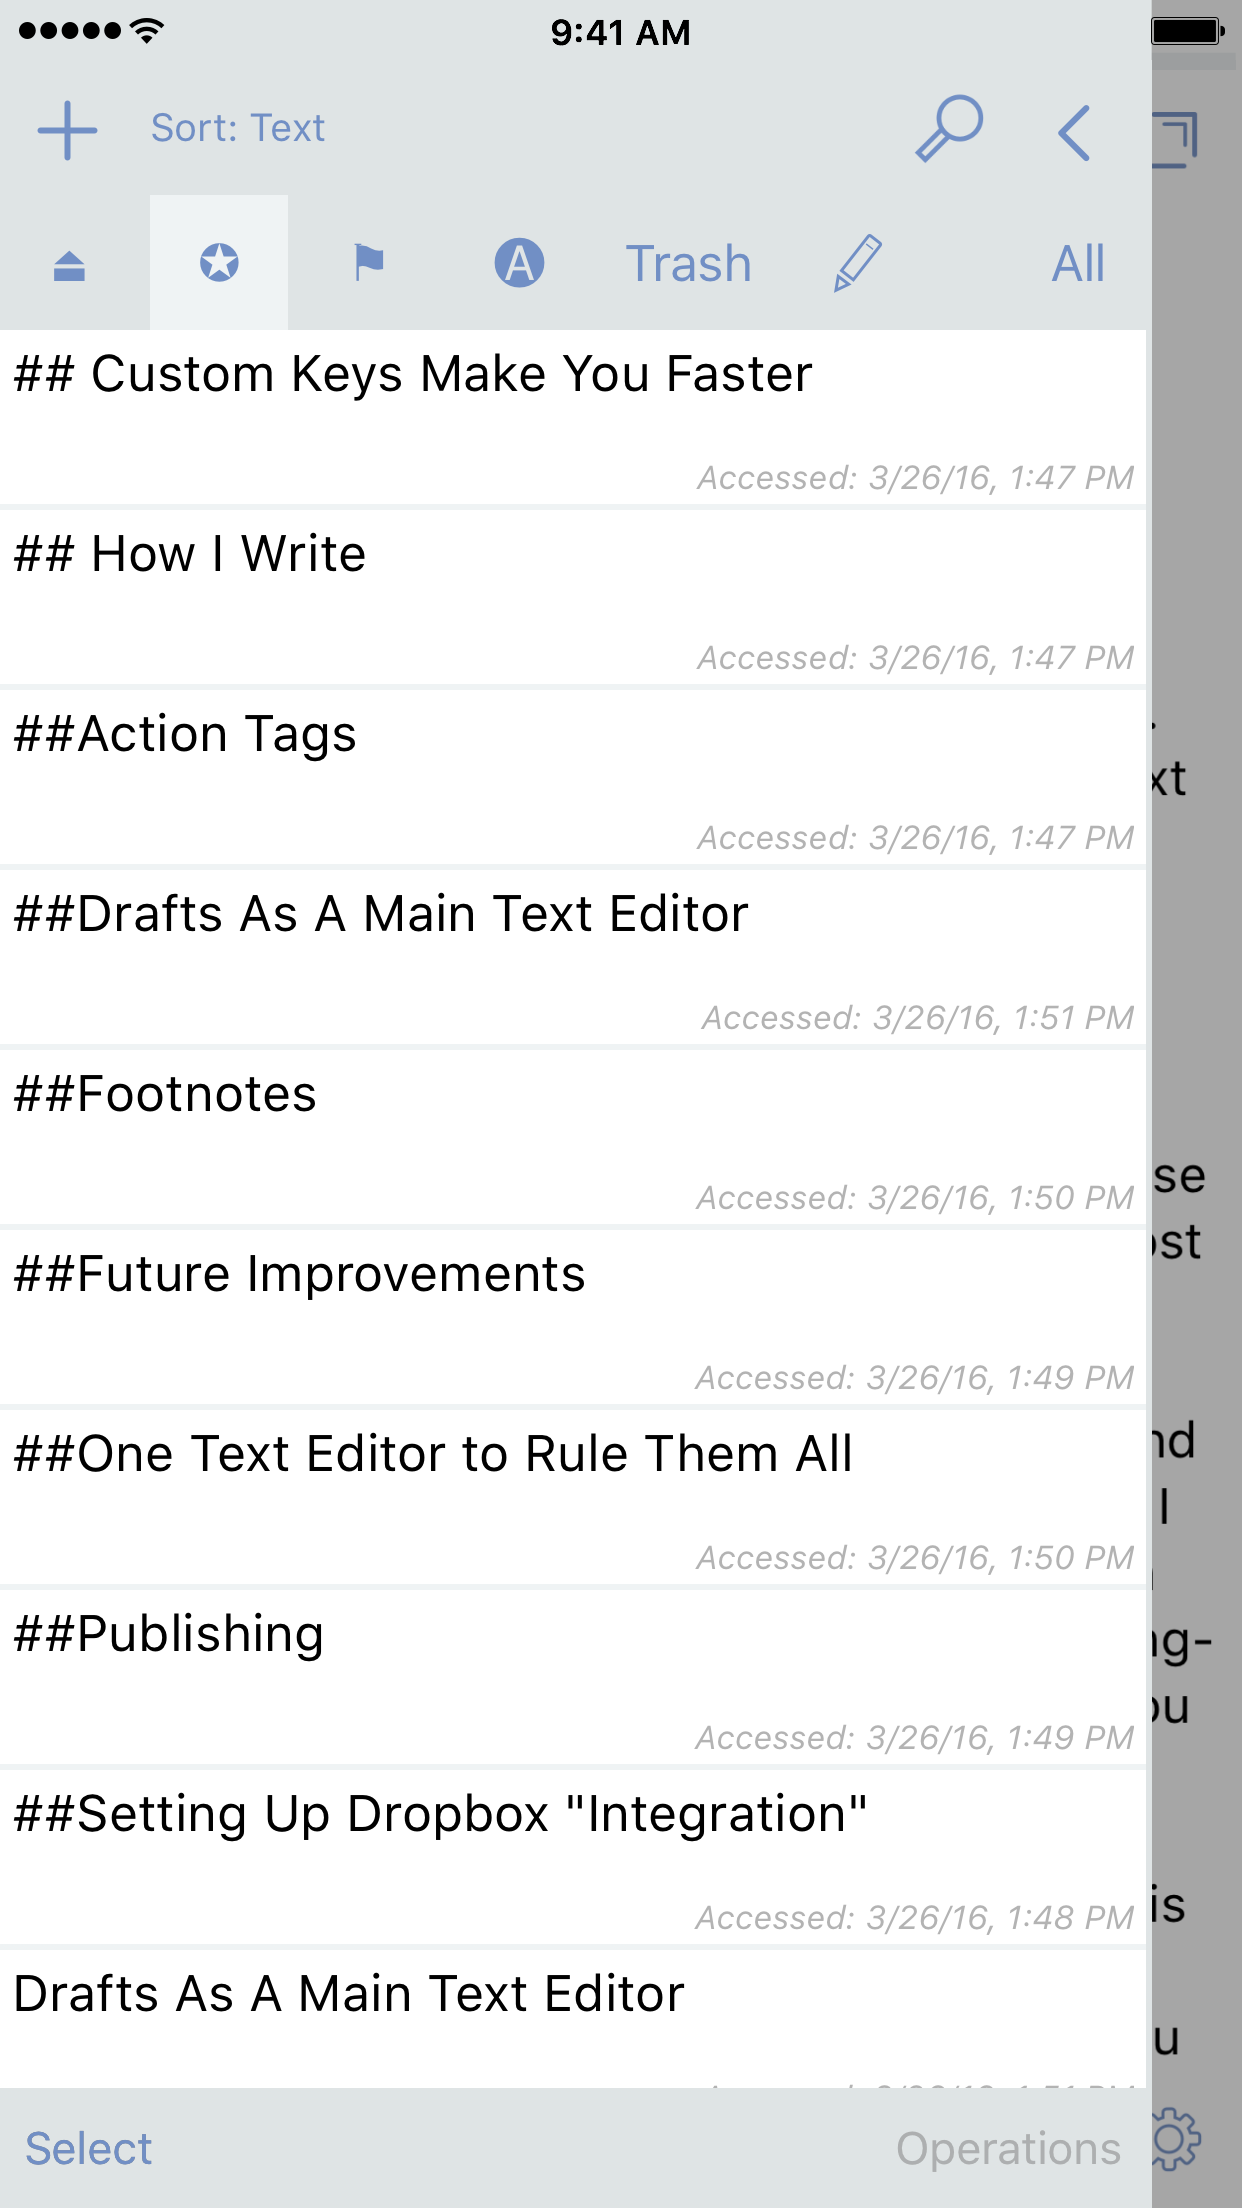
For as amazing as Drafts is, the whole idea of keeping track of everything in the inbox can be tough. Thankfully, filtering on a particular text can help you sort out different notes and group them how you need them. When you first launch Drafts, you have an inbox, an archive, and a trash. Trash saves deleted drafts for 30 days, unless you empty them sooner. Optionally, you can create and apply filters to narrow in on particular drafts or “sort” your inbox. You can have the filters scan the inbox, archive or both; you can check by status or sort in a specific way to suit your needs. For my writing, I use a tag of @post to have a filter; I place the @post tag right after the post title.
Another feature of Drafts allows you to keep multiple sections of writing separate. One of the big things that I came to find with other apps, most notably Ulysses, is the idea of writing individual sections in different files, then combining them at the end for one post. This is surprisingly helpful for clarity. It allows you to focus in on one part at a time, without you getting lost somewhere else.
In Drafts, the same is possible by breaking your outlines into individual Drafts. To do this: highlight the section name, tap & hold the + icon, then choose “New from selection”. Another option is to use the Split Draft at Cursor action; this splits the draft into two separate drafts. I can do this with each section of the post; I can then add the @post tag to everything to easily apply the filter and see all the sections.
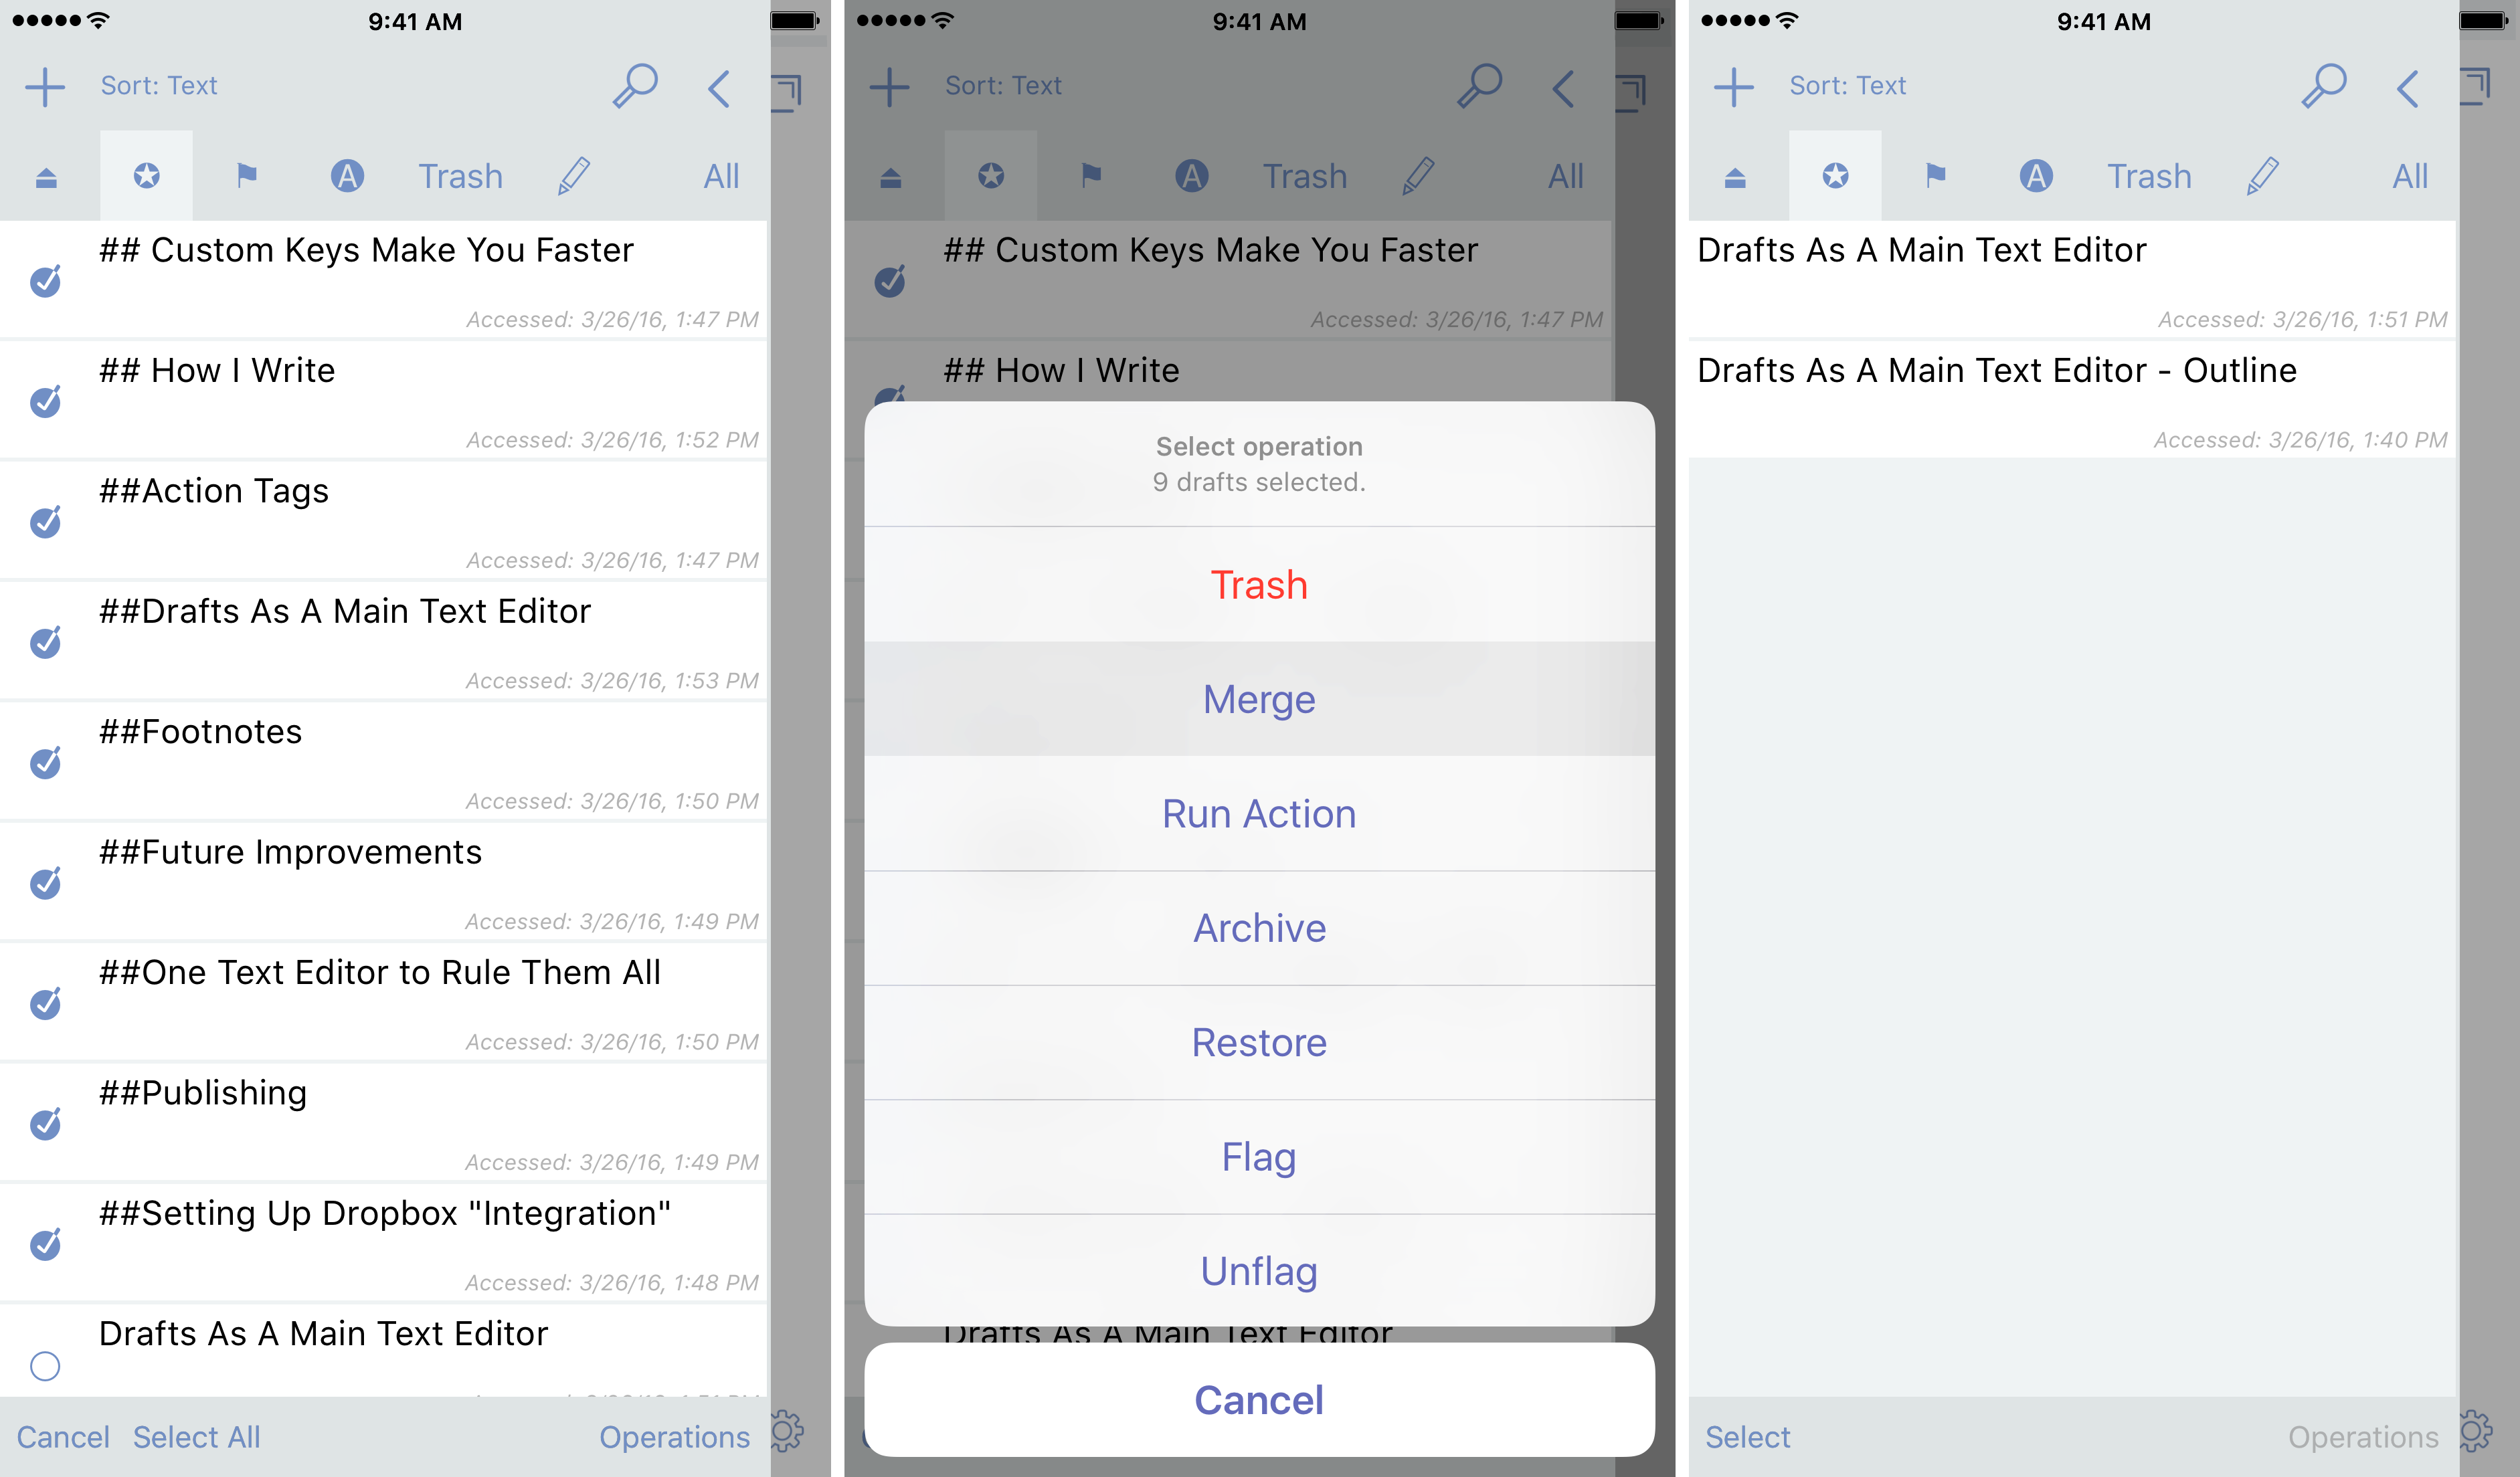
When I’m ready to combine the drafts back together to publish, I simply tap “Select” from the drafts list, highlight the selected ones in the order I want my post to flow, then press “Operations”, and choose “Merge” from the menu. Now I have one draft that I can manipulate for final formatting.
Action Tags
One of the powerful things that Drafts utilizes is tags for actions. These tags come in a variety of choices that you can use in and use from different action steps. Familiarizing yourself with these tag options is beneficial in how you think of your writing as it pertains to actions so that you can easily use them.
This is the transformative power that can separate Drafts as a powerhouse text editor.
Because I use Drafts for most everything on my phone, I have become very familiar with how and when to use certain tags. The standard tag for anything is [[draft]] which grabs everything in the current draft. But there are times where you want just the first line or everything but the first line; here, you would use [[title]] and [[body]], respectively. This is especially important when you are building custom actions, as it can yield you drastically different results.
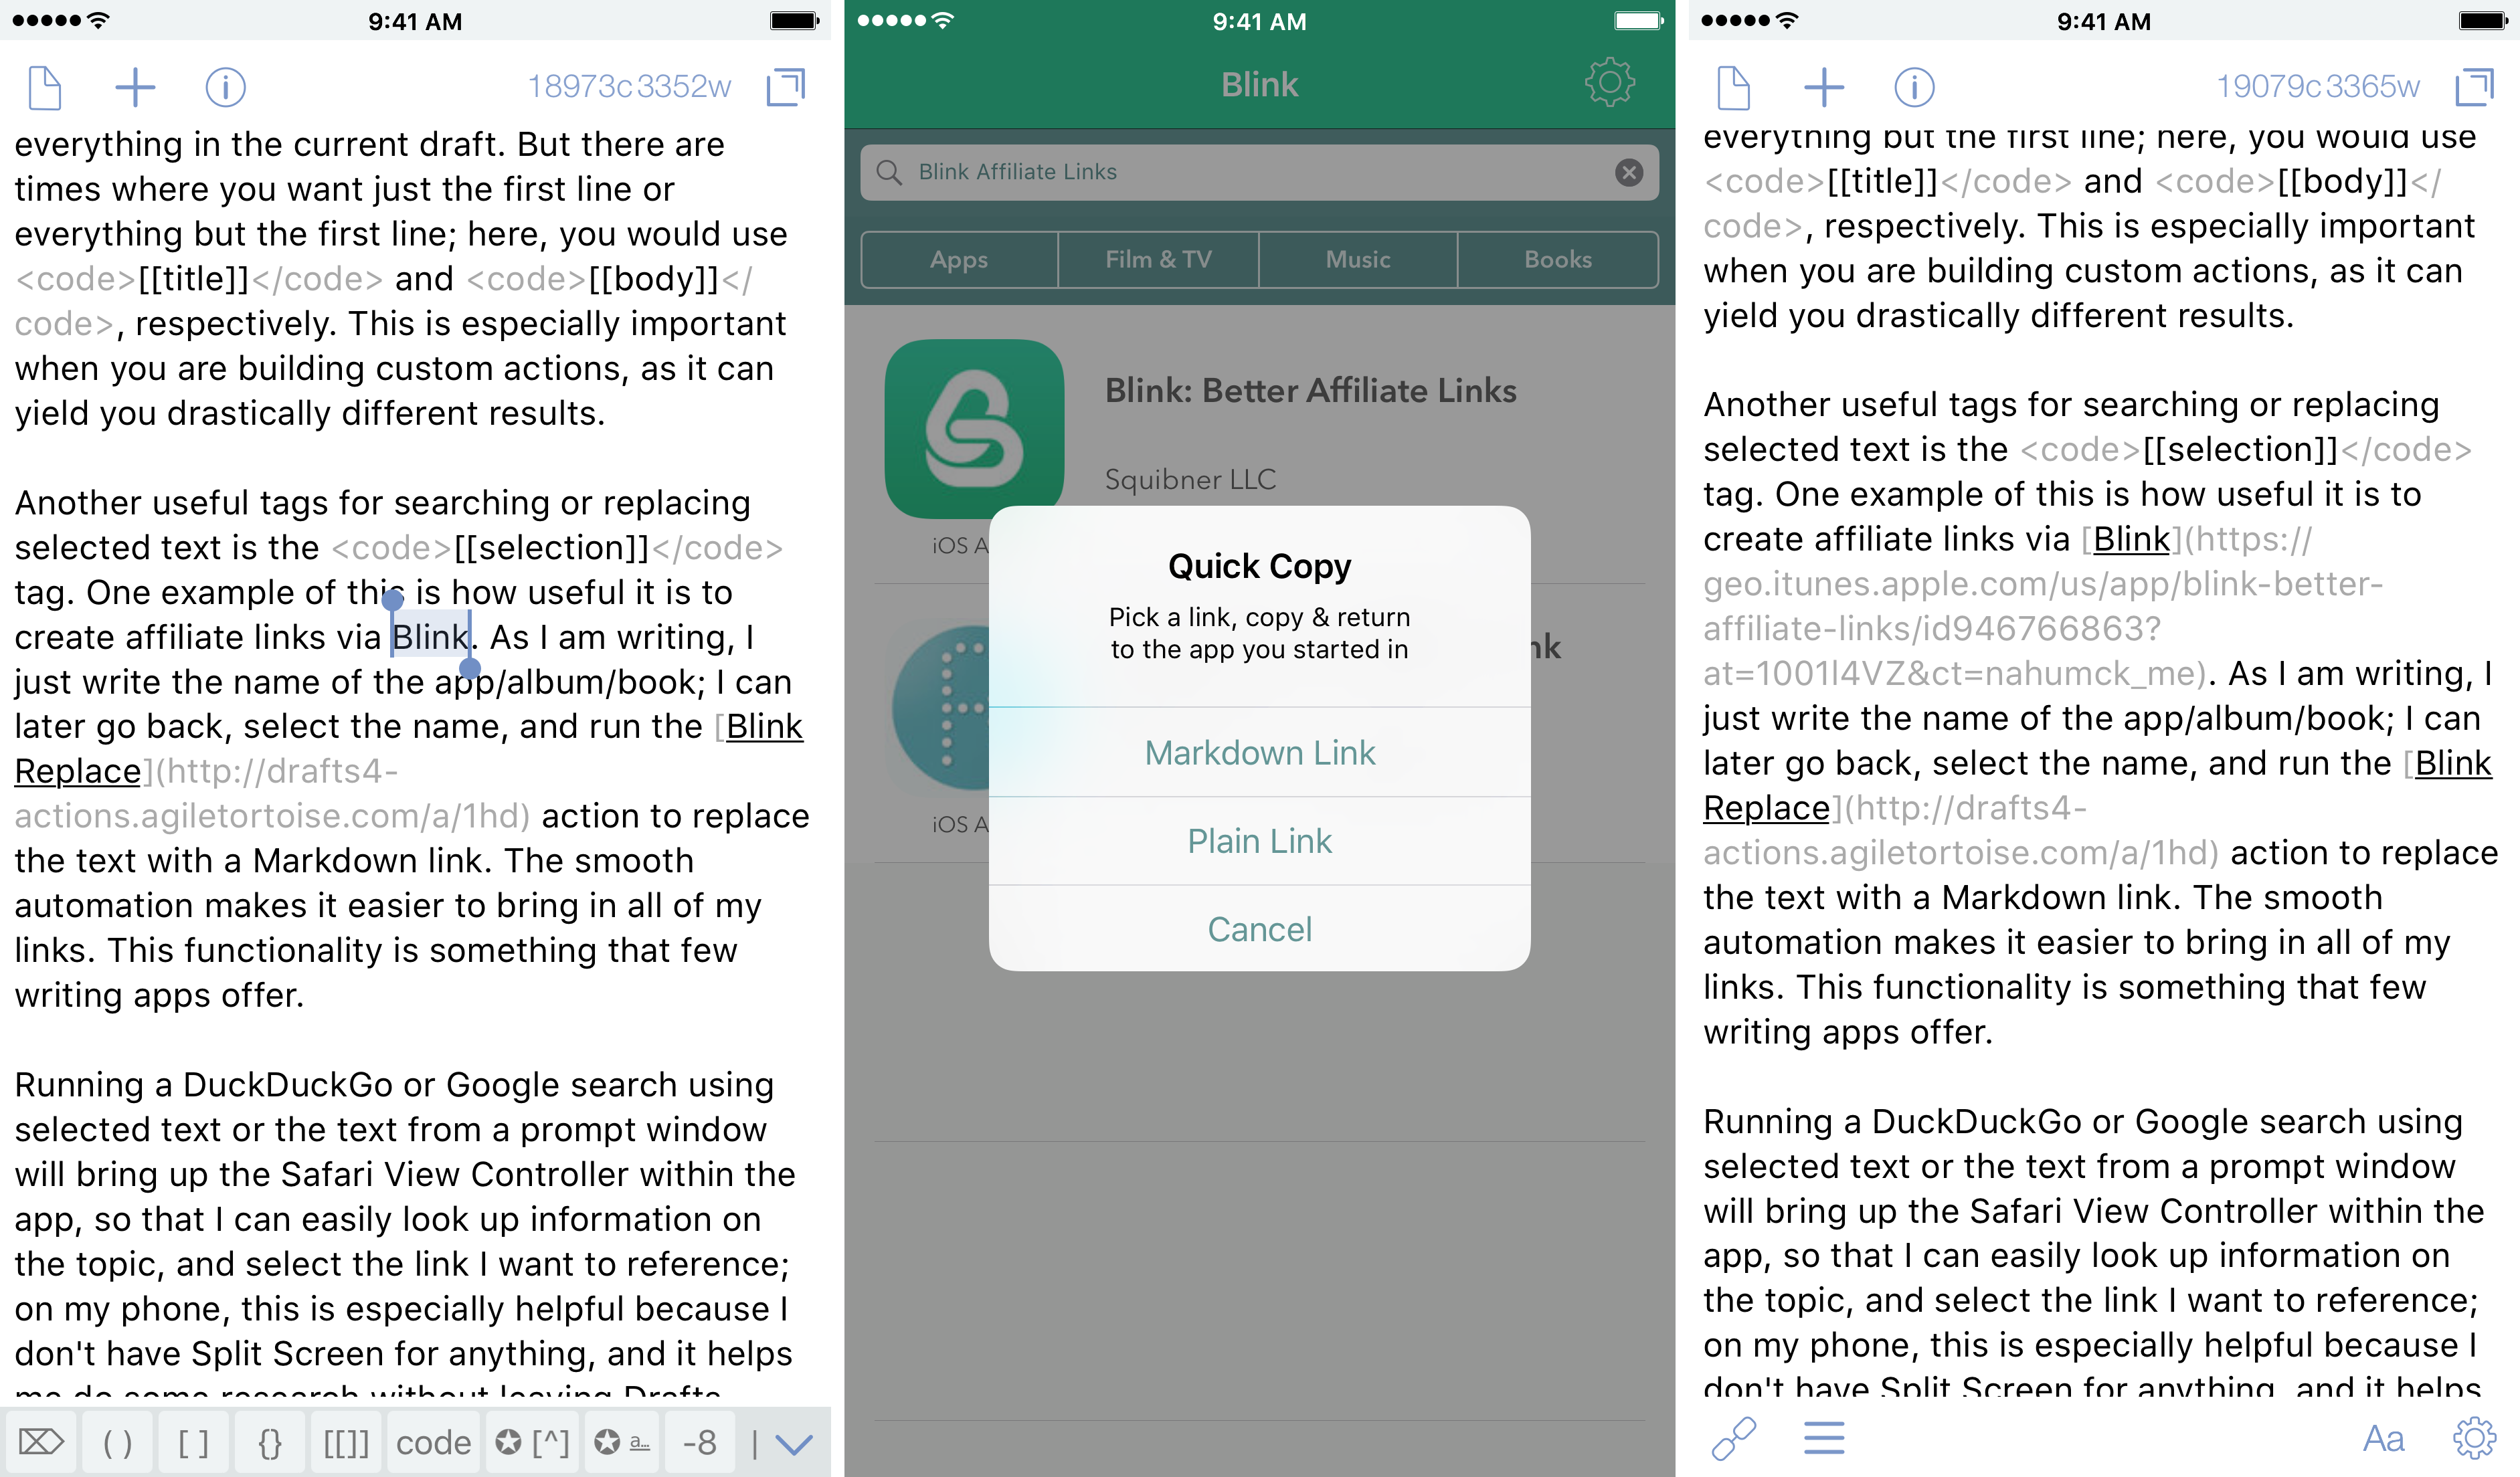
Another useful tag for searching or replacing selected text is the [[selection]] tag. One example of this is how useful it is to create affiliate links via Blink. As I am writing, I just write the name of the app/album/book; I can later go back, select the name, and run the Blink Replace action to replace the text with a Markdown link. The smooth automation makes it easier to bring in all of my links. This functionality is something that few writing apps offer.
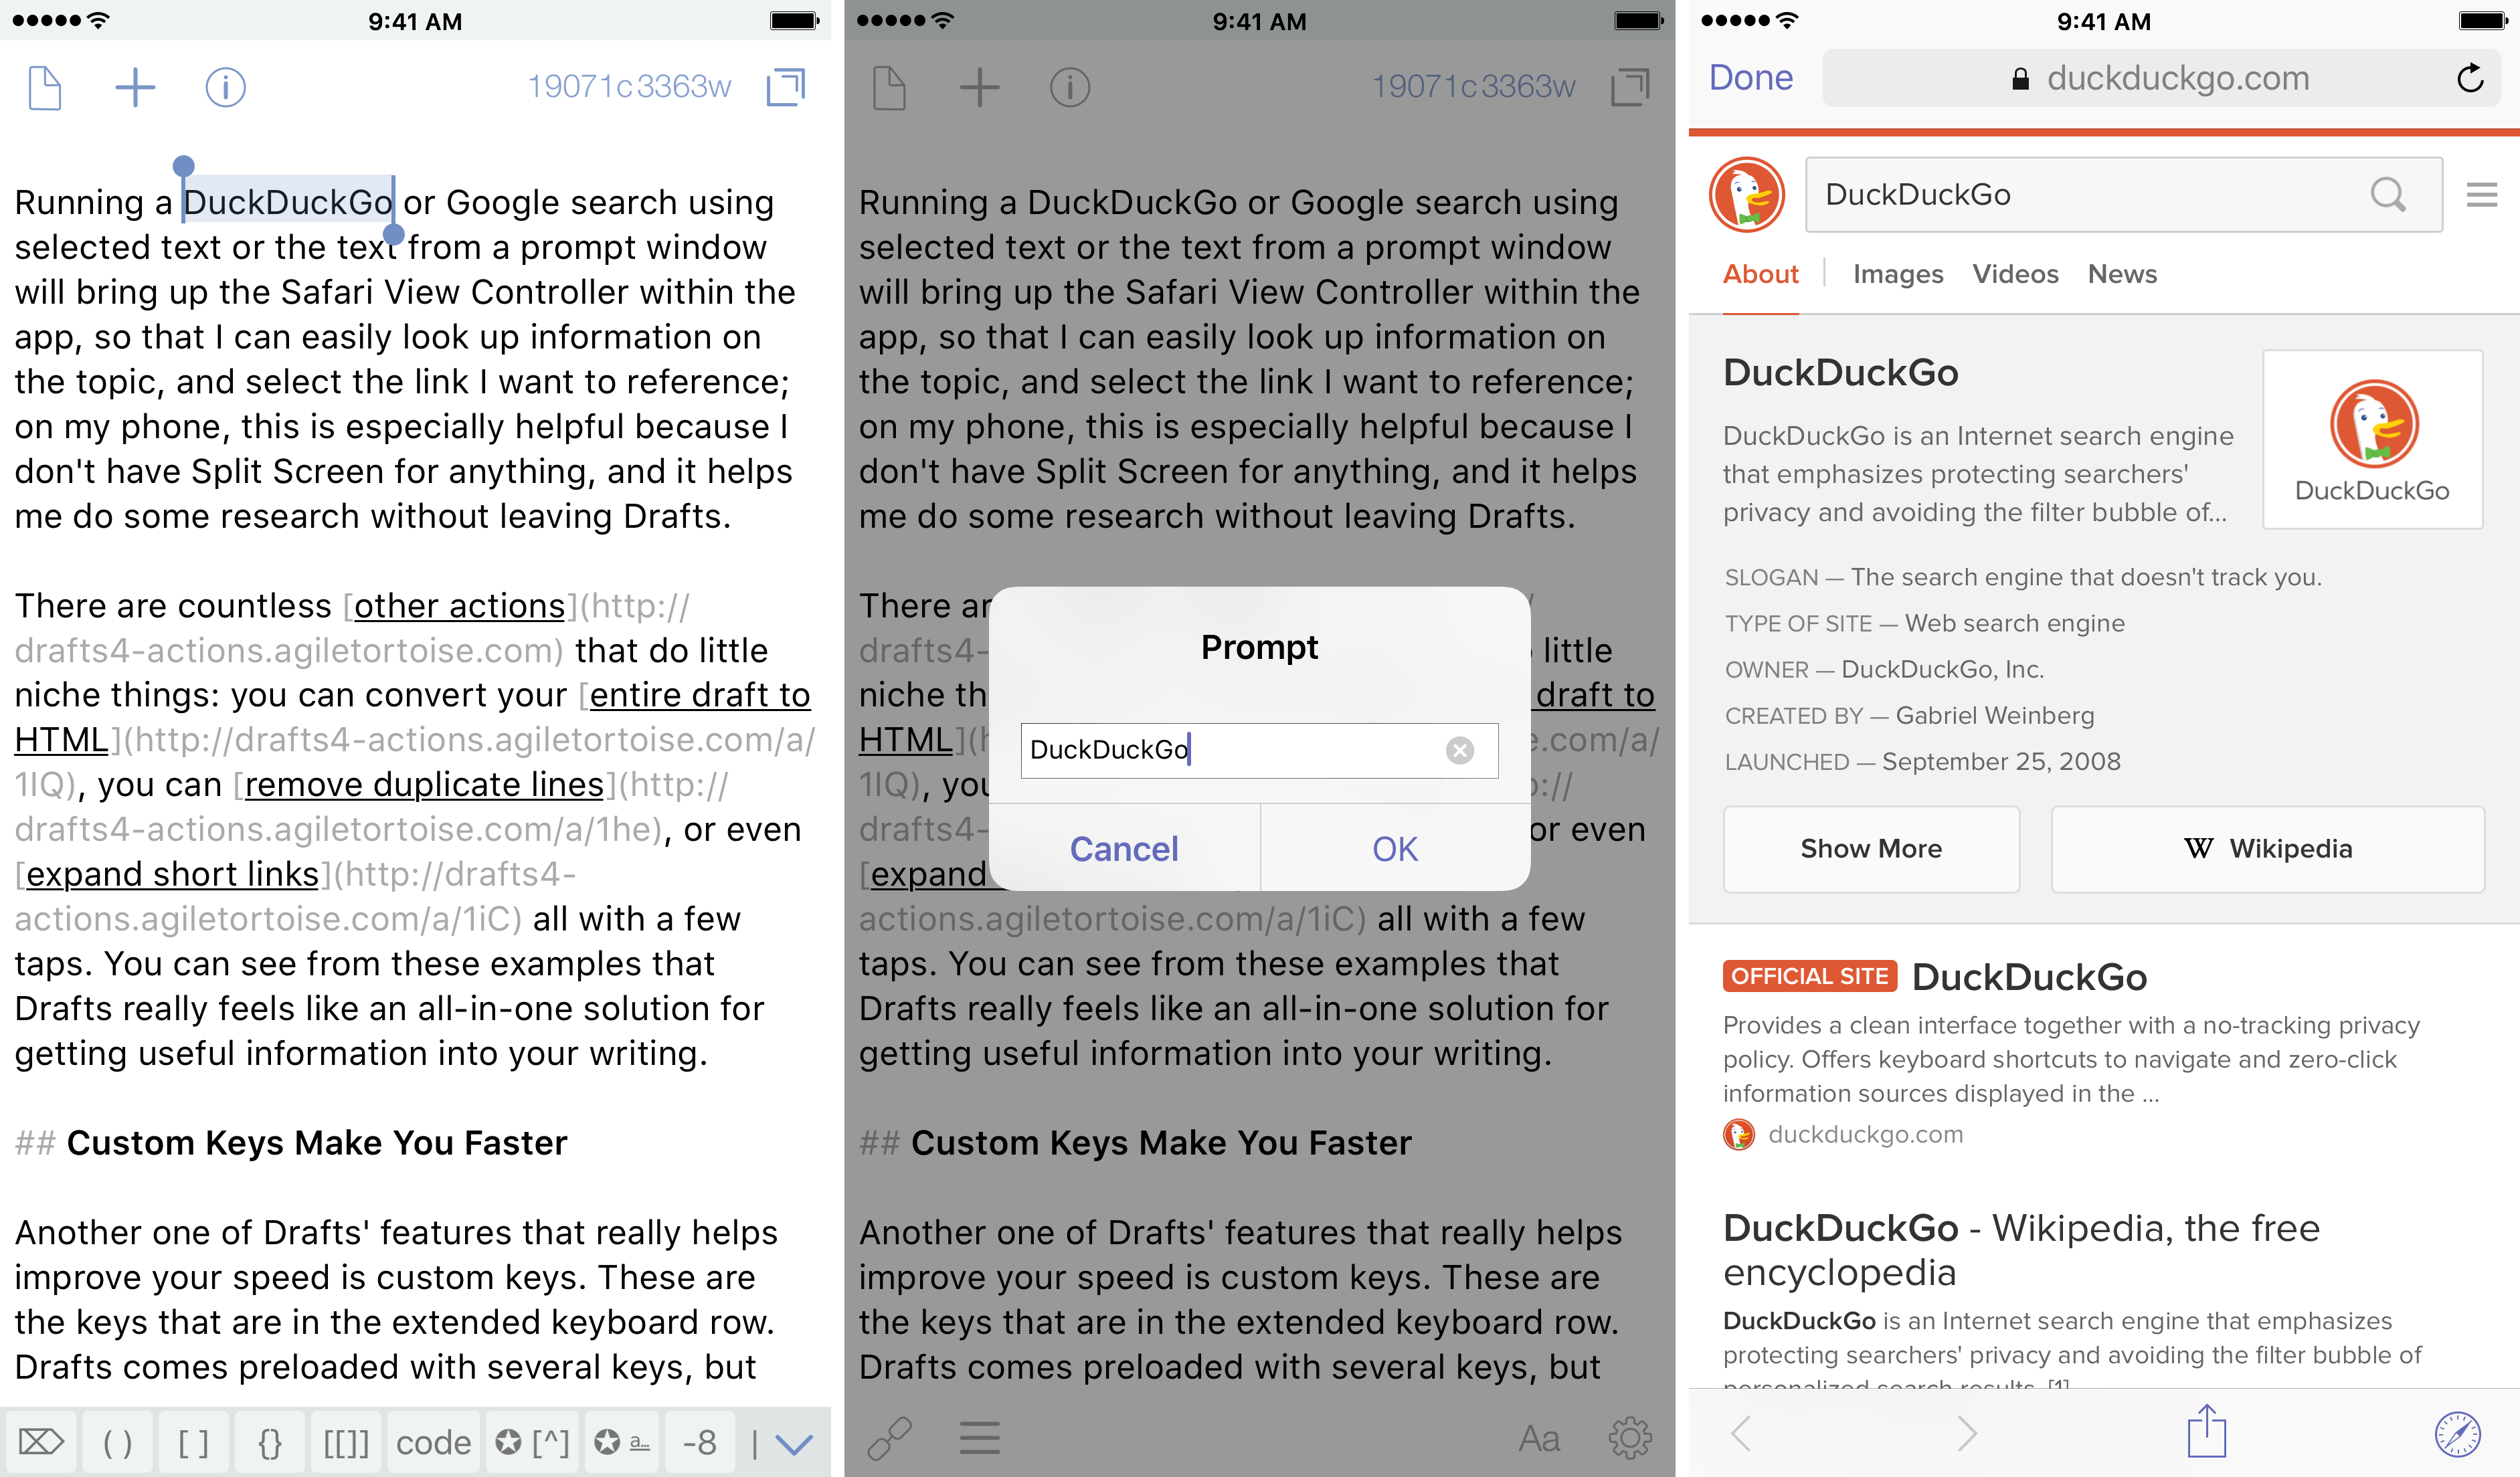
Running a DuckDuckGo or Google search using selected text or the text from a prompt window will bring up the Safari View Controller within the app, so that I can easily look up information on the topic, and select the link I want to reference; on my phone, this is especially helpful because I don’t have Split Screen for anything, and it helps me do some research without leaving Drafts.
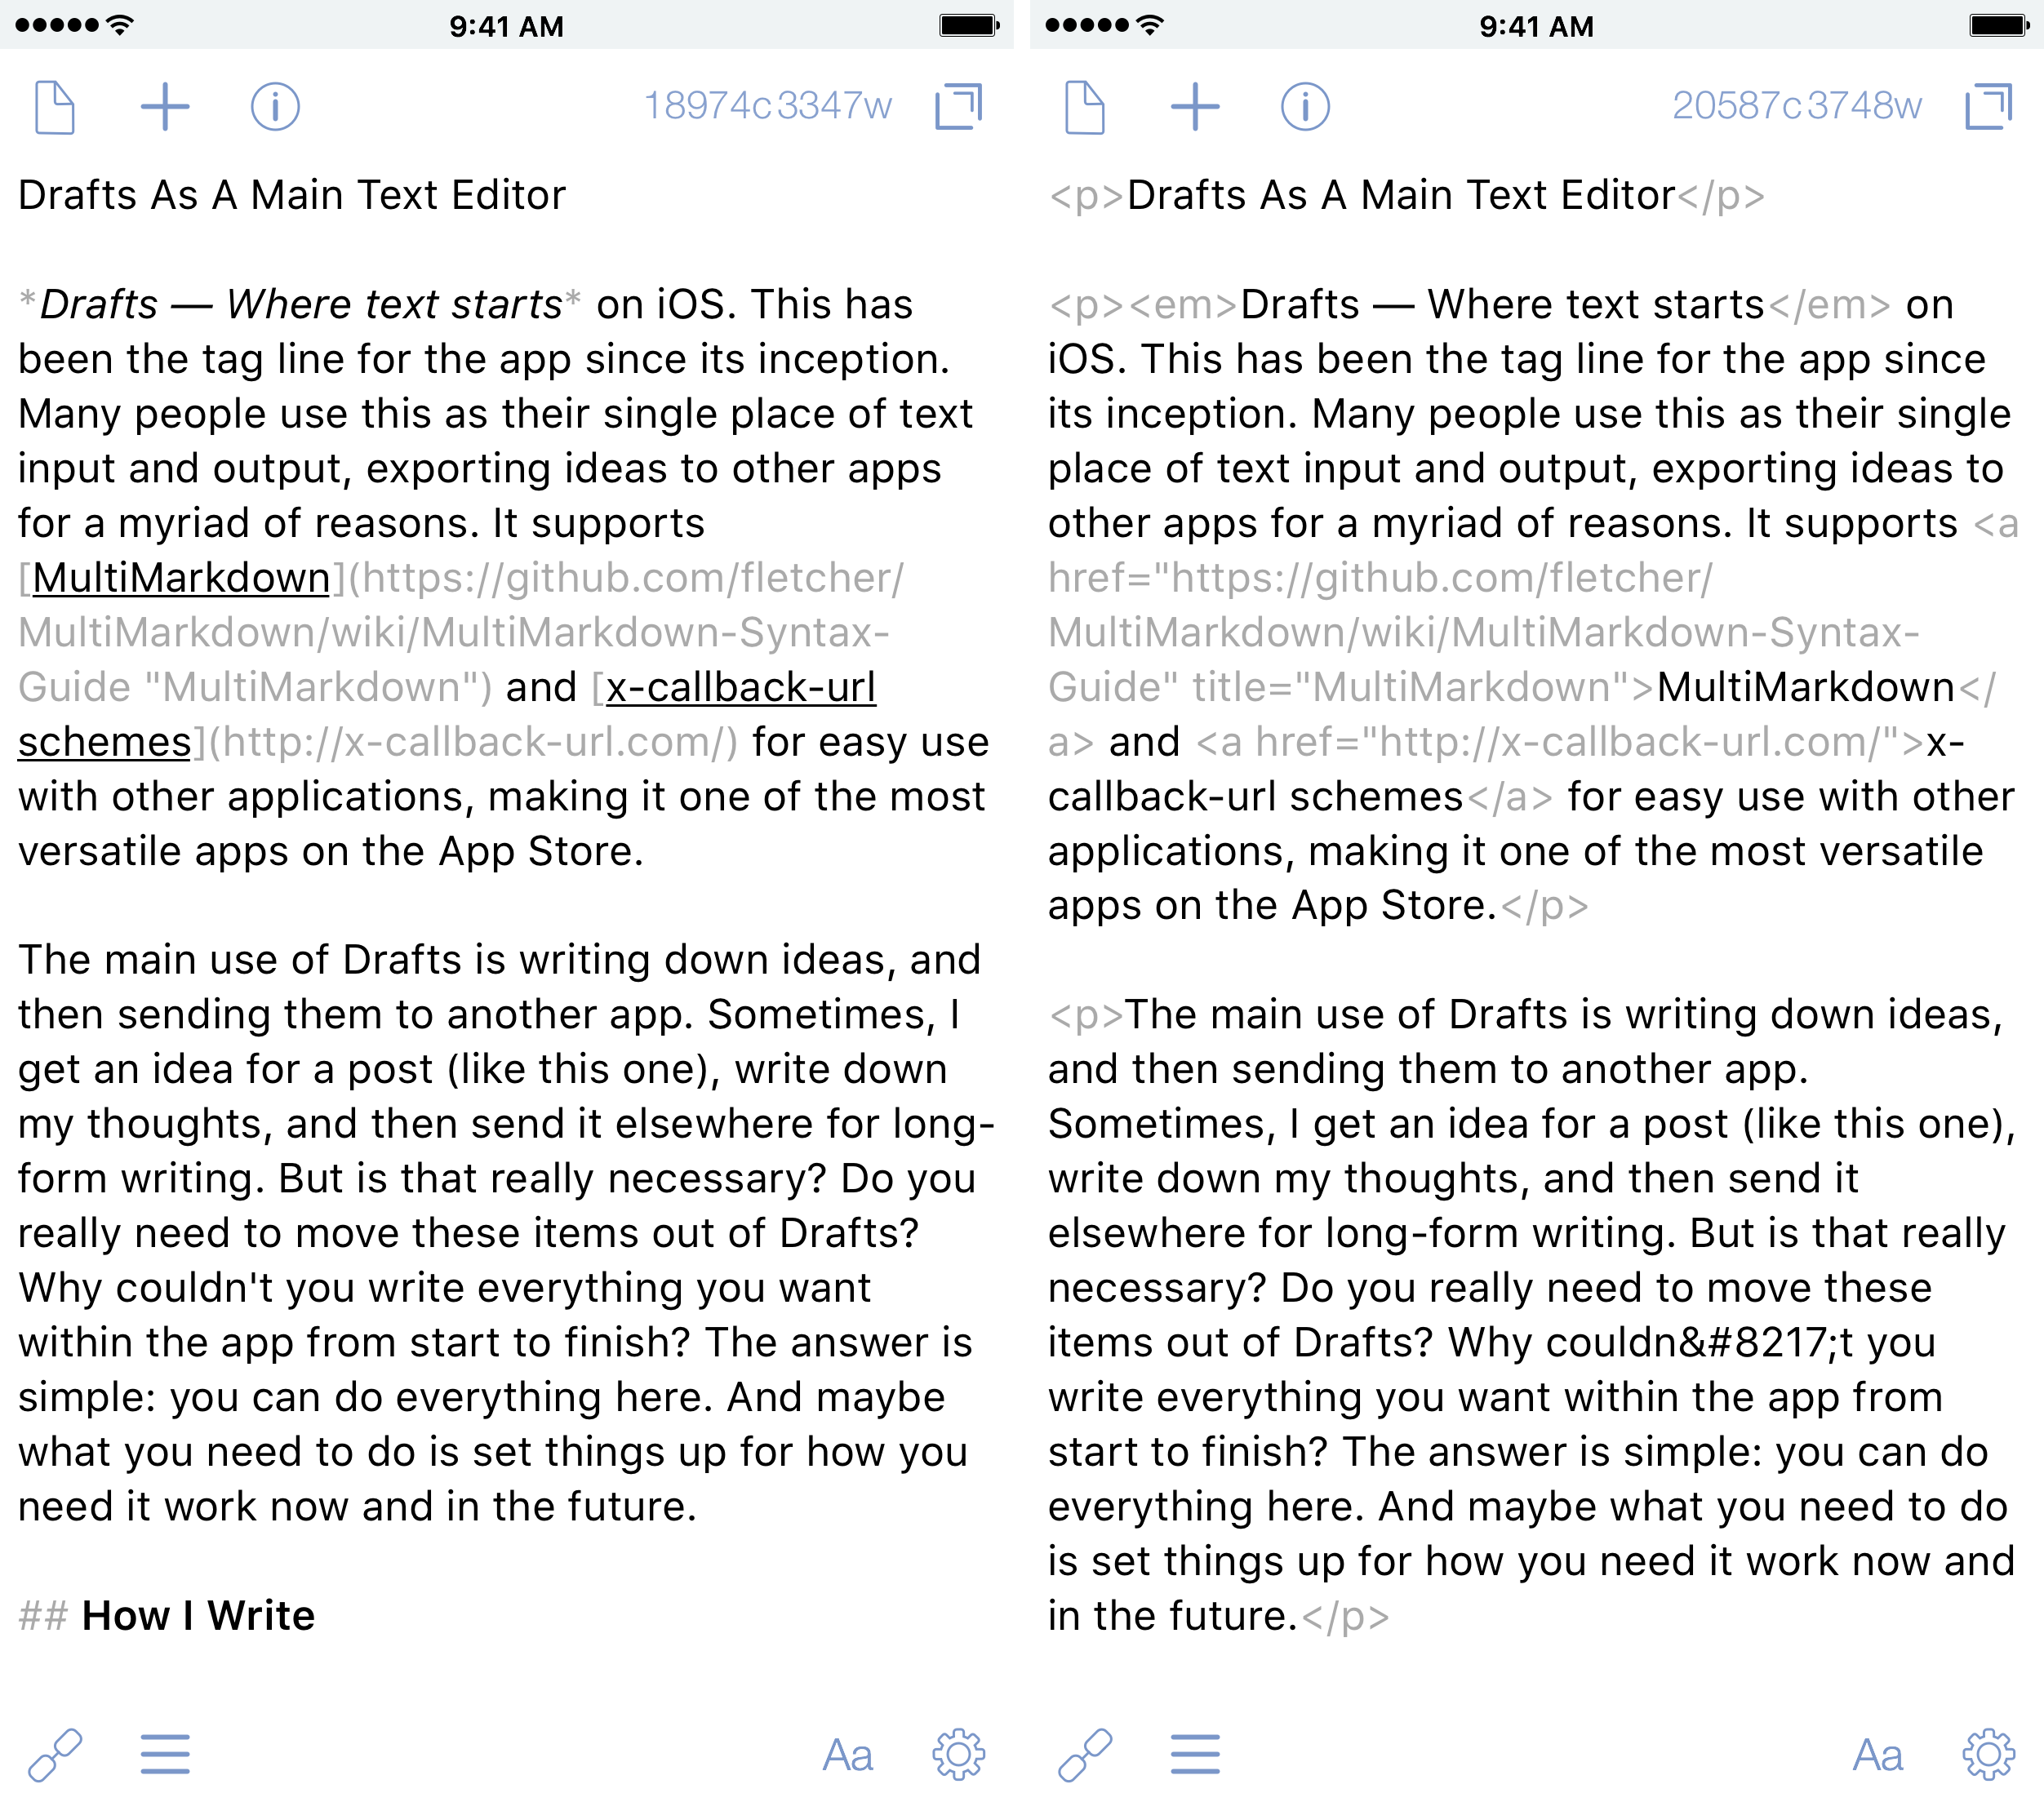
There are countless other actions that do little niche things: you can convert your entire draft to HTML, you can remove duplicate lines, or even expand short links all with a few taps. You can see from these examples that Drafts really feels like an all-in-one solution for getting useful information into your writing.
Custom Keys Make You Faster
Another one of Drafts’ features that really helps improve your speed is custom keys. These are the keys that are in the extended keyboard row. Drafts comes preloaded with several keys, but there is some real power here once you get familiar with the app.
The Drafts Action Directory has a lot of custom keys available, and they are as easy to install as actions. You can also assign shortcut keys for them if you have an external keyboard. (I use this one.) One way to use the custom keys is to run an action.
There are many times that I want to search using selected text. I have multiple actions for search that are all in one Action Set. But I will use this DuckDuckGo (DDG) Search action to show you how to assign it to a key.
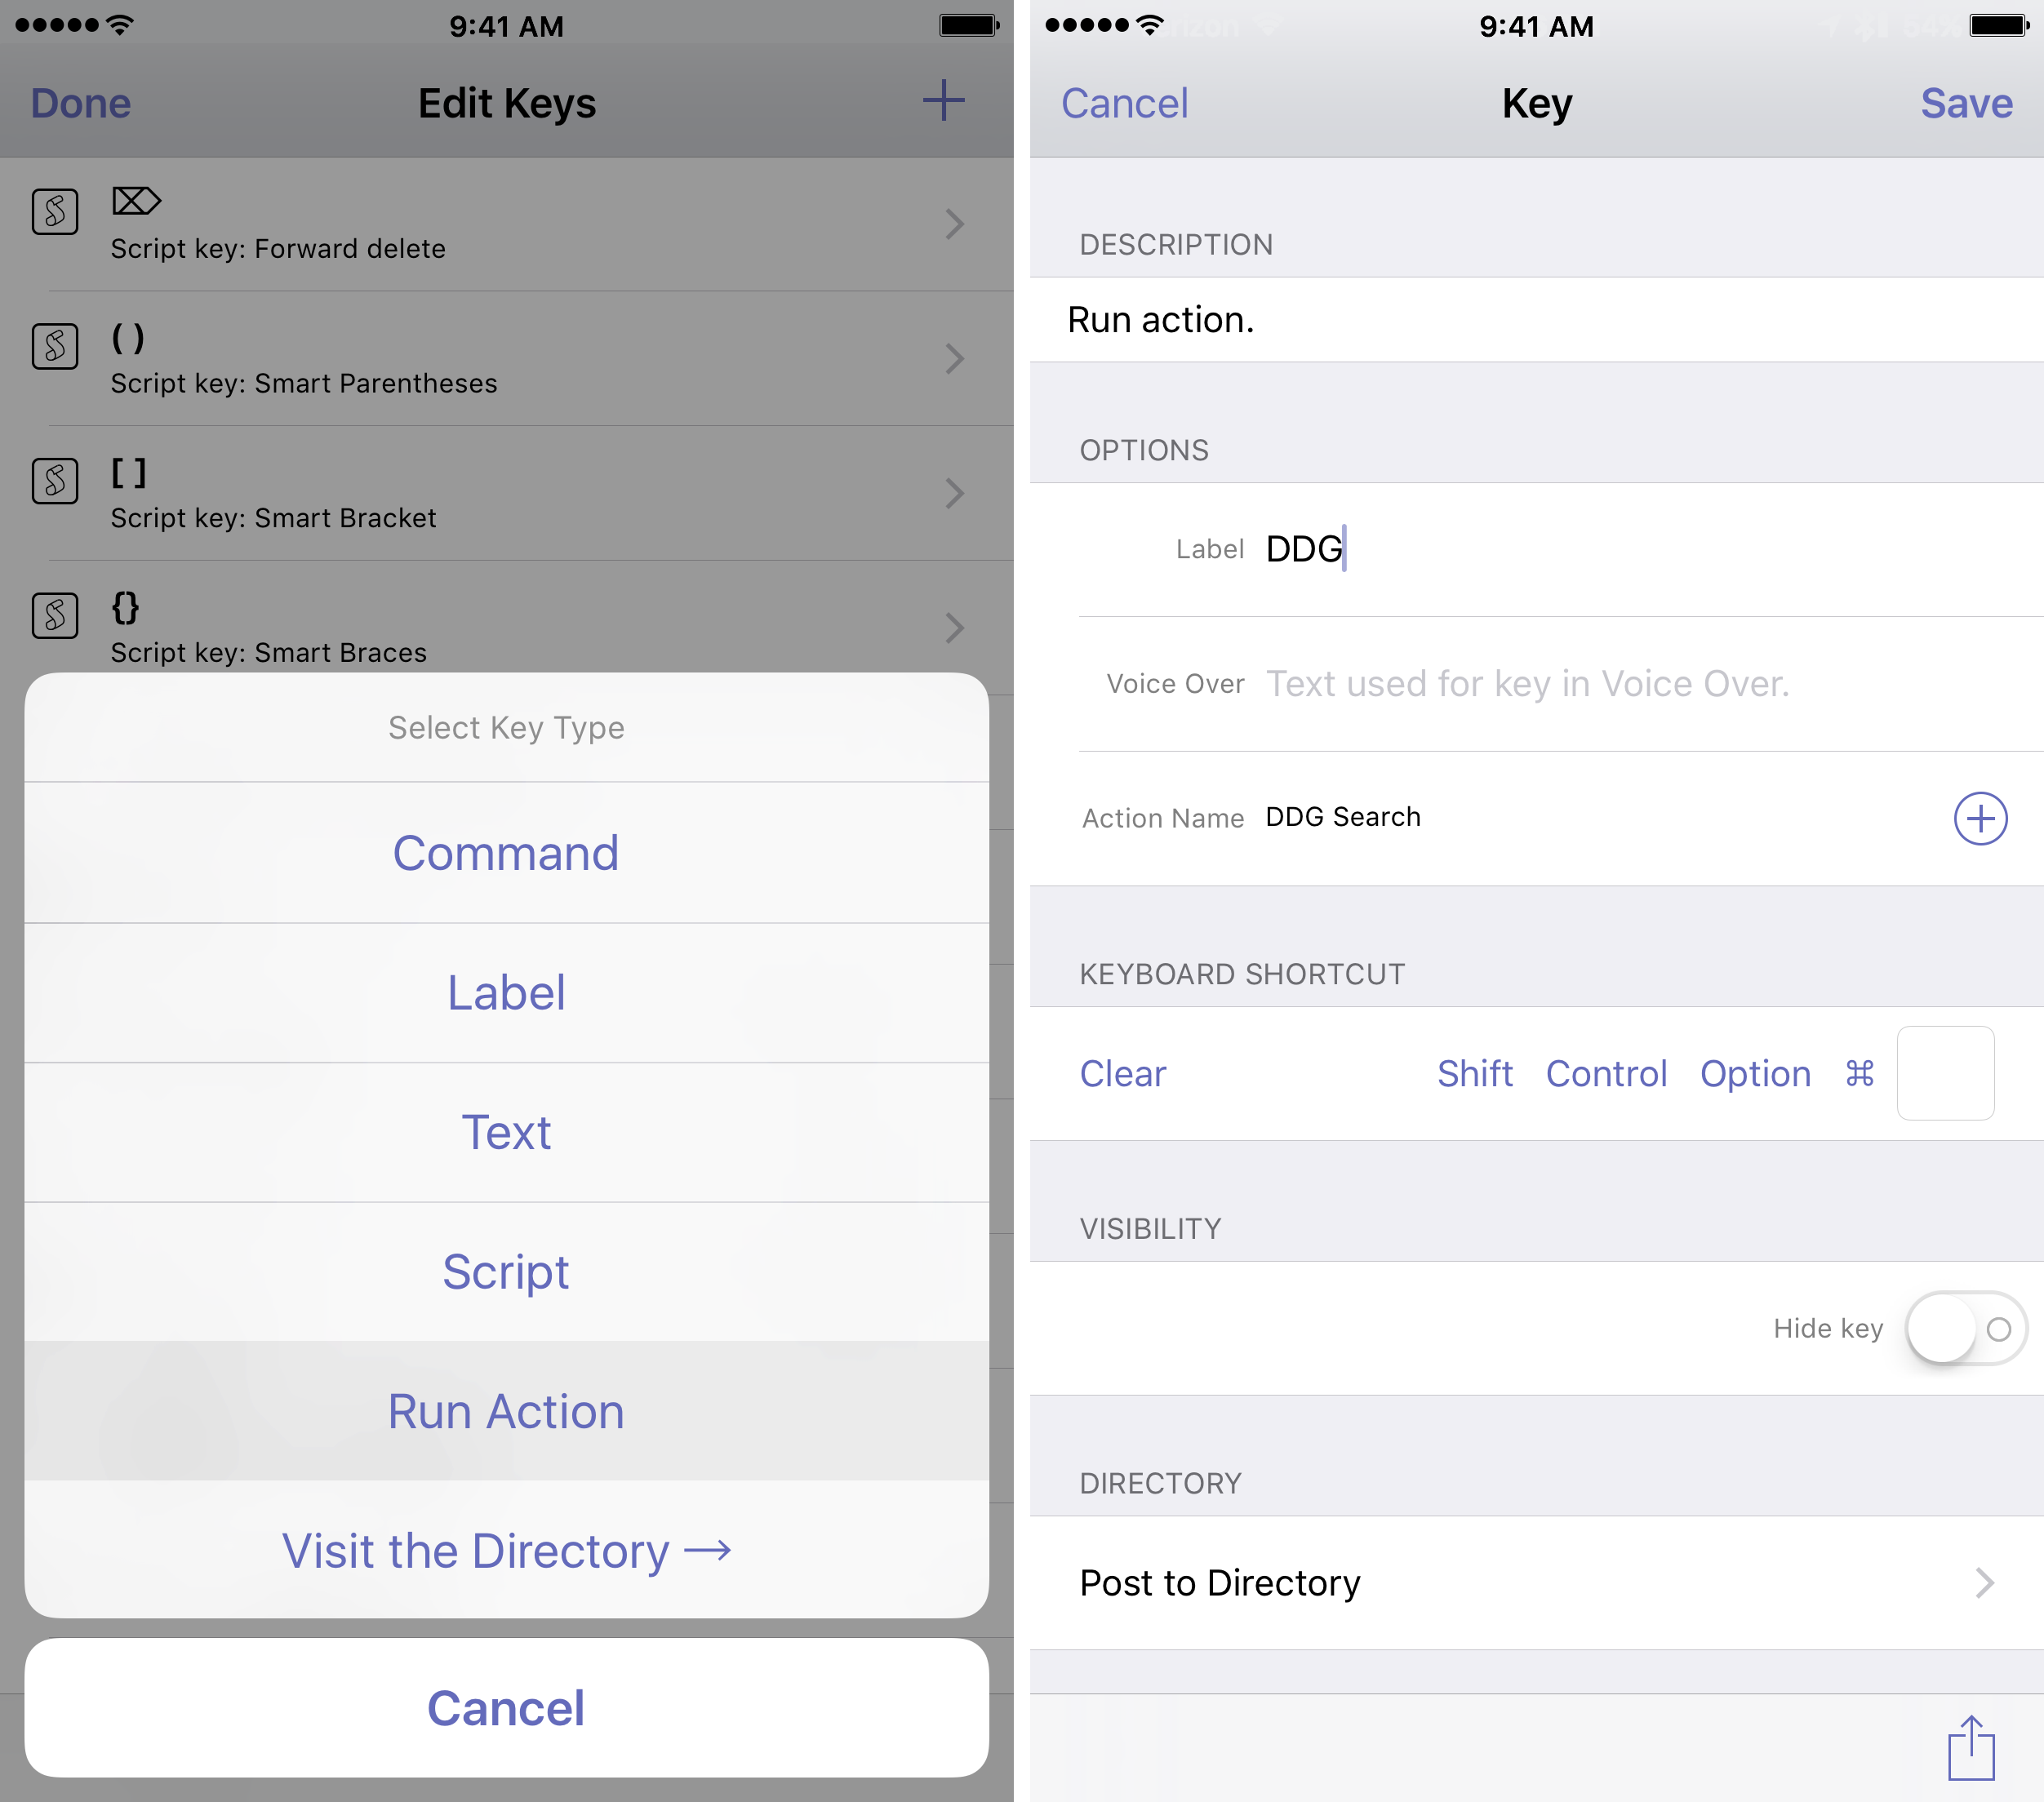
First, you need to have that action installed. Then, you need to go to your extended keyboard row, and flick all the way until you see the pencil icon at the end; tap this to edit. Next, you can add a key by pressing the “+” button at the top right. Now, select “Run Action” and fill in the action name field with “DDG Search”. If you wish to assign an external key, do so in the given field. It is important to remember that you will need to select one of the operator keys (Shift, Ctrl, Opt, or ⌘) to differentiate your custom keys. You can also optionally hide the key if you don’t want your keyboard row to be cluttered. Finally, tap save, and then you can move it into a position that makes sense.
Now all you need to do in the future is highlight the selected text, then press the key above your keyboard to search. While this only saves you a swipe when you’re using just your device, this can be sped up if you have an external keyboard by not taking your hands off of it.
Another thing running an action can allow is previews. I have a preview for my site that allows me to see how it will look once published. I can catch a lot of formatting errors this way, and has been extremely useful. How did I do it? I talked to someone about it and they offered help. If you know how to make CSS, then you should be able to make it from your site.[^1] I have a key that runs the “Preview…” action, and allows me to select from a number of different previews; I also have a shortcut key of ⌘ + Shift + P to quickly call it up when using my Bluetooth keyboard.
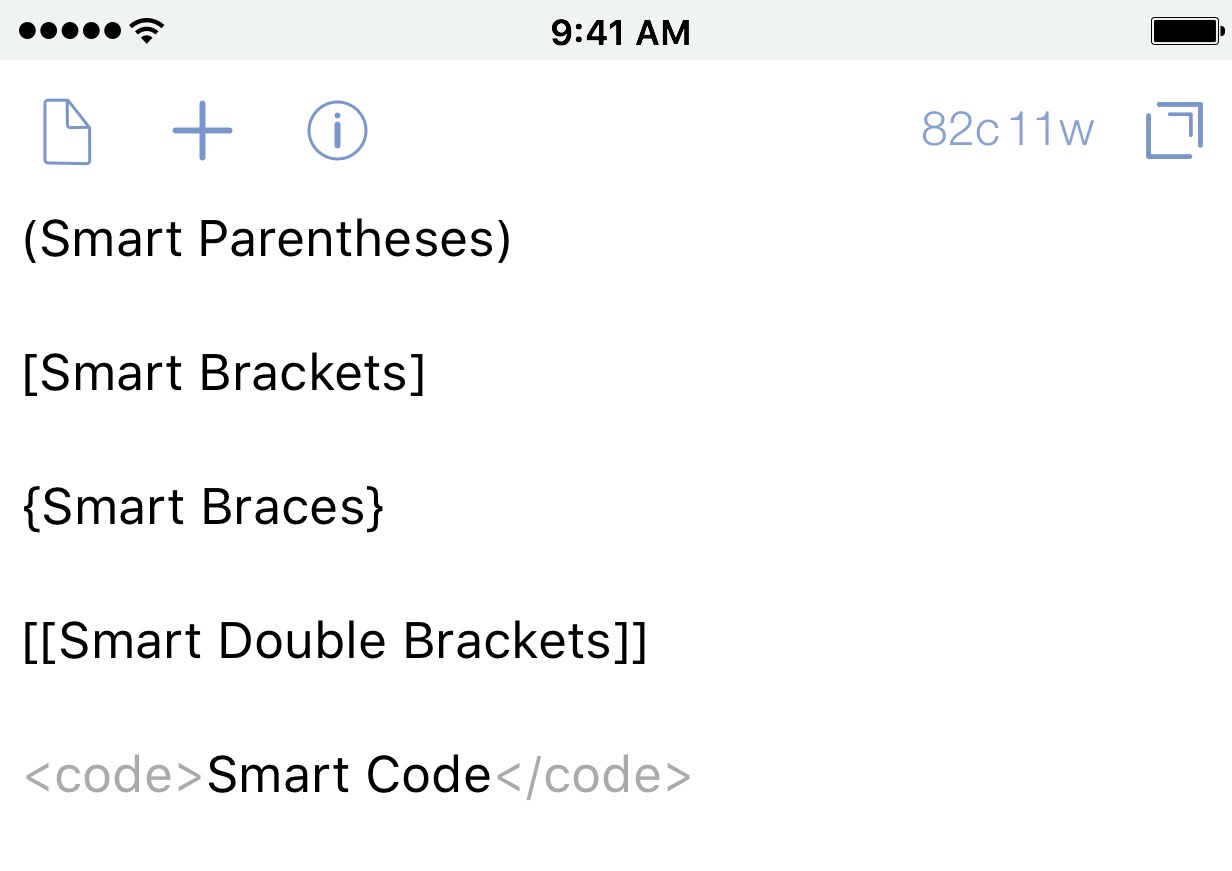
A few other keys that I have found useful are all based on the smart parentheses created by Greg Pierce that puts in, you guessed it, “smart” parentheses: this inserts an open parenthesis if none are present, closes them if you have an open parenthesis, or — and this is the best part — wraps selected text in parentheses. There is also a smart bracket key that uses the same script, but calls the open and close brackets.
I have modified the script and created three of my own. I created a smart braces key that uses { }. I also made a smart double bracket key that creates [[ ]] that are useful in creating [[tags]]. And finally, I created a smart code key that inserts html code blocks <code> for when I want to highlight something related to syntax.
Using the custom keys while writing has increased my efficiency in everything I enter into Drafts. I can insert a Markdown link by typing ⌘ + L to create my links faster. I can Change Title case by using ⌘ + T. I can encode or hyphenate text with a press of a key. As I have gotten more comfortable with writing this way, it is hard to see myself using anything else.
Setting Up Dropbox “Integration”
Dropbox has been a foundation for me using iOS. Most people that I’ve talked with pine after Dropbox integration for Drafts — and perhaps that will happen some day. But you can have something like it now, even if it is a bit more involved.
First, let me say that the iCloud integration has been rock solid for me. I have never had a single issue. The only things that I ever save into Dropbox are things that I know I want to save permanently; this could be a small note or a list or a post.
The key is setting up actions to allow me to save these items efficiently. Tags are particularly useful for creating a Dropbox “integration”; this isn’t a true integration like other apps have.
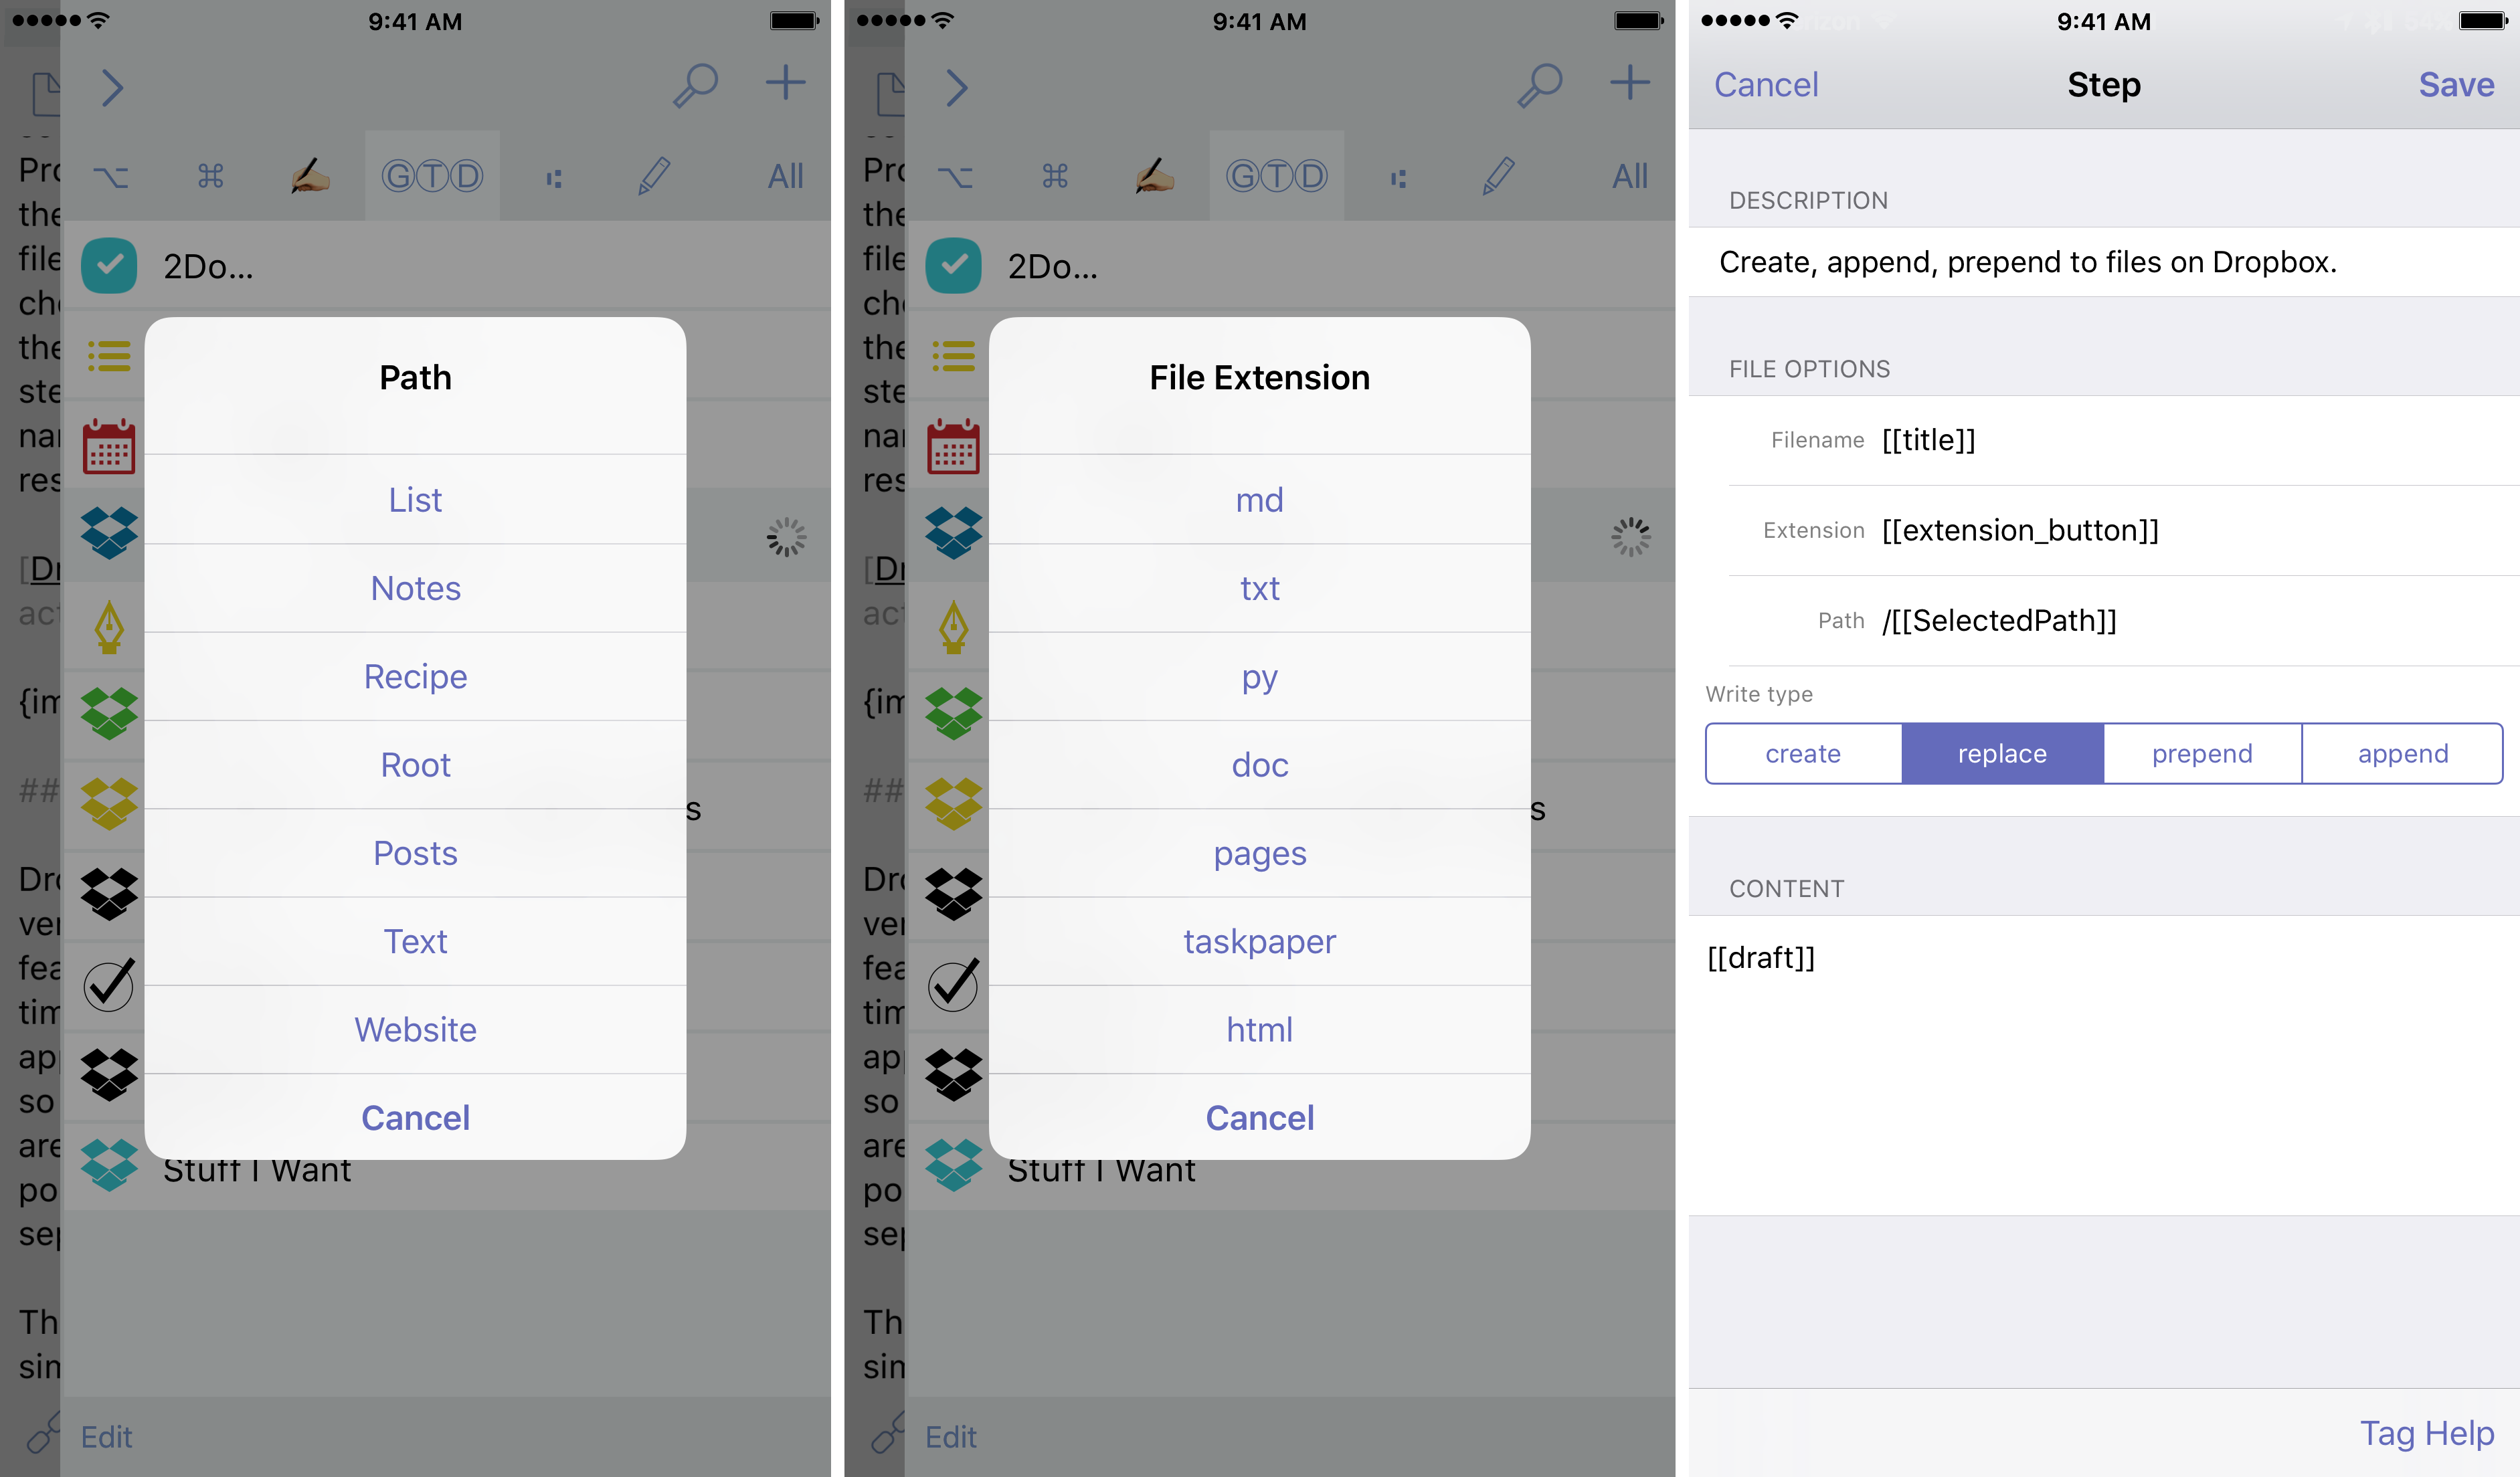
Dropbox > Save As…
This is an action that I created to allow me to save any sort of document; think of this more as a File > Save As… that you would see on a desktop menu. It uses a couple of Prompt steps: one for the file path and one for the extension. Using scripts, I am able to take the file path and action extension and parse the one I choose, giving me tag outputs that I can use in the final Dropbox action step. The Dropbox action step takes the [[title]] as the file name, then uses the two scripts to complete the rest.
Dropbox Pro users can get the option of versioning through the web, which is a nice a feature as it can be (and has saved me several times), still isn’t something available in the iOS app. To replace this for me in iOS, I have made it so that I can create backups accordingly. There are times that I will want to create a backup of my post; other times, I might want to backup a separate post version.
The first action is Create Post Version. This simply uses the Dropbox step, with the use of the [[title]] and [[draft]] tags. As I said above, part of my writing setup is using the title of the post as the first line; the reason for doing this is because I want to be able to save the post in this way. If I feel like I have something that is ready to be archived in Dropbox, I can simply tap on my action and it’s automatic.
The real difference in Create vs Replace is in how I tell the action step to behave. When I replace, it is simply that: it over-writes the version that is saved. And while Dropbox Pro users could go onto the web and rollback the version they have, standard users cannot. This is where Create comes in to play. Using Create will save the initial version of the post, but on subsequent Create saves, will put a (n) version number after it; this allows you the ability to go back to a previous version of what you have written.
Didn’t like the section you just added? Want to pull from a different version? No problem. To create a draft from a file in Dropbox, simply tap on the “+” button, select Dropbox, and locate your file. You won’t be working in the active file, but this is OK. It allows you to edit without having to worry about affecting what is in the cloud. When you’re ready to put the version back, because I’ve kept the first line as the title by using the [[draft]] tag, I’m able to re-use it again to save the file.[^2]
As I wrote about previously with Action Sets, you can easily create one for your Dropbox[3] setup.
Here is a link to the Dropbox Action Set I’ve created for the actions above.
Publishing
Now that I have everything backed up, I can move on to formatting and publishing my document. The first thing I do is run an action to remove the @post tag I created for the filter.[4] This is easy to do with the Find and Replace action.
I then take my screenshots and upload them, replacing any of the image placeholders I have with the final versions. I used to have to painstakingly do this one at a time, using the web uploader on WordPress. When Workflow received an update that integrated publishing things to WordPress, my friend Seth created an action to upload an image to WordPress.[5] This was very useful, but I wanted to allow for multiple images; I also wanted to get each of the links for the images I uploaded. I ended up creating this workflow which takes the selected images, gives you a preview of them, allows you to rename the image, then uploads it to Wordpress. It then returns the URL of the image and adds it to a list, which it then exports directly to a newly created draft in Drafts. The action has an area that you will need to change for your site, so make sure you take a look when you download it; also, if your upload settings are different than mine, you’ll have to change it to suit your needs.
Next, I view the post one last time with my preview, then I convert the entire post to HTML using this action; this allows me to change a few things prior to posting in HTML that Markdown doesn’t allow. I then run an action to change all of the <img> tags to be centered.
The last thing I do is strip the HTML from the title, and then I am ready to hit the Publish action. This uses Workflow to publish to WordPress, the platform I use for my site. This action takes the [[title]] and puts that on the clipboard; then it takes the rest of the text ([[body]]) and sends it over to Workflow. There is a way for me to post via email and rely entirely on Drafts, but I really appreciate the way Workflow handles the publishing where it can allow me to put in categories and tags, and even different publish dates or states.
That’s it. What started as a simple outline has now turned into a full post. I am able to write entire posts simply and efficiently, with access to everything I need right from within Drafts. This seemingly simple text editor is made massively powerful by the actions and keys that I am able to create.
Future Improvements
With all of that said, there are some improvements that I have seen in other apps that I would love to see happen in Drafts. Having these features would be useful for long-form writing and navigating within a draft itself.
There are two things from Editorial that I would love to see get added to Drafts {Maybe Drafts 5? Please let this happen…}. The first is the folding of sections when Markdown headers are applied; having that allows me to fold sections as I’ve completed them, or to simply get them out of sight. The second thing I would love to see is the arrangement of lines; Drafts has this functionality via arrange mode, but I find the the implementation used in Editorial better.
I would love to see the ability to search for something within a draft and see it highlighted. That way I can find a specific section or see how many times a word has been used in a post. Expanding on this, the find/replace action could be built in to the search, which is something only a few apps offer, and would be a welcome addition.
The last thing that I would like to see is better syntax highlighting. I really appreciate the syntax highlighting in Ulysses. It uses multiple colors to distinguish between links, images, footnotes, etc. It is visually nice to to see these items as you write, and is something that I would love to see added. Drafts does currently support some of this now, but it only uses a de-highlight of text if it is part of a link.
These improvements would be welcome, but don’t stop me with how I use the app. They would only make my experience with using it better.
One Text Editor to Rule Them All
So is this the only text editor that you need to use? No. For me, I can’t use just one for everything. The issue is that all of the apps have different features and do things a differently. Ulysses on iOS is great: the MarkdownXL writing is clean, the interface is beautiful, and the ePub export is outstanding. Editorial is nice because it has great Dropbox integration and can do so many things; the folding and arranging of lines and sections is top notch. Byword provides a nice clean interface and some good export options, but lacks some of the power features that Editorial, Ulysses, and Drafts have. Pages is cumbersome, but can provide you with a nice visual of how things will ultimately look. And there are a ton of others that I’m sure I’m not mentioning that are incredibly useful and have other features.
With all of the options out there, I’m sticking with Drafts. The app, coupled with all of the great custom actions and keys, gives me the freedom and flexibility to do so many things, write once, and send everywhere. After experimenting with other apps and trying new things, Drafts is still where my writing starts.
Box also can be used in place of Dropbox. Simply download the actions, change the Dropbox step to a Box step, and you’re all set. Just be sure to match the fields when doing so. ↩
This was extremely difficult for this post, because I was using @post in the text of the document. I actually just deleted them all manually to make it easier this one time. ↩
Here are a couple of the things I've been enjoying this week.
Osprey Momentum 30 Backpack
For work, I have a laptop. A 7.8 pound laptop. I used a messenger bag for years[^1], but it had started getting very uncomfortable for my walk in and out of the office. So I started searching for a bag that would not only be good for carrying my laptop, but also would be good for travel, biking (if I only had time to do it), hiking, and anything else I threw at it.
After several recommendations, looking at $200–300 bags, I finally looked into a recommendation from a colleague of mine: the Osprey Momentum 30. As the name implies, there’s 30L of storage in this thing. It’s big enough to hold my work laptop (at nearly one inch thick), a 13" MacBook Pro in a sleeve, my lunch tote, a water bottle, and a ton of gear. I’ve only been using it for a short while, but it works perfectly for what I need.
I can’t wait to use it more outdoors and while biking, assuming the weather improves. But even if it’s raining, the backpack comes with a rain cover that is stowed on the bottom of the bag to keep your pack and belongings dry. I picked mine up at REI with a 20% member discount, but it is also available on Amazon and other places.[^2]
PCalc
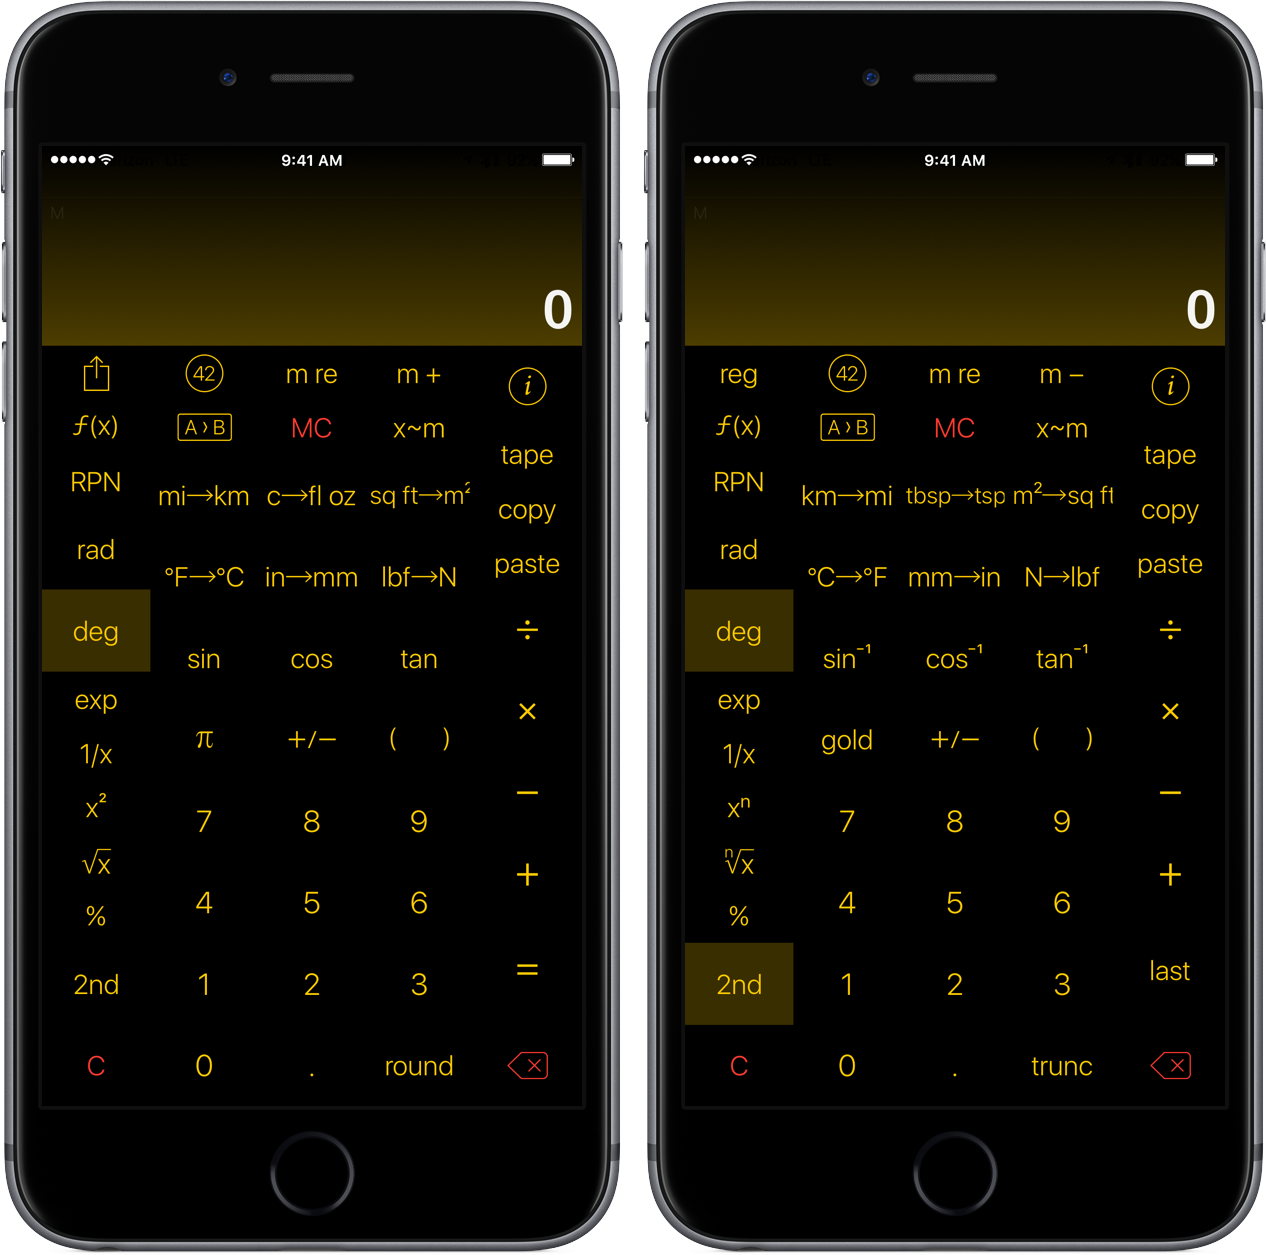
I’m very, very late to this party. PCalc has been around a long time. It’s not just the best calculator: it has conversions, formulas, a plethora of options, and — my favorite — customizable layouts.
The option to customize layouts is amazing. You can start with a given layout, but you can also rearrange the buttons as you need; you can also add your own buttons to include frequently used conversions, constants, or functions. This can also extend to the 2nd function, and you can have 2 buttons occupy the same space. I’ve just started playing around with it, and I’m already coming up with a default layout that is all my own.
I’ve had this app for a day. My only regret with this app is that I didn’t purchase it sooner. This is worth every penny.
In fact, my L.L. Bean Messenger bag had been my primary bag since college, which I started in 1999. ↩
One thing to keep in mind: buy it from one of the authorized sellers listed on Osprey’s website. Osprey offers a stellar lifetime warranty on their products, but only from those places. ↩
In light of the events of today, like so many days before it, I have to reflect on how these actions affect my thinking.
I could get political. I could get upset. I could get angry.1 I can get frustrated with all of it. I can feel sadness for those that have lost friends or loved ones to senseless violence. I can feel sorrow that things won't be done to help solve it. I can feel a lot of things.
And today, I have all the feels.
So in times like this, it is important to remember one thing: any time you talk to someone you love and care about, make sure that you tell them or show them, in your own way, how you feel. You may never get the chance to do it again.
And to those that fester and plot to hurt others, remember this: even if you don't agree with them, get along with them — even if you feel that you hate them — you can still let them know that you're a good human by leaving them alone. We all have differences, and committing these senseless acts of violence is heartbreaking for humanity.
This is not the future I want for my children. I hope and pray that things will change, that this festering hatred toward one another goes away. I want to run home and hug them and keep them safe the best that I can. If we would all just be good humans to one another, maybe this would be a better time and place to live. Until then, I want to go to Hangover Island to get away from it all…
Task management is a very personal choice. Every person has their own idea of how they'd like to organize their life, which is why there seem to be as many task managers as there are people. I’ve tried a bunch of them— Reminders, Clear, Due, Wunderlist, Trello, Things —and through that journey I’ve found 2Do works best for me.
ePub Version
Thanks to the power of Ulysses, I was able to create an ePub version of this post. It's not in the same format as my site yet, but when I get more accustom to the app, I'll likely update it to the same format.
I first stumbled upon 2Do during its Free App of the Week promotion on the App Store in June of 2015. I wanted to see how well that worked, so I moved everything there. After a short while, I was overwhelmed by all of the options and features. My brain wasn't thinking how the app seemed to want me to operate.
I started thinking I needed to try something new. There are many in the tech community that considered OmniFocus as the killer to-do app, and I had a bit of a curiosity based on all of the people I respected that were using it.
So, in the fall of 2015, I started to dive into OmniFocus as my new Task Management System (TMS). I was added to the beta program in TestFlight, which gave me basically a "free trial" to see if I could make this work for me.1
I learned a lot from that experiment. I am primarily an iOS-only user. And while OmniFocus is great at many things, there are several things that don't have feature parity between a Mac and an iOS device in their apps; you almost need both to accomplish everything needed for task management. There were also things that I wish would have been incorporated from other apps to use in my system. About 2 months in, I found myself using not only OmniFocus, but also supplemented it with Due and Reminders. My task management system was now three apps, which is far from ideal.
I started wrestling with the looming feeling: while OmniFocus is great for some, it's UI design is stunning, and comes highly recommended: it just wasn't for me. 2 It didn't integrate in the way I thought it should and I had difficulty conforming to a set system. I even reached out to friends who had used OmniFocus for years to see what I was doing wrong. Turns Out™, it wasn't me.
Now I had a dilemma. For as much as I wanted to make my system fit OmniFocus, I didn't stop to think about what I needed to fit into my system. The system I was looking for needed to be flexible, to handle the small task to the large project, and help push my TMS to the next level. Around this same time, I could see that work was going to be picking up and I needed to get a handle on things fast.
I spent a lot of time moving around in different systems, trying them out to see what did and did not work. It took time and effort that I could've devoted to other things, but I found it necessary to help me hone in on what I wanted and needed from a TMS on a daily basis. If I use a product and I'm unhappy with a feature (or lack thereof) or I'm not compelled or excited by it, I won't use it. It's a bit of productivity addiction, but as long as I set aside the time to review how this works for my life, then I'm happy to do it.
So with all of the apps that I currently had, I started looking at what each one could do. What I needed to do. Clear and Reminders were too simple. Things didn't have enough reminder options for me. Remember the Milk hadn't been updated in a long time. I looked at other options, but each had limitations that I couldn't handle and didn't have multiple integration points into iOS.
And that's when I saw it: 2Do. It was there the whole time. It had the features I needed. It had the automation I wanted. And aside from some UI elements that I would like to see changed, it proved to be the system I wanted. What I came to realize later is that I just didn't take the ownership to learn it like I should have, and I didn't understand its full potential. So now, I needed to move things from OmniFocus to 2Do. And this, as they say, is where things started to get interesting.
Expectations of What Follows
I want to make sure I state that I'm coming from an iOS-only perspective (and primarily my iPhone). I don't use a Mac for much of anything, except to upload something to iTunes every once in a while. So your mileage may vary.
Entering things into your new TMS is easy; getting tasks out of your current system is a way more difficult task. For anyone that has ever moved/switched anything (houses, jobs, etc.), it can be:
a giant pain in the ass
a scary thing to undertake when you do not know fully what you're getting in to
difficult because you have to retrain your thinking and methodologies
extremely rewarding
It's the last part that takes some time to realize. But it really is the most important part. And if your current method isn't doing what it needs or isn't something you really feel like using, break through the fear of change and push through.
Choosing a Sync System
Before you begin, consider these options. There are pros and cons to each, and starting off with the right one for you will help as you get more of your tasks into the app. 2Do gives you several options for sync, but I'm only familiar with two of them:
Dropbox is great. It is the recommended sync service by the maker of the app. One downside is the lack of Siri Integration, but with the invention of Email 2Do, as Federico Viticci suggested in his review of the feature, you can simulate a "task assistant" for implementation.3
iCloud is good if you share lists in Reminders with others (especially family) and gives you Siri integration. I have found this to be solid as well, but I wanted to keep this separate from iCloud because of the way it handles sync (see the manual). The only list I share is a grocery list, so it's not compelling enough for me to use this option.
While I haven't tried the others, I would be concerned about using them based on the limitations highlighted by the 2Do User Manual. I would want to use the full feature set (and full sync functionality of everything in the app), so I personally wouldn't recommend another option.
How I Moved Over
Here's the TL;DR — from my experience, there's not an easy way to do this.
I had tasks with notes entered that I needed to carry over. If I had started from scratch, I would've likely forgotten about them. I needed a way to get things out of one system and into another.
I tried a few different things, and while they worked, it was difficult and required way too much input; frankly, I don't even want to get into them because it was awful and not valuable to you, dear reader. It was so bad, that I ended up completely deleting everything in 2Do and starting over again. I stumbled on the the method that worked for me, and made the most sense.
Here are the tools I used:
Numbers (to deal with the export of the .CSV)
Drafts
Workflow
First, I started with an export of the CSV from my former TMS.4 I imported the file into Numbers and deleted all of the completed items. Then I deleted everything except the task names and notes columns. I took those columns and pasted that into Drafts. I separated the Task Name and the Notes fields by the | delimiter, and ran the action that utilizes this workflow I had come up with to import tasks.5 This dumped everything into 2Do in my default list (I use the GTD Inbox, so that's where it went for me).
You won't be bringing in flags or dates or contexts/tags or priorities — nothing but what needs to be done and descriptions. And, even though this puts a tremendous amount of effort in front of you to re-enter that data, it has great benefits as you learn your new system:
Exporting in this manner allows you to keep your original database intact. This is especially useful if you're on the fence for moving everything over.
You can move a smaller amount over to learn the interface, methods, and all of the useful features of 2do.
It allows you to refocus and rethink your task management. By stripping away the cruft of your legacy methodology, you can start to change your system.
Re-thinking your approach allows you to really focus on what is important. Perhaps you don't need every little step in a checklist or project. Getting rid of the clutter allows you to retrain your focus.
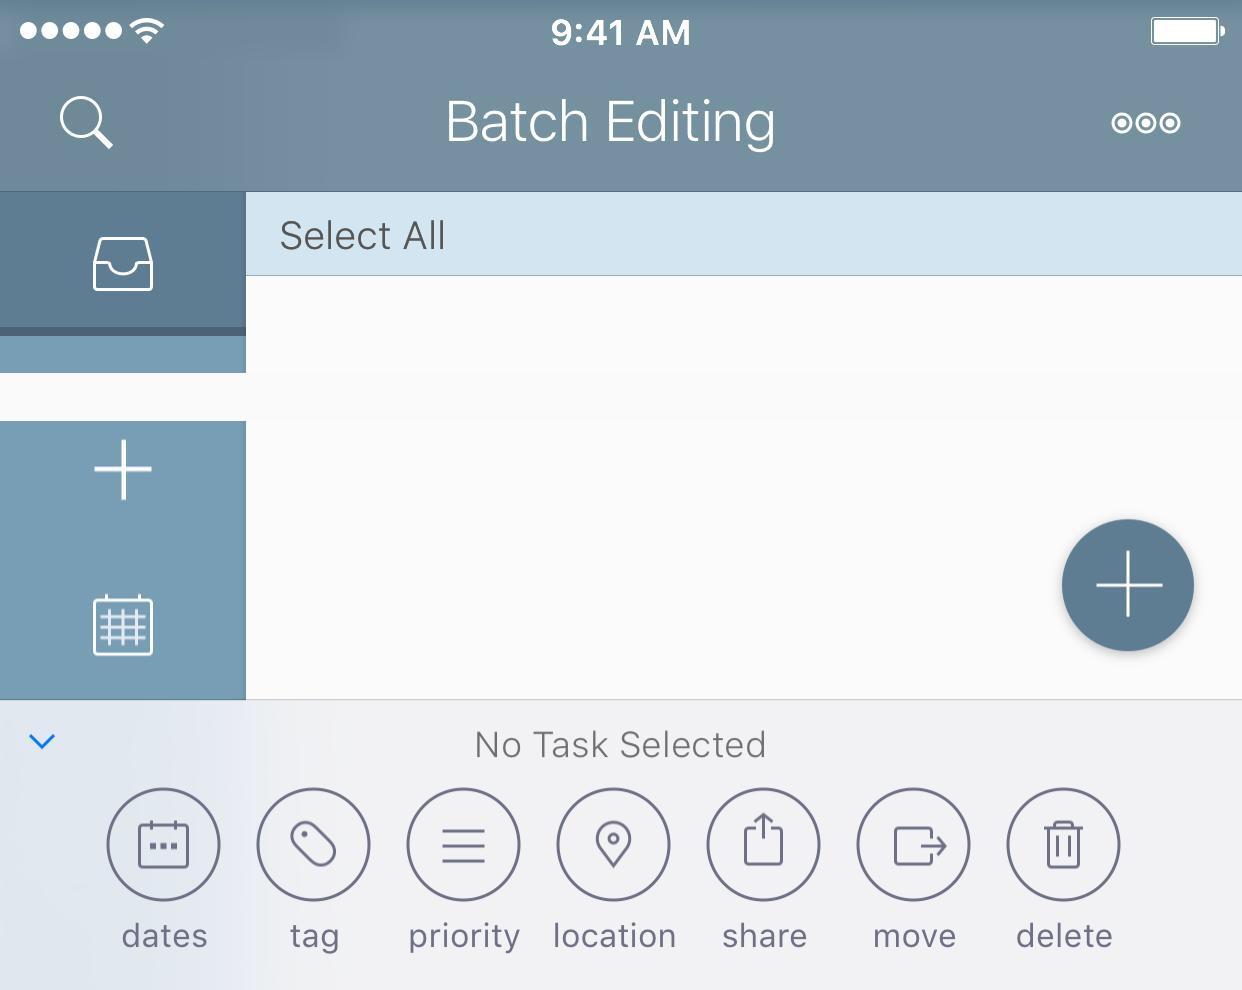
One feature that 2Do provides is batch editing. This will allow you to quickly apply various things and power through a bunch of tasks. This is something that other apps simply don't have, which not only helps move you over from another system, but also helps you in the normal day-to-day use of the app.
A Few Missing Things
There are a few things that I have enjoyed in other apps that are not in 2Do. While these aren't a deal breaker, they would some useful additions:
Review Mode
Review mode is something that I really found useful with my time in OmniFocus. This allows you to review specific projects or lists to make sure you get an overview of what is in your TMS, and is another way of helping you remember some of the tasks that could get away from you.
Granular Location
Another thing that I have found in other apps (Fantastical or OmniFocus, for example) is the ability to set leaving/arriving parameters for tasks. You can set nearby locations, which is better than having no location reminders, but I would really like to see the improvement here. I often want to get a reminder when I'm leaving work to pick up the groceries, but I would really like to set it for a distance away from work, and be able to go directly to the list.
Sequential Lists
I haven't really used this feature, but I've created the same basic thing in 2Do by having a specific Project or Checklist with priority and/or different start dates to accomplish the same thing. I know several other users have been asking for this, and I would love to see a smart implementation of this type of feature.
Management Hierarchy in 2Do Parlance
If you've been a long-time user of your current system, you are used to specific nomenclature in regards to your tasks. 2Do offers many of the same features, but with different names. But the key to using 2Do when leaving your old system is this:
Throw out the old, and embrace the new.
New terms scare us. While it's easy for me to say now, in practice it can be difficult. You can learn new things, even if you are afraid of change.
There's a hierarchy of how to organize things in 2Do. This isn't a rigid system, but rather one that you can customize to your liking. Here are the basics:
Groups
Lists
Projects/Checklists
Tasks
Groups aren't required, but if you have a layered setup, they are useful. Inside of the groups, you can have multiple Lists. Within each List, there are multiple Projects or Checklists or Tasks with the grouping.
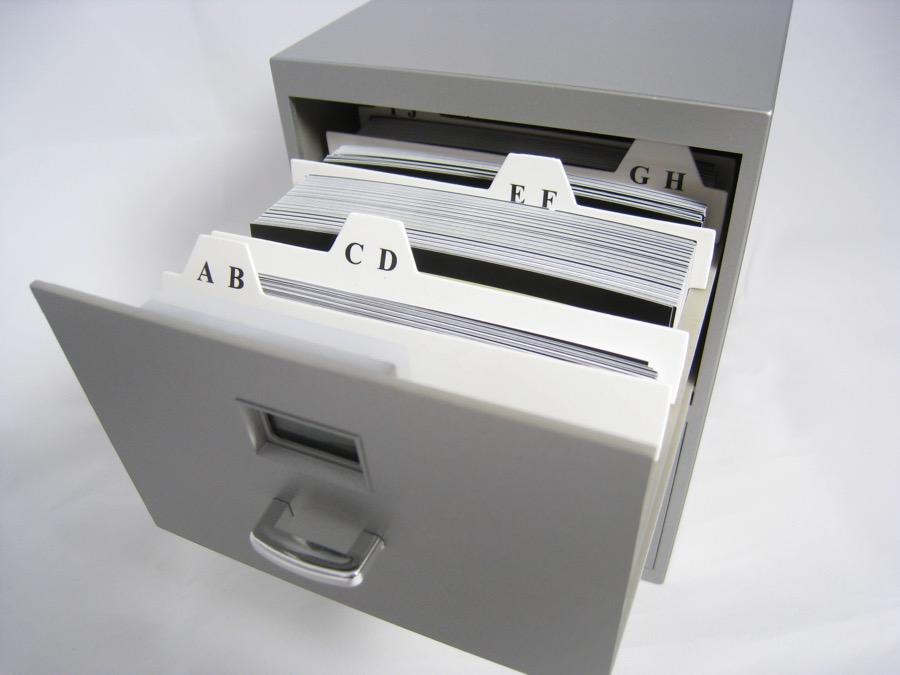
Think of the TMS as a traditional file cabinet: each drawer (Group) contains hanging files (Lists); within those hanging files, you can have folders (Projects/Checklists) or pieces of paper (Tasks); and inside the folders, you can also have paper.
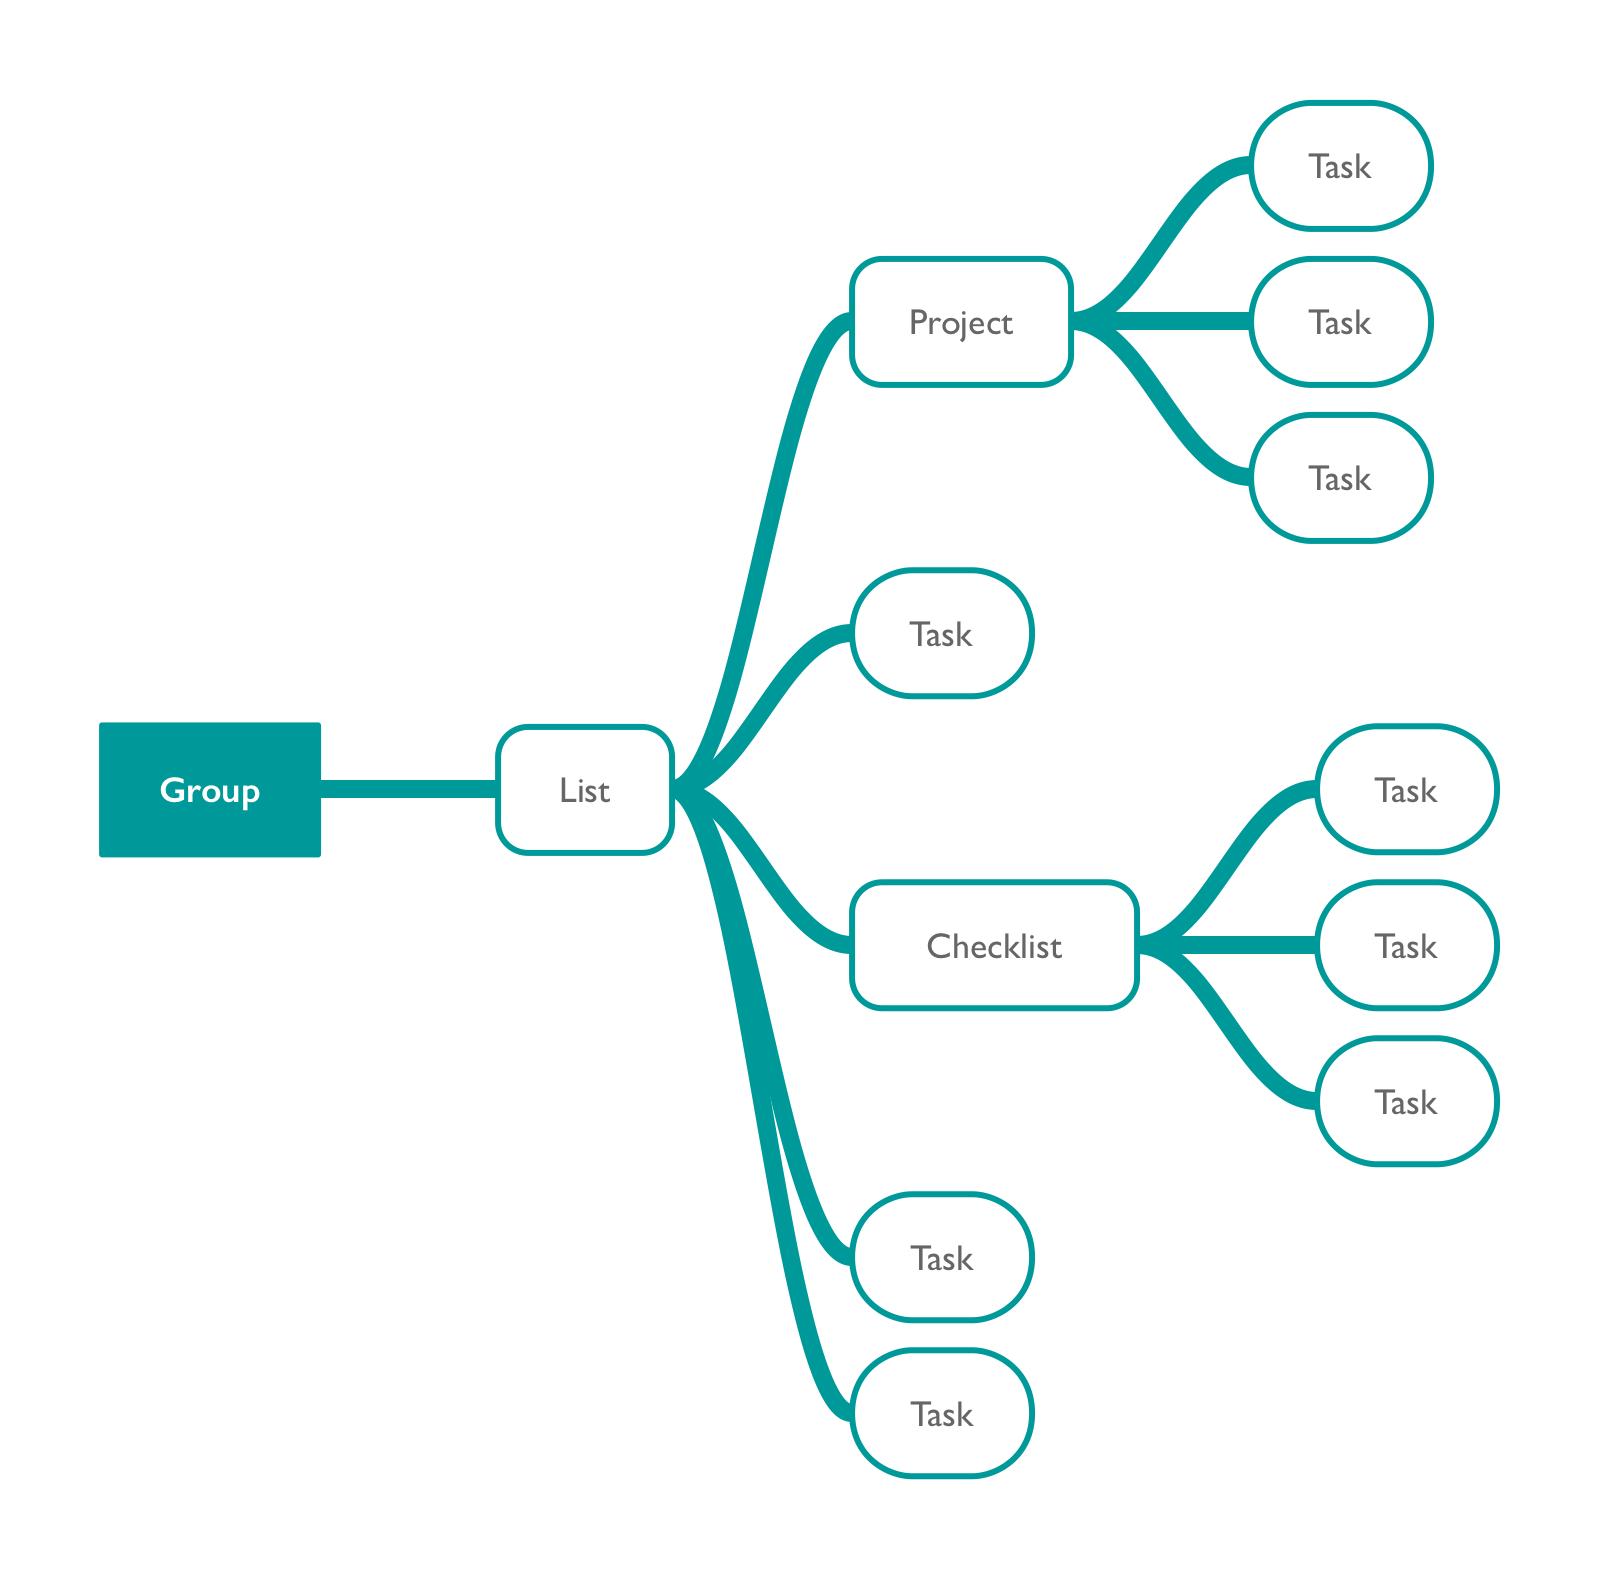
If that doesn't make sense to you, here's a visual mind map to illustrate:
Now that you have things organized how you need them, it's time to start using the features.
Features to Start Using
As you start to try some of the power features, I would consider first moving over a small, manageable list. This will allow you to customize 2Do to your liking before moving your entire TMS over.
Groups
Using groups for me is a power feature. It allows you to be more granular about where you place your tasks, and you can then use the Smart List feature to extract out what you specifically need (more on this in a bit). They have helped me keep work and personal tasks separate, all while having one central database for everything.
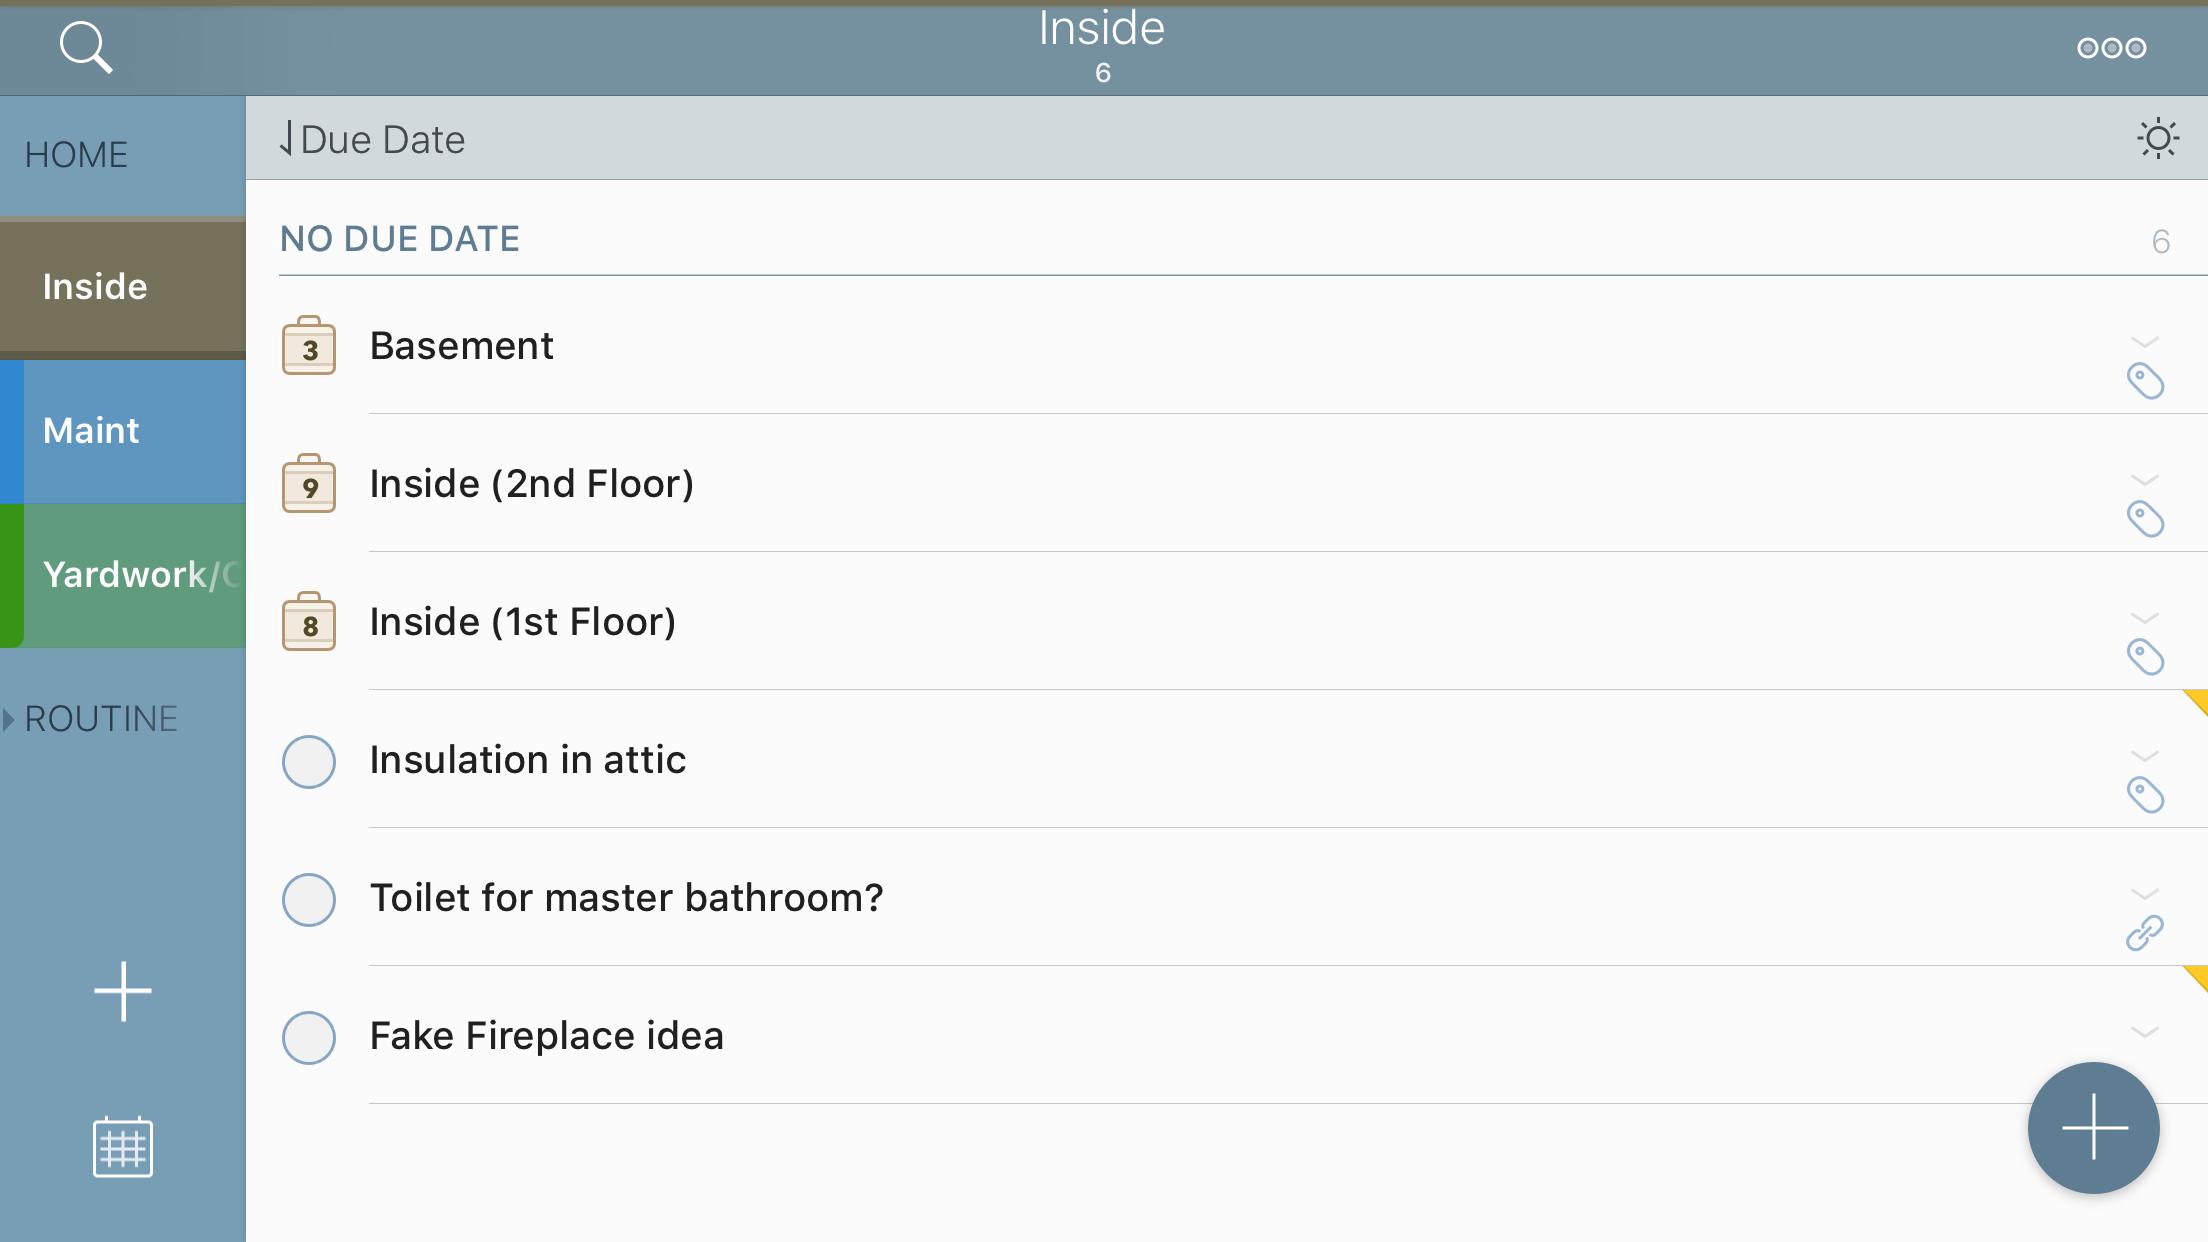
When you begin thinking about organizing your tasks, I recommend you start thinking of groups like buckets. I have 3 main buckets: Personal, Home, and Work.6 Within each of those groups, I have multiple lists. Here's an example of my Home Group:
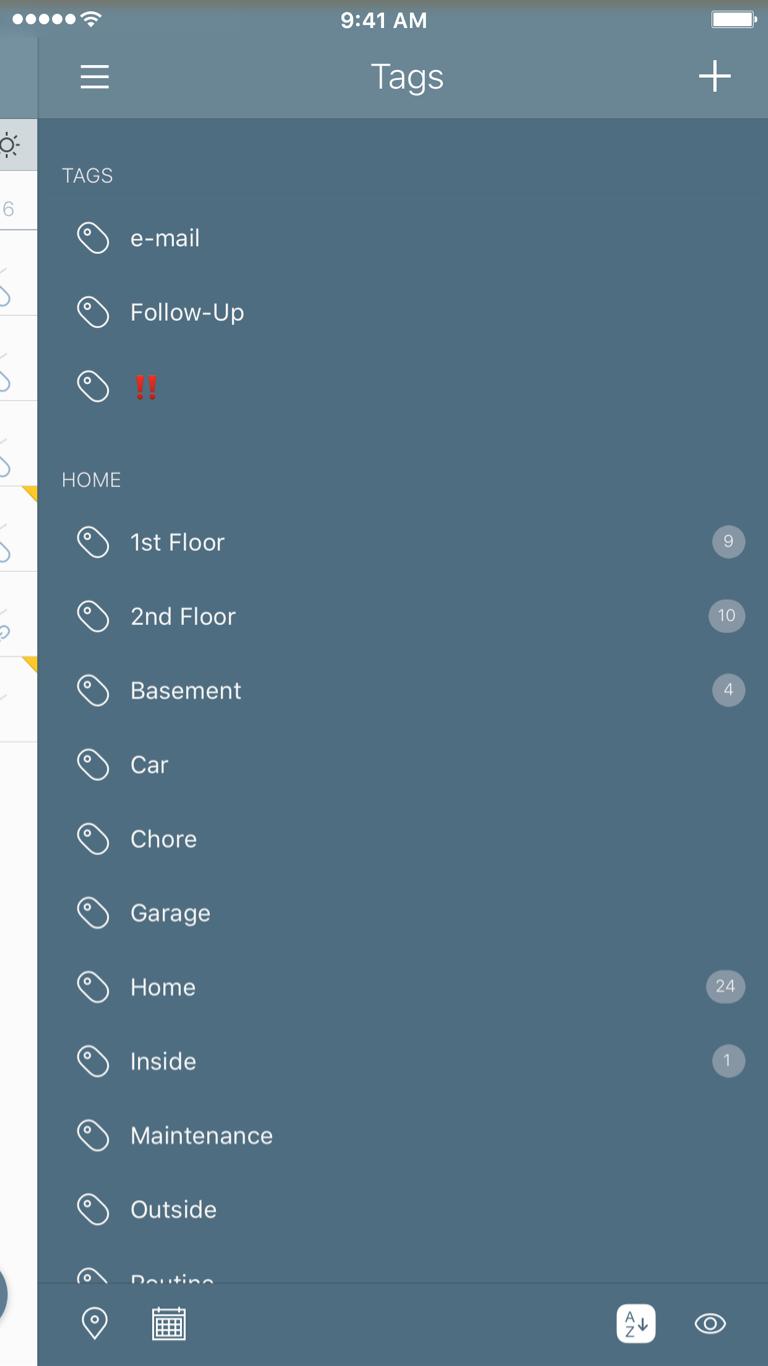
Tags
Tags are simple to apply, but are extremely powerful in your task management. This is going to separate a lot of your tasks into groupings that make sense. They are very similar to contexts, but more powerful in that an item can belong to multiple instead of one; you aren't locked into a singular way of thinking about where a task resides.
You can set up a bunch of tags up front if you have a list from your previous app. The other option is to create them as you're sorting all of your tasks from the default list into new places within the app.
Another nice thing here is how you can group your tags. These groups are different than how you have your tasks organized, but can be helpful in identifying where things belong.
Setting up tags does take time, but as we'll touch on later, will help with the creation of Smart Lists to help you focus on the task(s) at hand. There are also a ton of other useful tips in the user manual.
One helpful tip that I heard on the Nerds on Draft Podcast was creating tags for the people you interact with, and then filtering based on those tags so you can focus on talking with them. While I haven't implemented this at work (yet), I have done this for things at home. Helps me navigate certain things I need to discuss with my family, and allows me quick access to those tasks.
Tags also have the option of being paused. This is extremely helpful to get rid of the clutter that can build up. If you manage projects at work, creating a specific tag for that project can be useful if that project gets put on hold. I've had this happen a few times at work, and pausing those tags gets them out of my view so I can work on projects that are progressing forward.
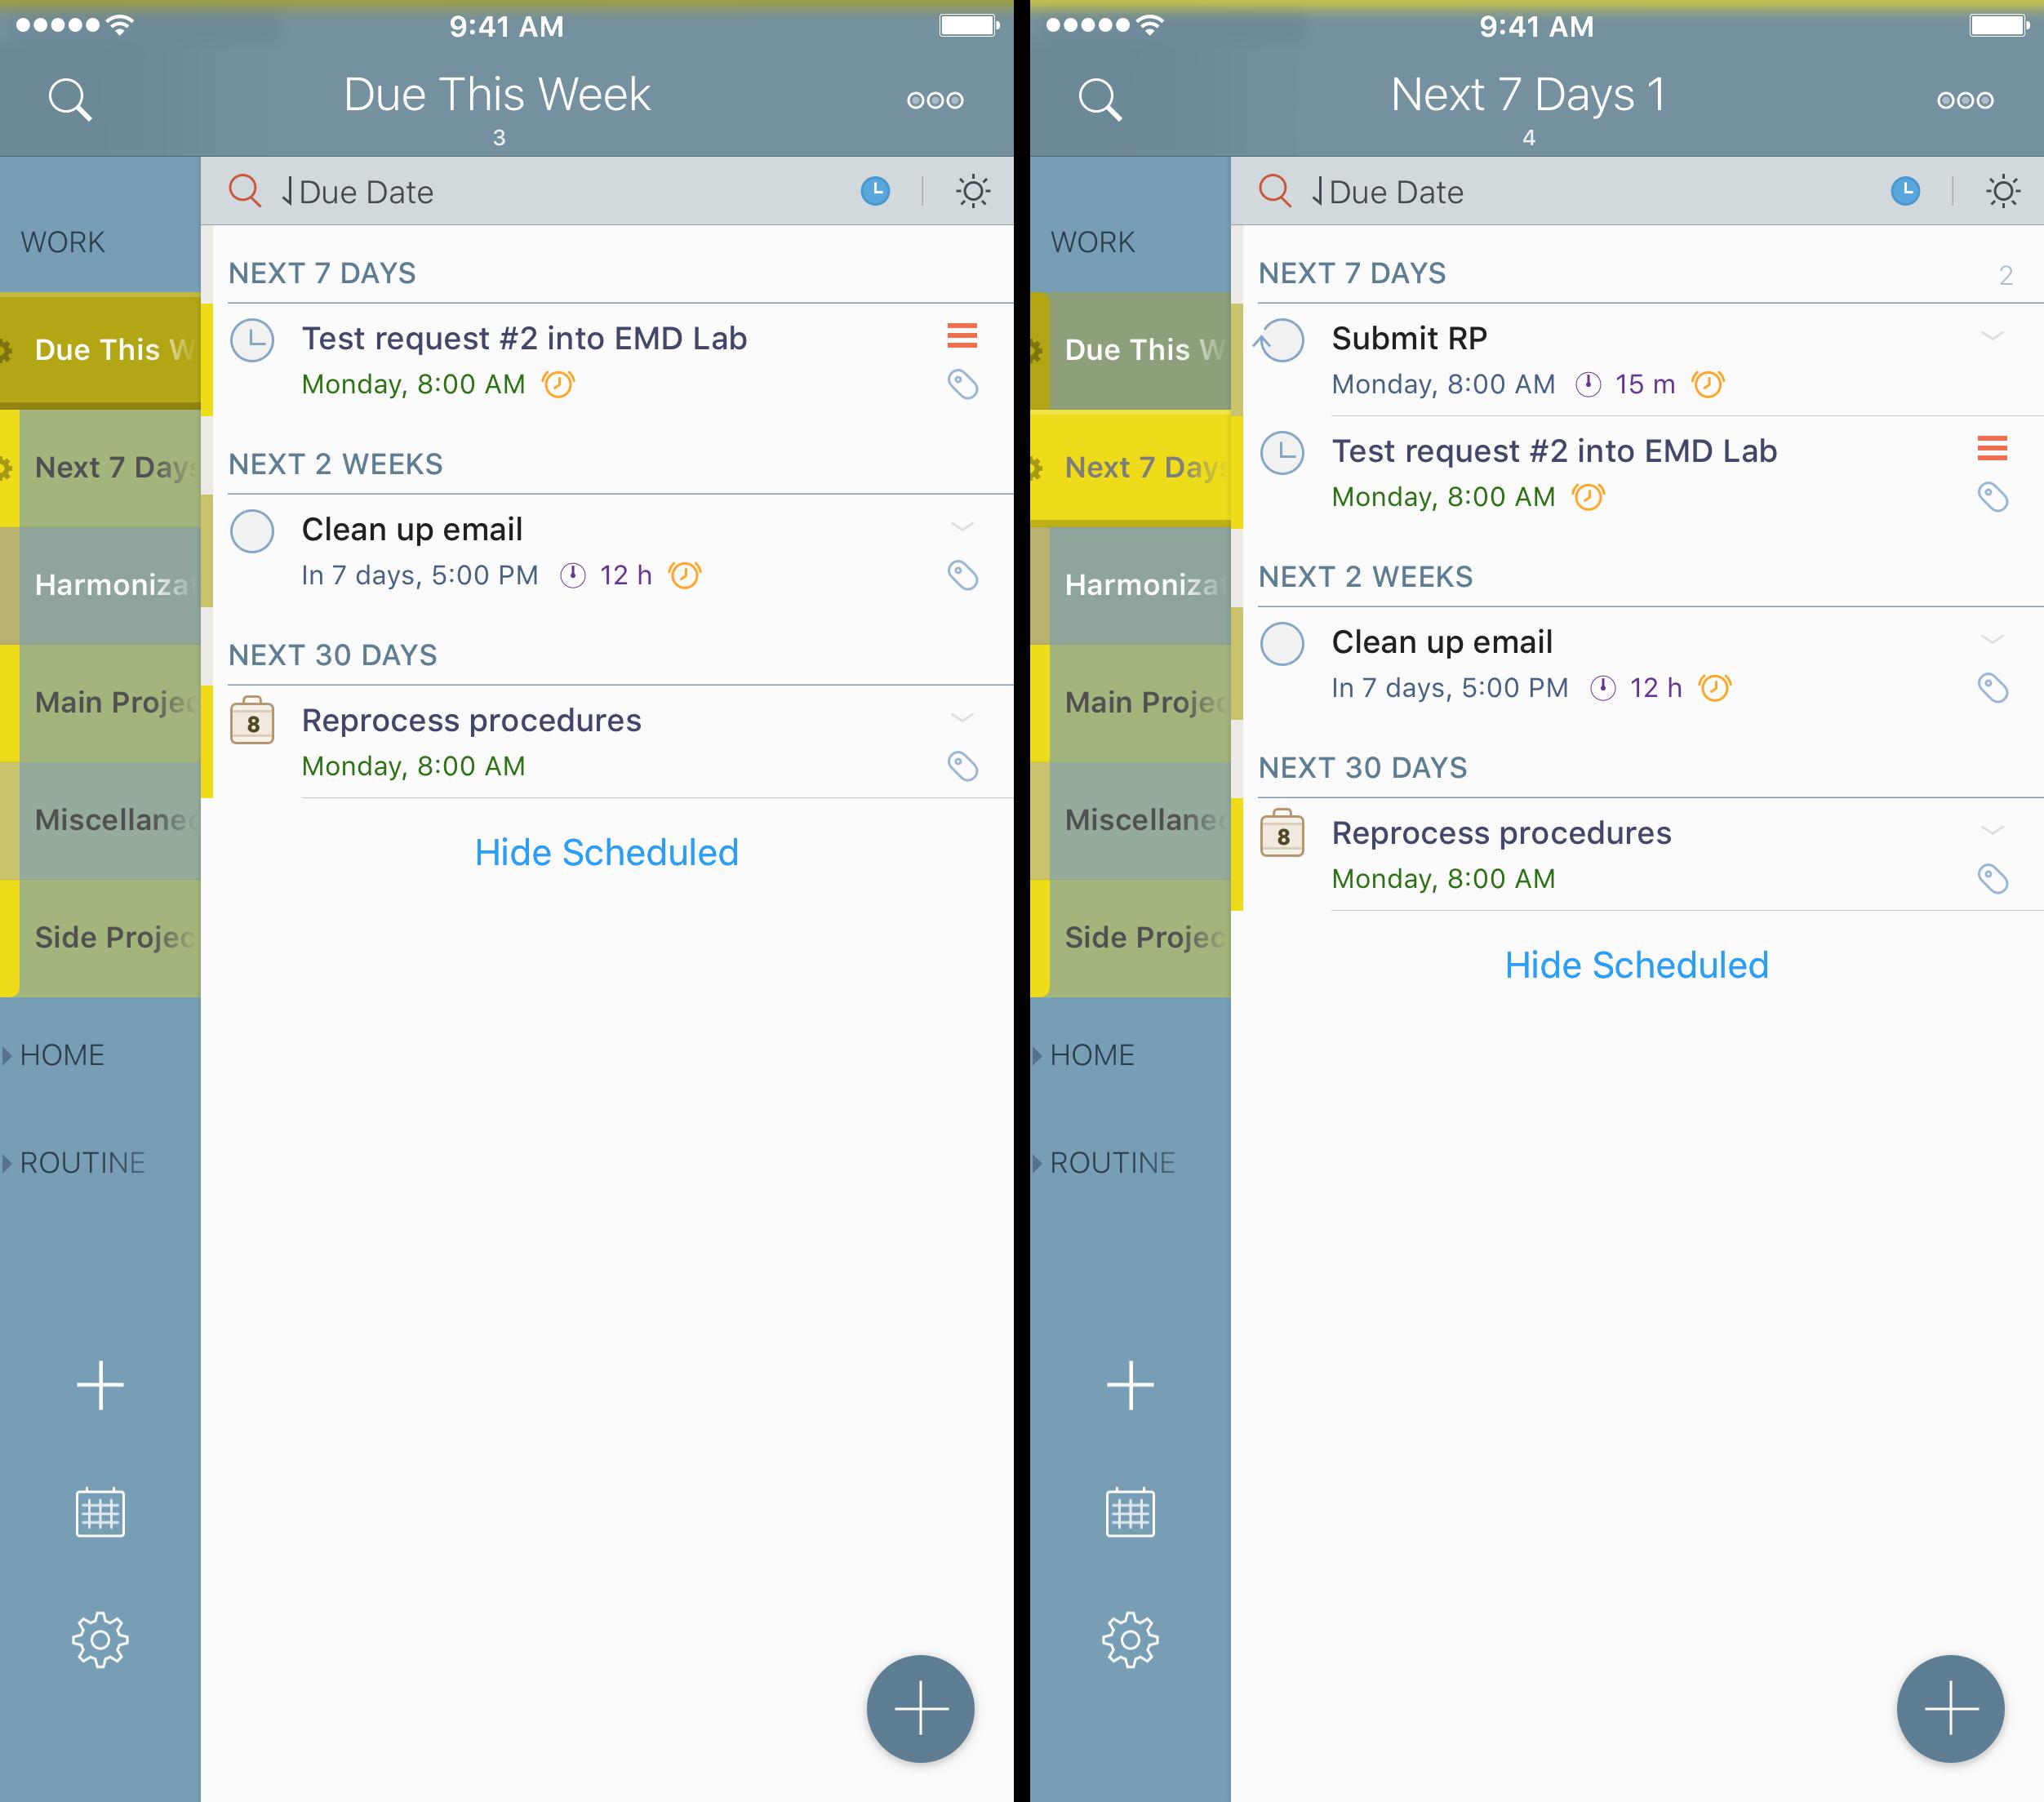
Due Dates, Start Dates, and Duration
There are 3 types of time-based metadata that you can apply to a given task/project:
Due dates are simply the date/time that a task is due. New with 3.8, the digital clock option was added to the existing analog clock option for easy time selection. For due dates, you do not need to select a time; sometimes you know that a task is due on a particular day — like mowing the lawn — but the time is flexible. This is where setting a due date with no due time is useful.
Start dates are useful for tasks that you want to have appear in your list, but at specific times. By default, tasks with start dates are hidden from view, but can be shown by tapping the clock icon that displays Scheduled Tasks. This helps to get the clutter out of your view, and get you focused on what needs to be done.
Setting a duration is a very helpful option for when you need to be notified of something in advance. If you know a task is going to take you a few days to complete, but need to be notified to start that task, using duration in conjunction with a due date is a good choice.
There is a great video on the 2Do YouTube channel that shows you how to use due dates, start dates, and durations, and gives you good use cases for when you would apply a start date or a duration, and I highly recommend watching it (along with the other videos).
Federico Viticci mentioned in his post on MacStories on why 2Do is his favorite iOS task manager that setting start/due date shortcuts is helpful for entering tasks quickly. I encourage you to read his review to better understand those options, as they will save you time and effort as you are creating new tasks.
Projects & Checklists
Projects and Checklists allow you to set up smaller projects that contain a set of tasks. They are the same in basic function, but differ in the way start/due dates get applied.
Projects and Checklists can have an overall start/due date applied to the entire set of tasks; the difference between the two is that tasks within a Project can be independent of the overall start/due times, whereas tasks within a Checklist inherit the start/due time.
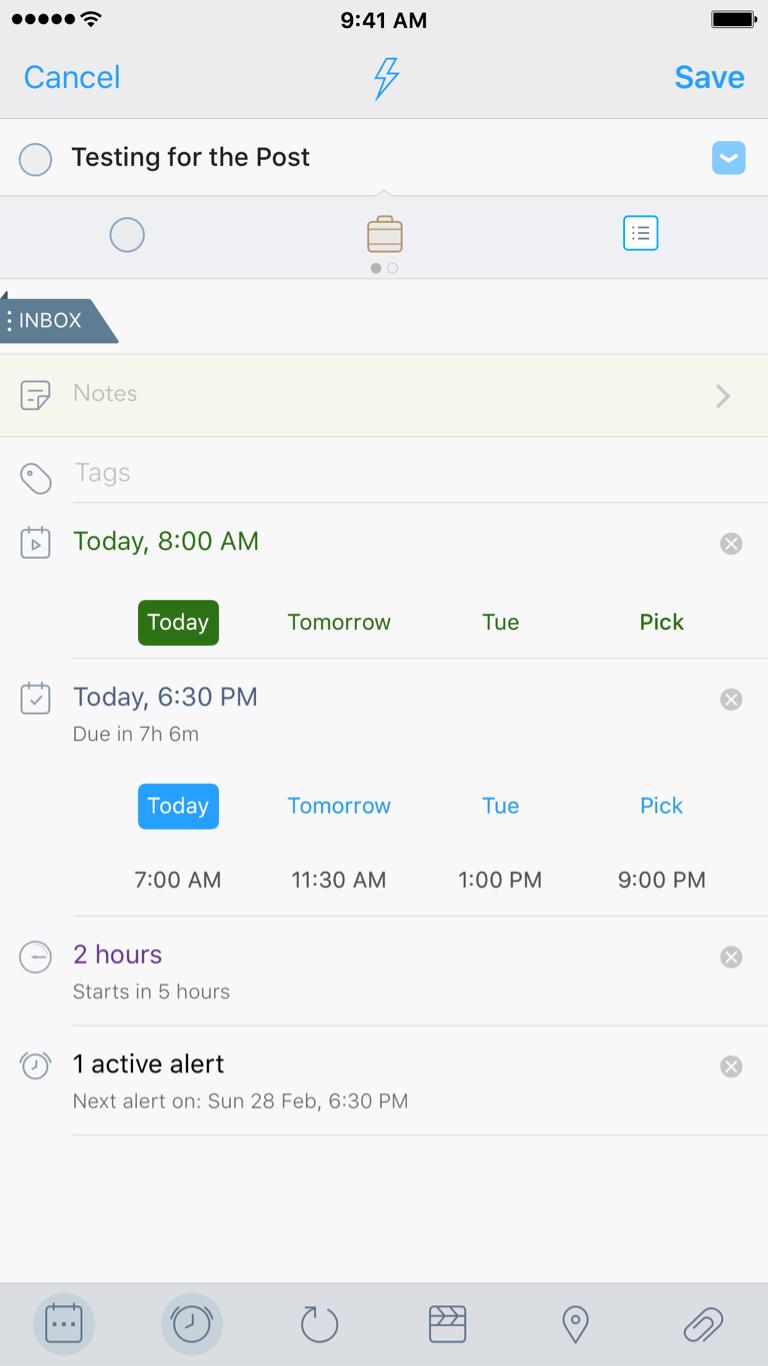
As of 2Do 3.8.1, there is a great way to use a Checklist with alerts to set up a recurring list of items. This allows you to set up an alert for each task that is based on the start date. When the Checklist is completed, the checklist start/due date are repeated for the specified repeat cycle, and the alert times adjust with those dates.
Here's an example:
Say you needed a reminder to refill your prescription every 30 days. This involves a few steps to complete:
Call your doctor to have the prescription written at least a week in advance.
After 24-72 hours (depending on the office), you need to drive to pick up the prescription.
Then, before you run out of your current prescription, you need to get the new one filled.
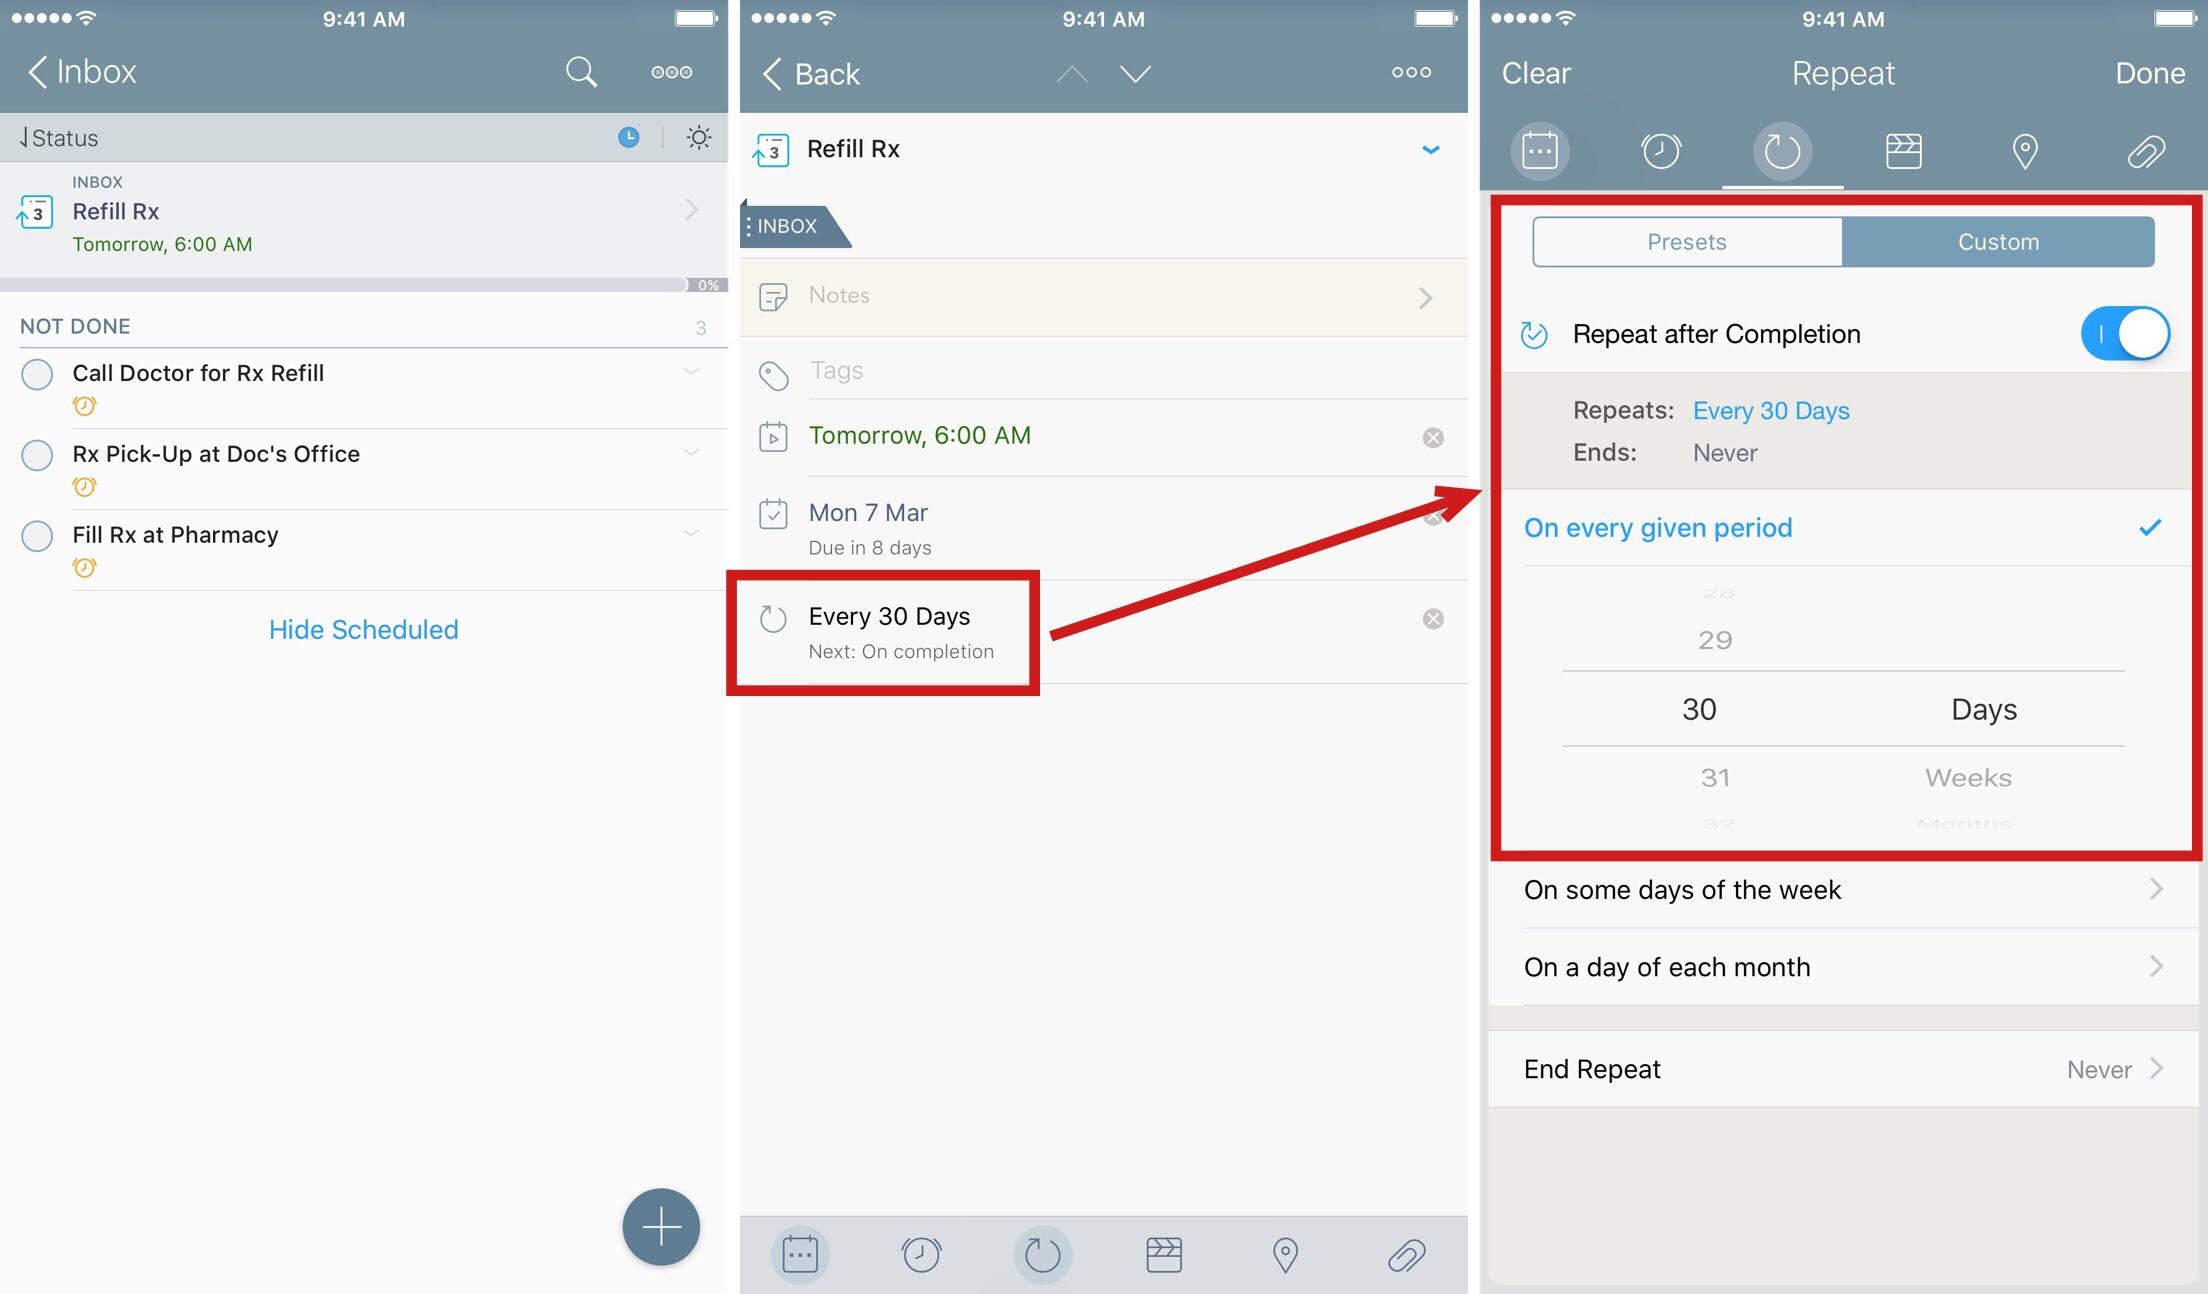
Now with a Checklist, you can set the start date seven days ahead of the due date. Then, you can set up your Tasks within the Checklist, and apply an alert to each one at a date/time relative to the start date:
Update: Many people have asked where they can get the workflows for tasks, projects, and checklists. I have created a post here with all of the updated links to those workflows and actions.
Sort Navigation
One thing I have heard from others is that 2Do has a lot going on in the screen. There are layers of UI, and there are things that can be missed.
Just prior to posting this, I was contacted by a friend of mine asking how to accomplish sorting. He wanted to sort the tasks manually, without applying a Due Date or a Priority; he just wanted to take a list, and move a task up from near last to the 4th position in the list.
I had always assumed that sorting manually was missing from the app. But, as was pointed out to me, it was right there all along. After all this time, I was glancing over navigational cues that would help me find these items. It would behoove you — and me for that matter — to play around with this a bit more. Let's use the example of the sort options.
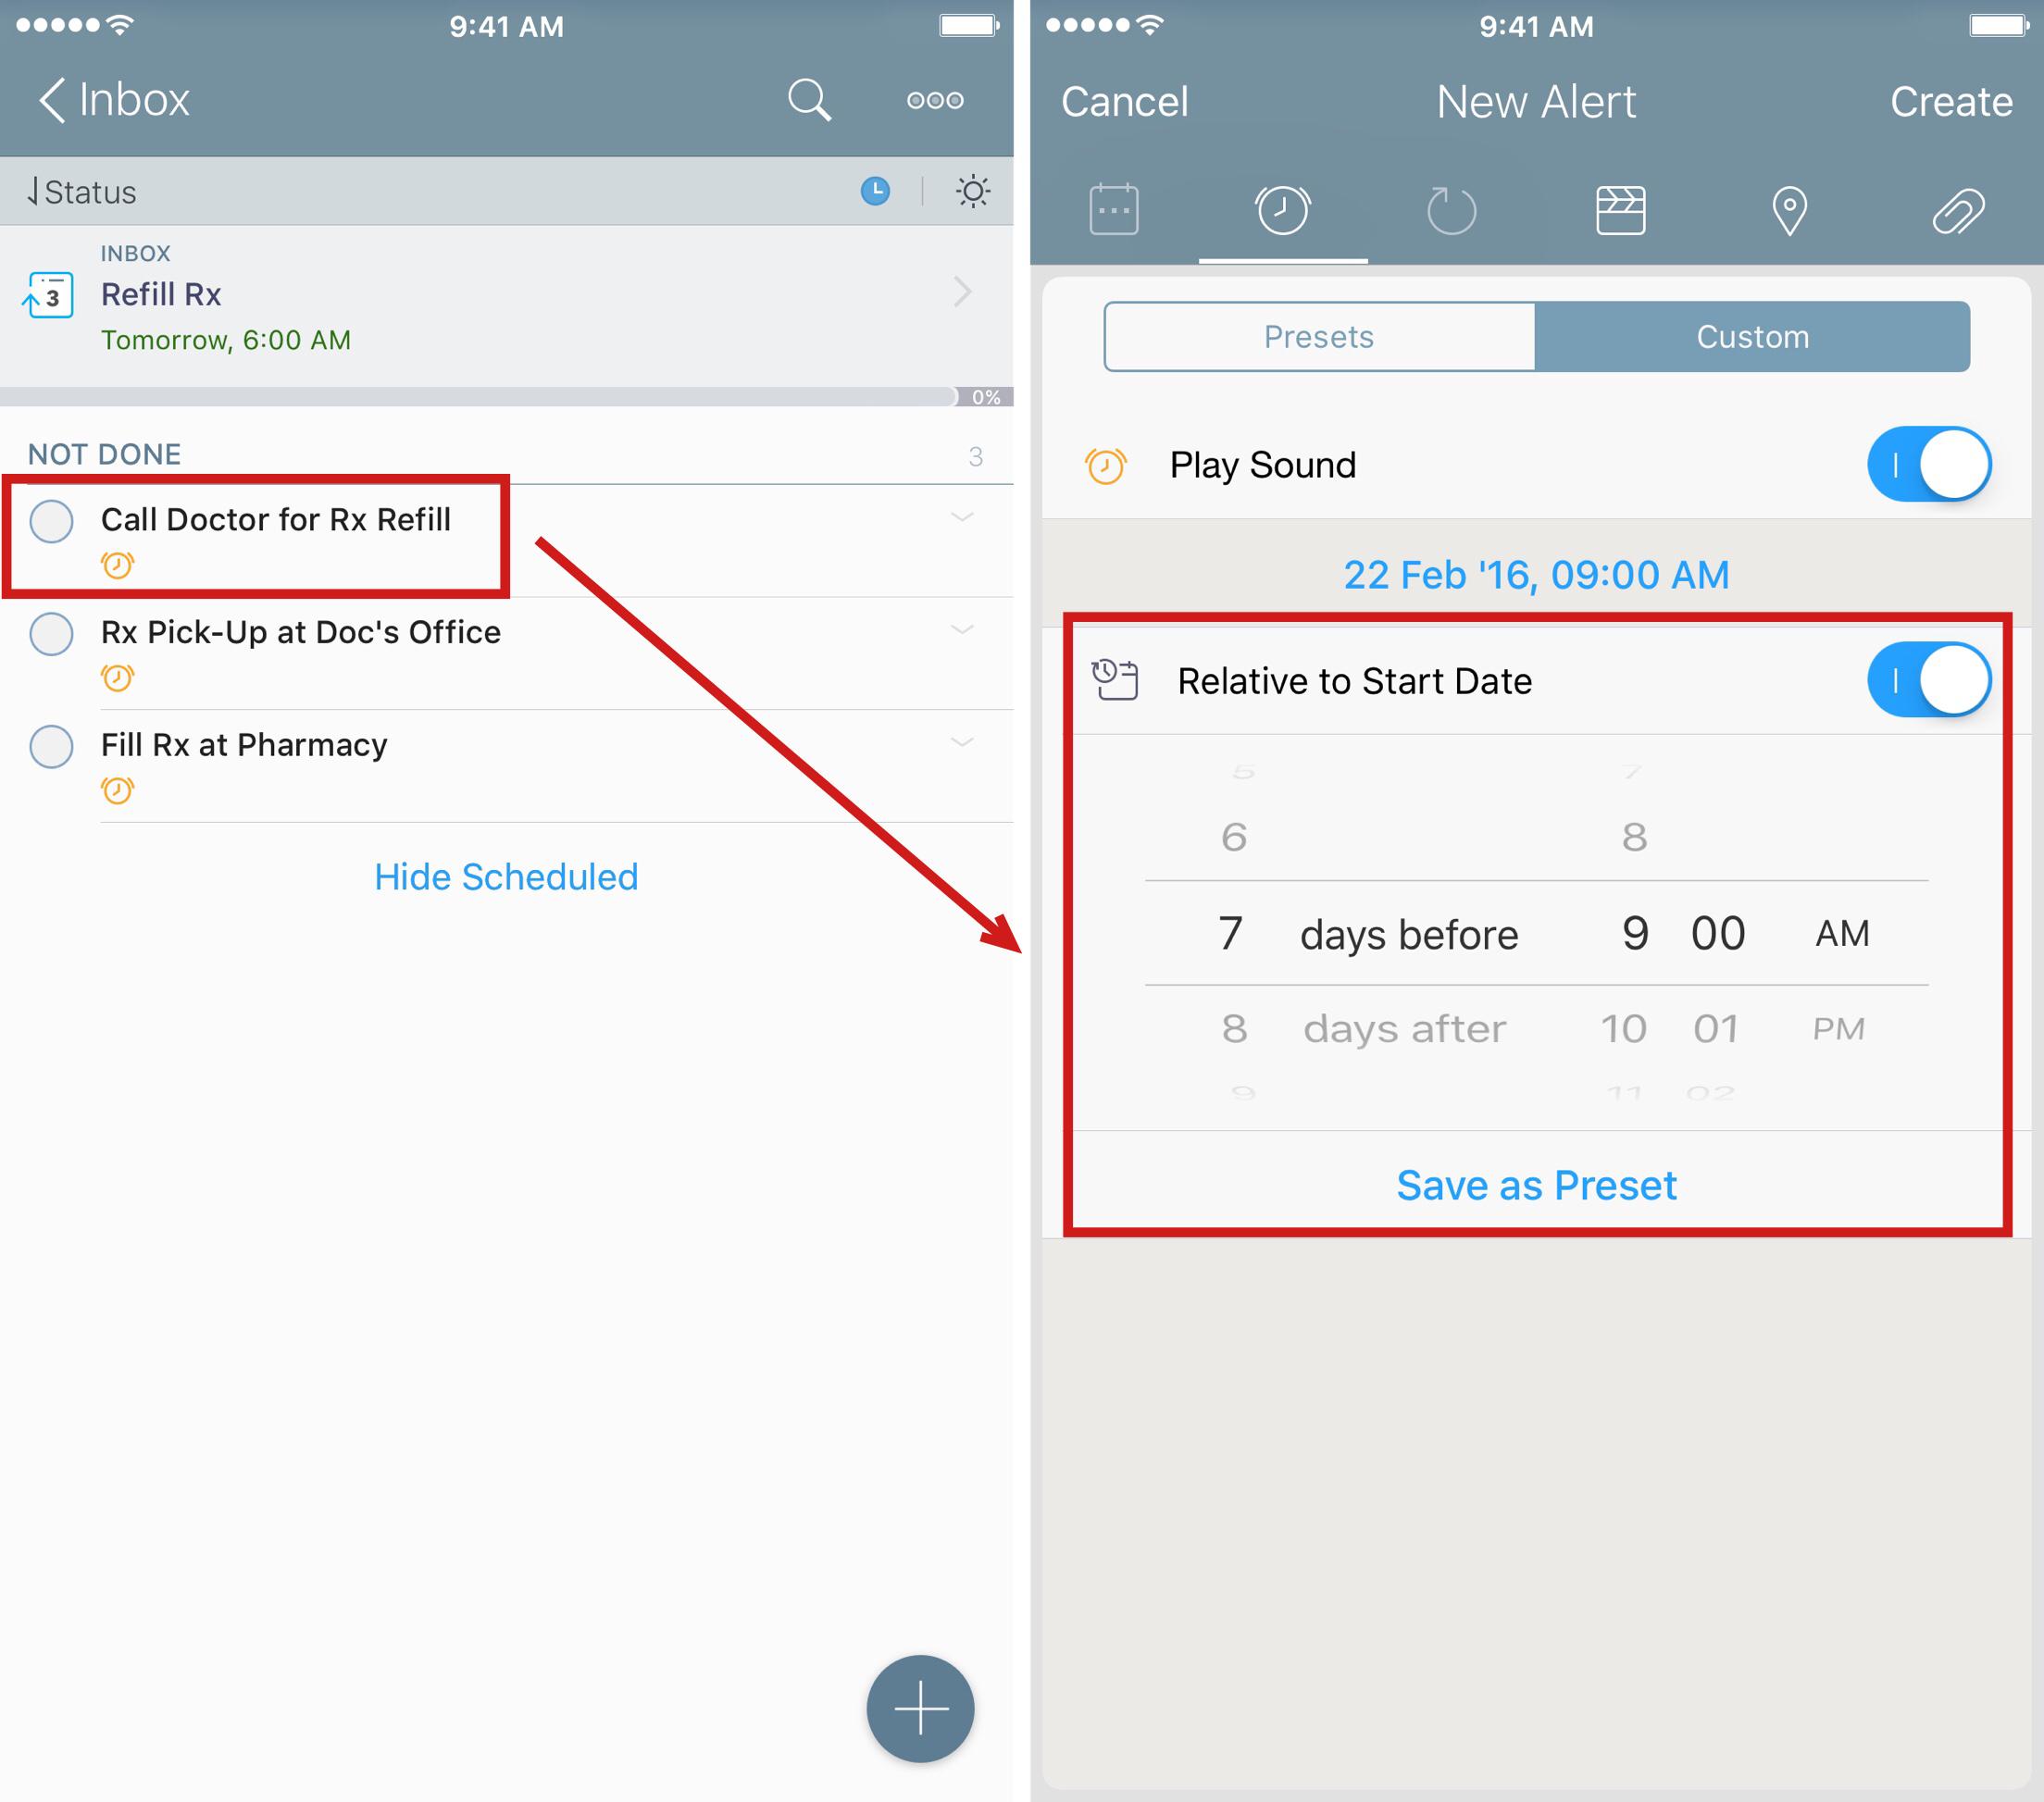
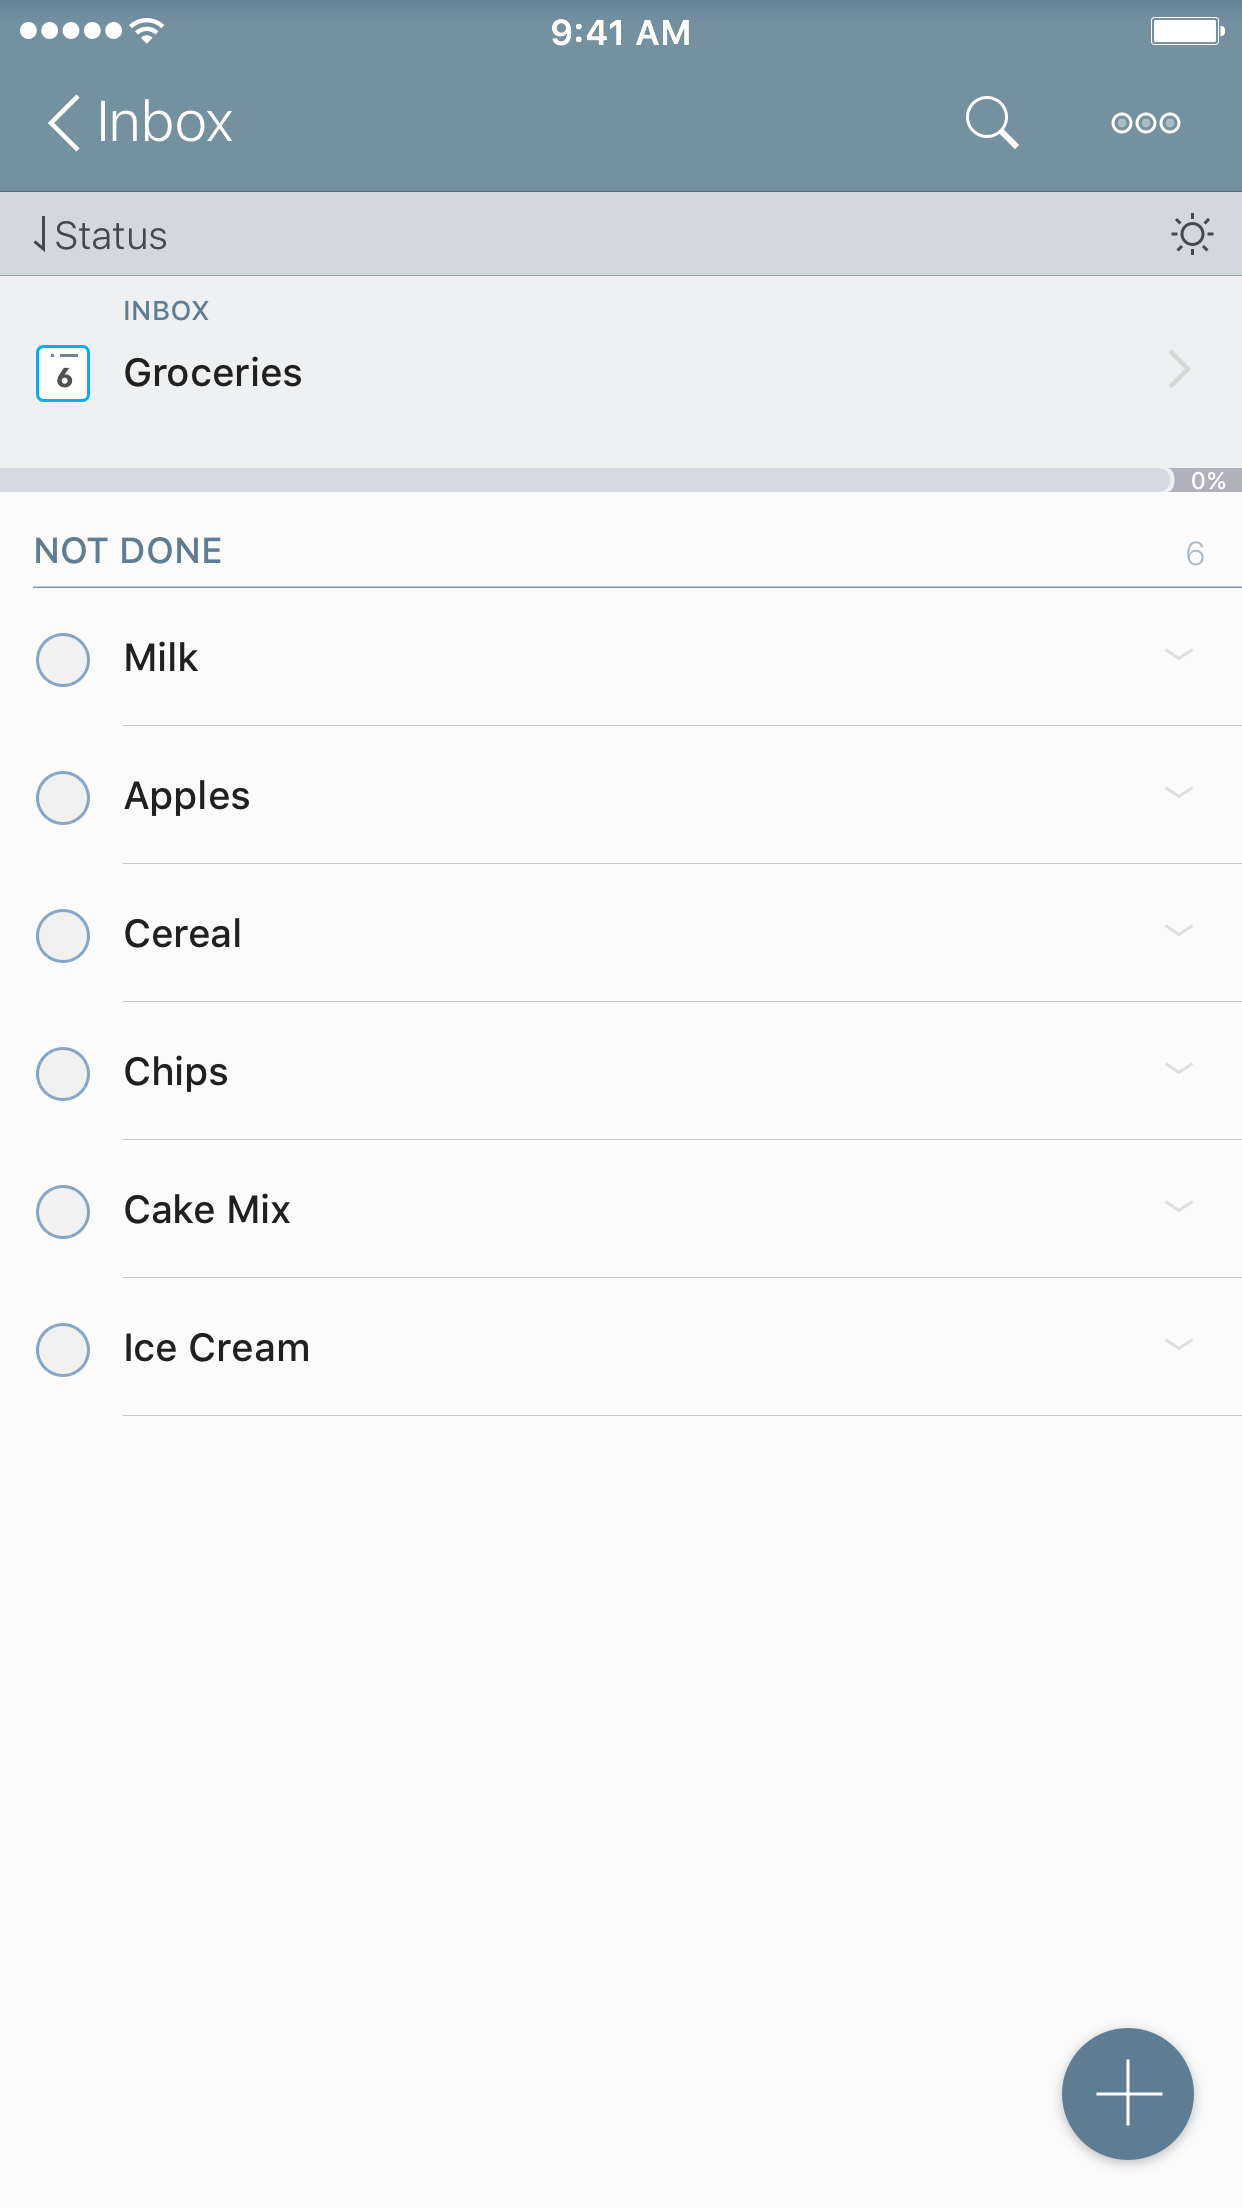
Say you have a checklist of groceries, entered as you think of them:
When I go shopping, I like to have my list in the order I move through the store. I generally know the layout of the corner grocery store and the larger store that is a few miles away. I don't have a due date or priority to sort on here, but I want to sort them in the order I need for the store.
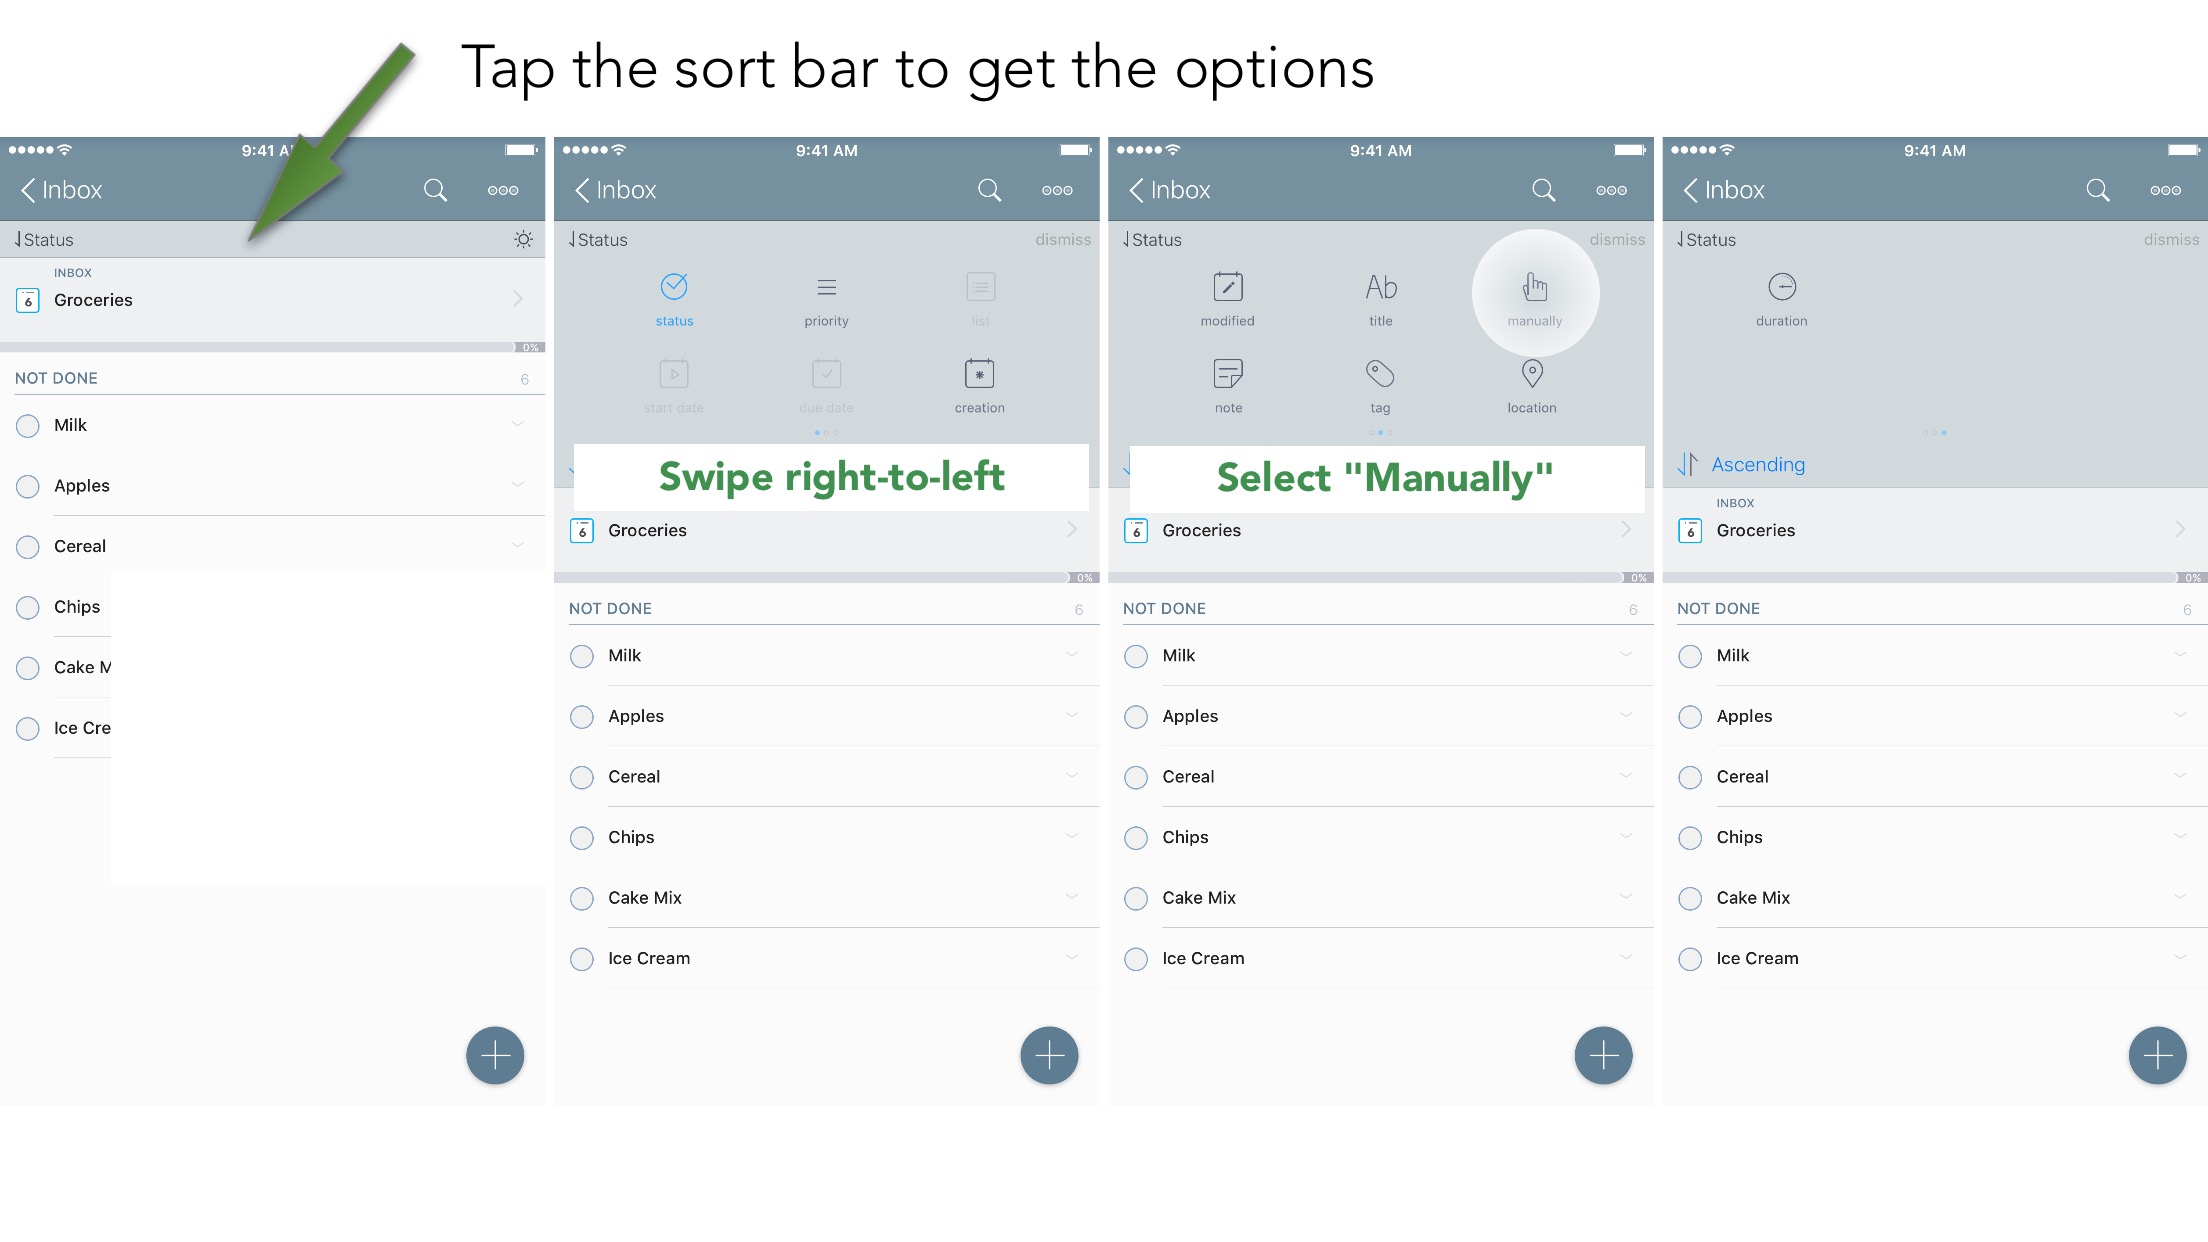
First, locate the Sort Bar. Tap on the sort bar to reveal the other options. You will be presented with the first screen, but notice the three dots:7
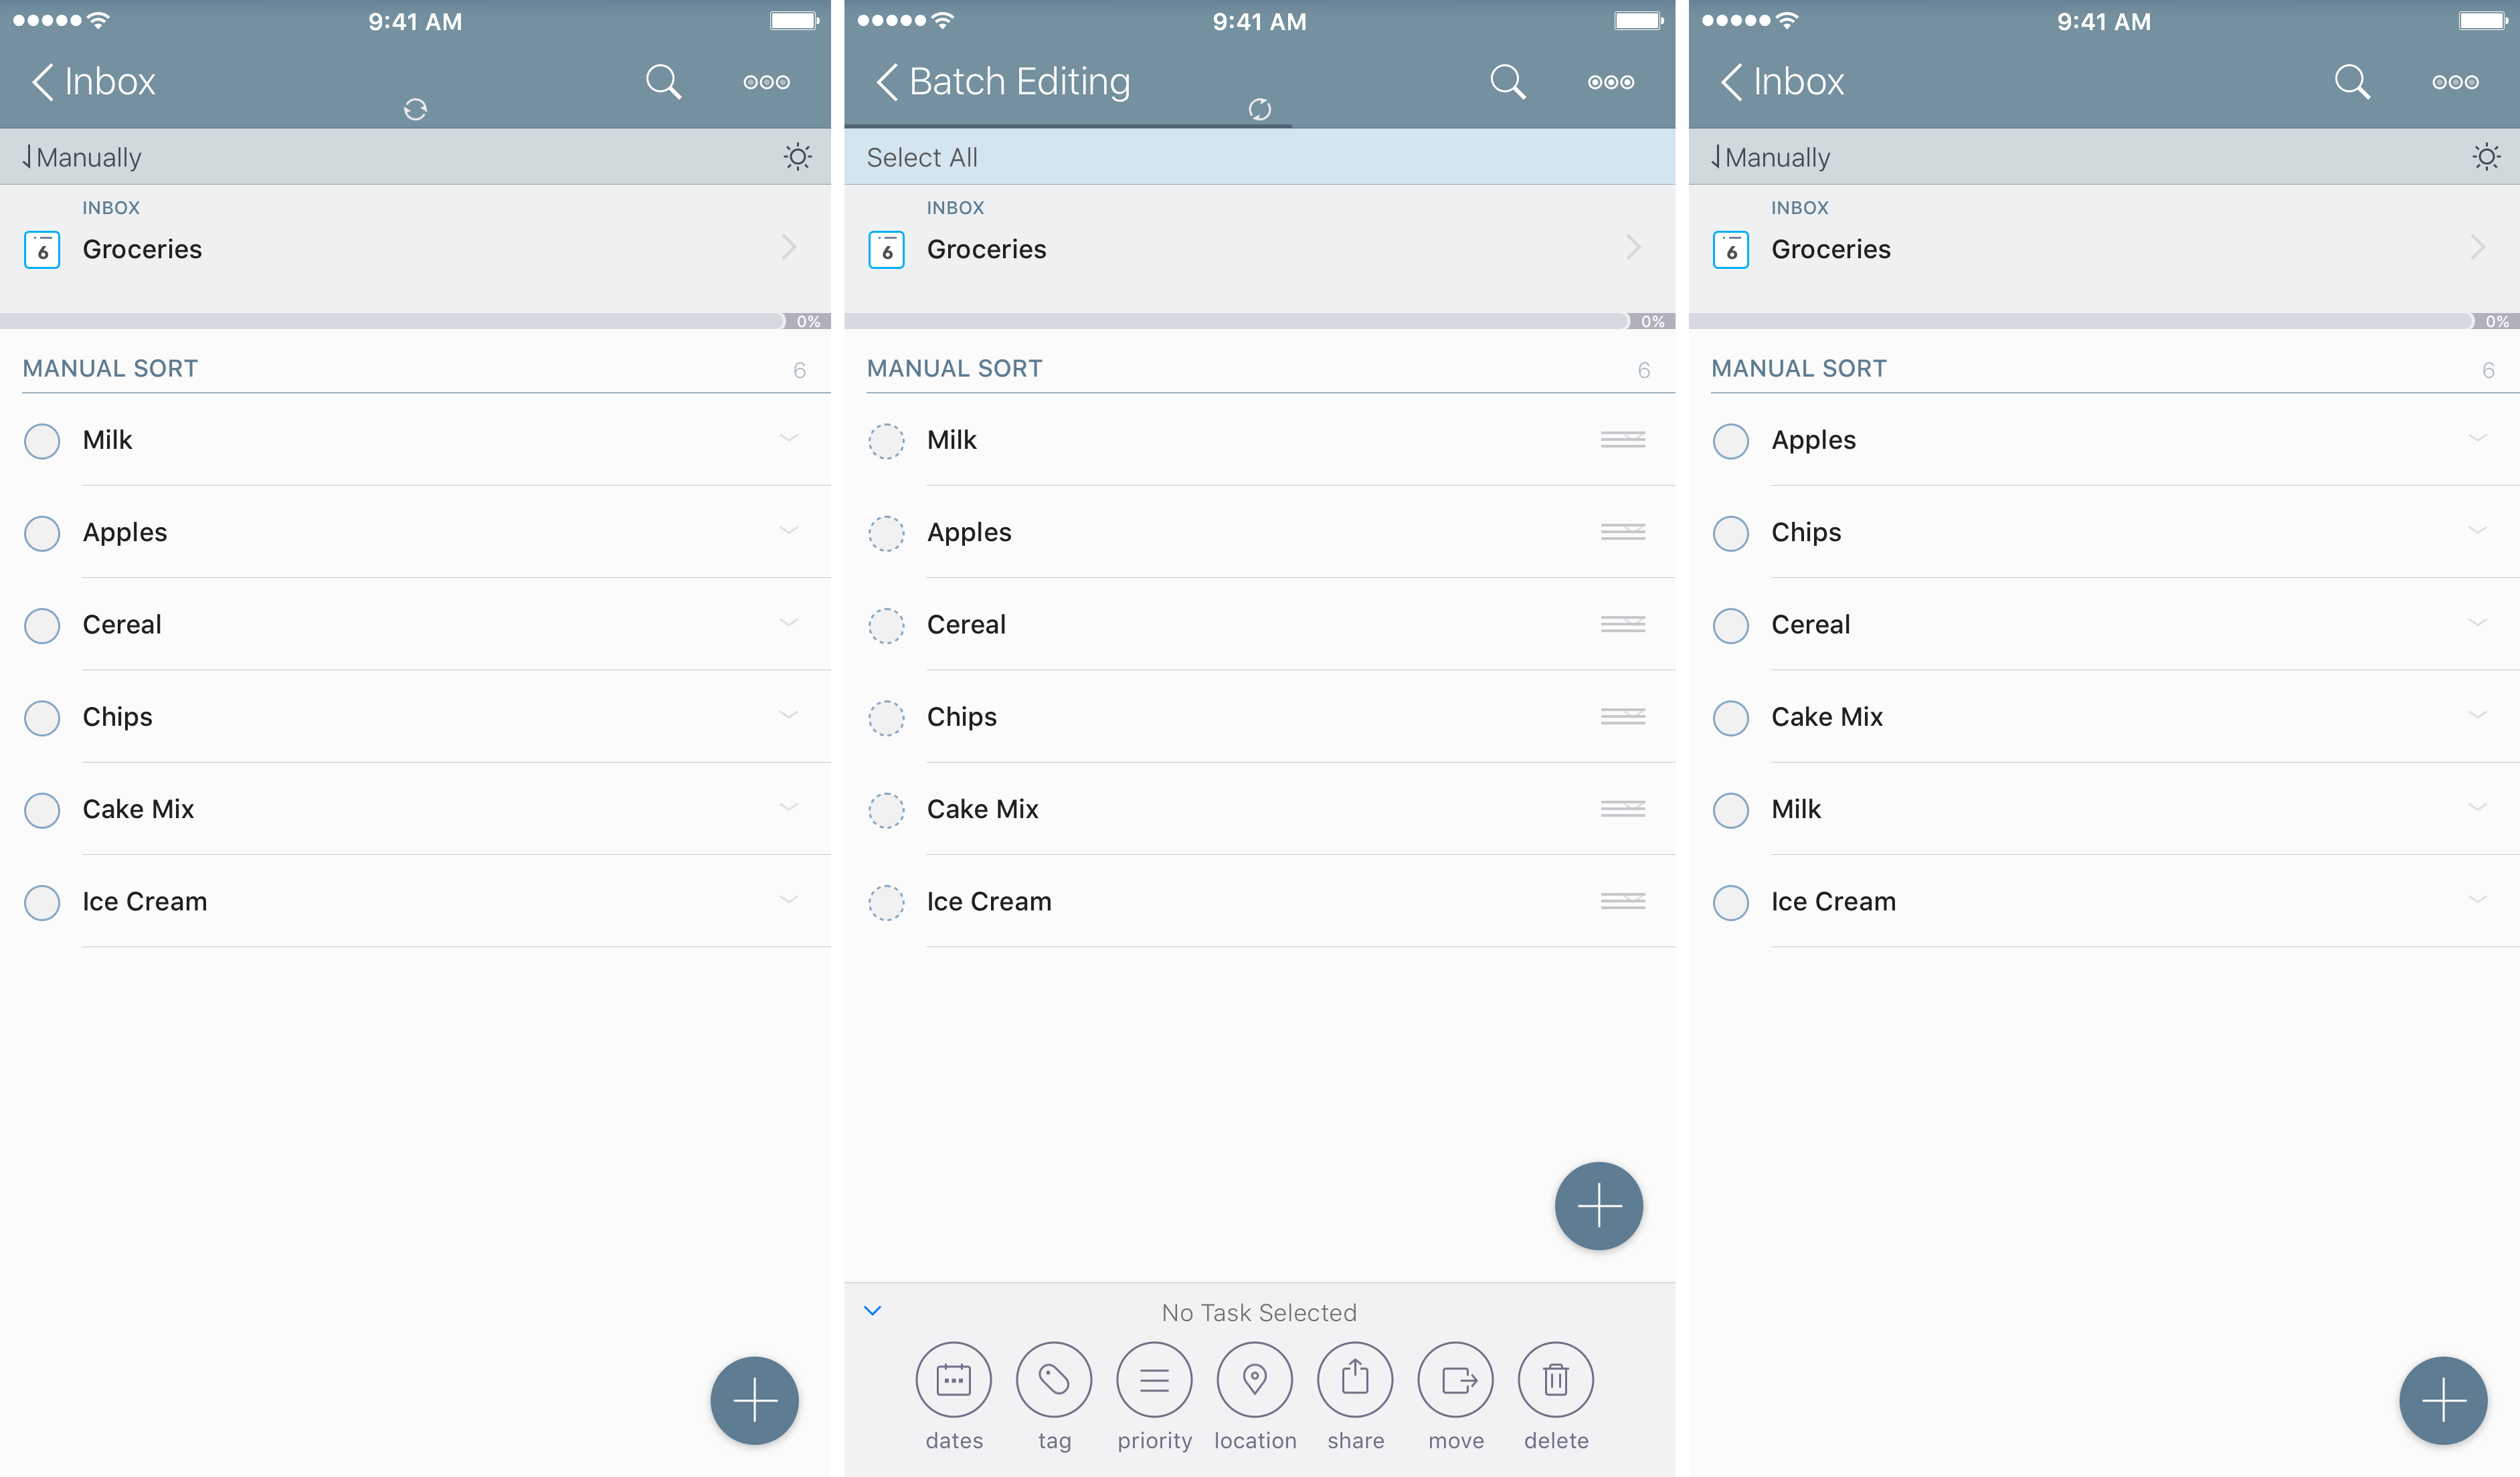
So now, as I swipe left and right, I have multiple options to sort a list, a project, or a checklist. If I select manual, I can move around the items that make sense to me; simply tap on the batch editing icon to enable the mode.
Sort works on the list or Smart List view you are in. You can have one list or project be sorted by due date, one sorted manually, one sorted by creation, etc. It is fully flexible to suit your viewing needs.
Embracing Smart Lists
The creation of Smart Lists is one of the most powerful features of 2Do, but also has the highest learning curve. There are some limitations that hopefully will be fixed with future updates of the app. Users coming from OmniFocus will find that they are very similar to something like Perspectives, though they may not perform the same way.
One of the biggest tips I can give: learn the syntax. Yes, it's nerdy. Yes, some people don't like reading the owner's manual to understand how things work.8 But you absolutely should.
The idea behind Smart Lists is this (from the User Manual, emphasis mine):
Smart Lists, in simpler words, are in fact saved searches. A smart list only filters on the original list it was create in (such as Home, 'All' and so on) and can be used for applying dynamic date range searches, keyword and tag filters.
This clicked for me as soon as I started thinking for what I wanted to search for, rather than what I thought I want to see. I input many tasks and can't always remember where I put them. Searching for them is helpful; having a way to regularly search for a set of parameters is a godsend.
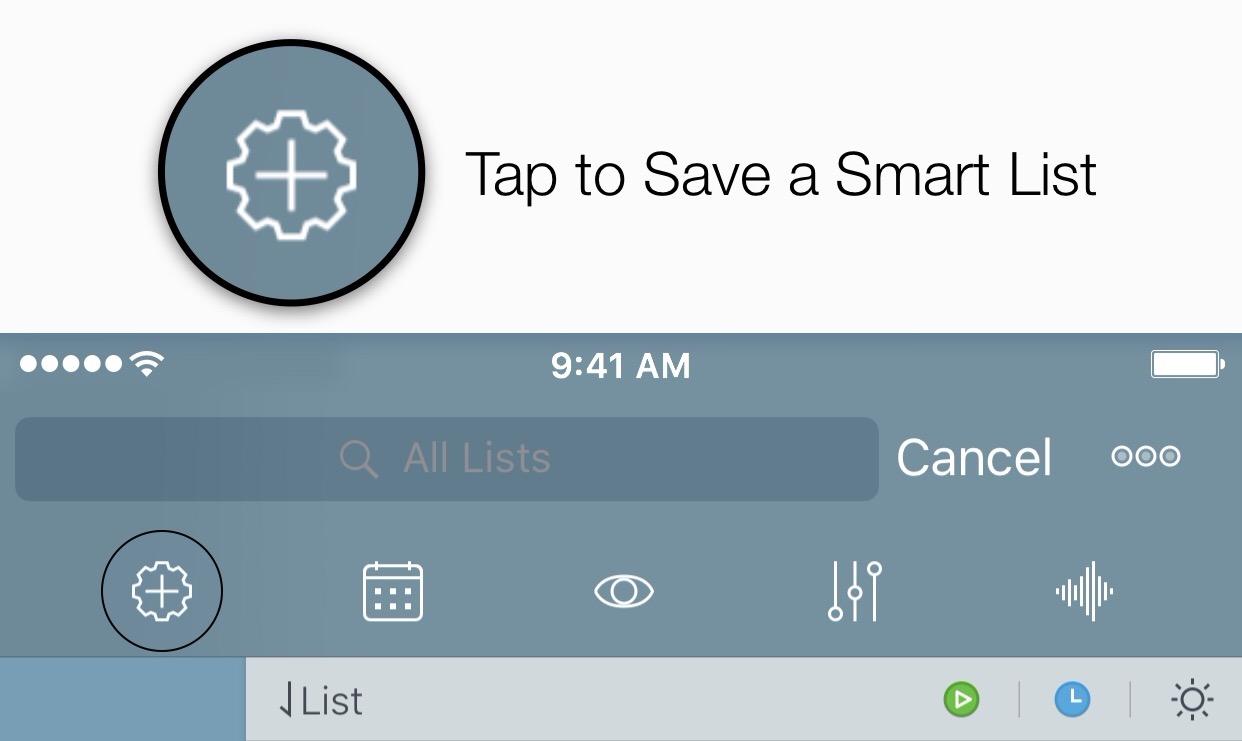
Many times, I just need to search all of my tasks for things. I may do it once, twice, or a few times - but being able to create a saved search is great. When I complete my search, all I have to do is tap and hold the icon to save And that is why Smart Lists are great: they allow you to customize your search parameters to find the tasks you need to do. They can help you organize your lists across one or multiple projects.
I would recommend that when you create a Smart List, you start off from the All list; searches only refer to the list you searched in, and this will capture everything for you. You can then search in specific groups or lists to narrow it down.
Examples of Work Smart Lists
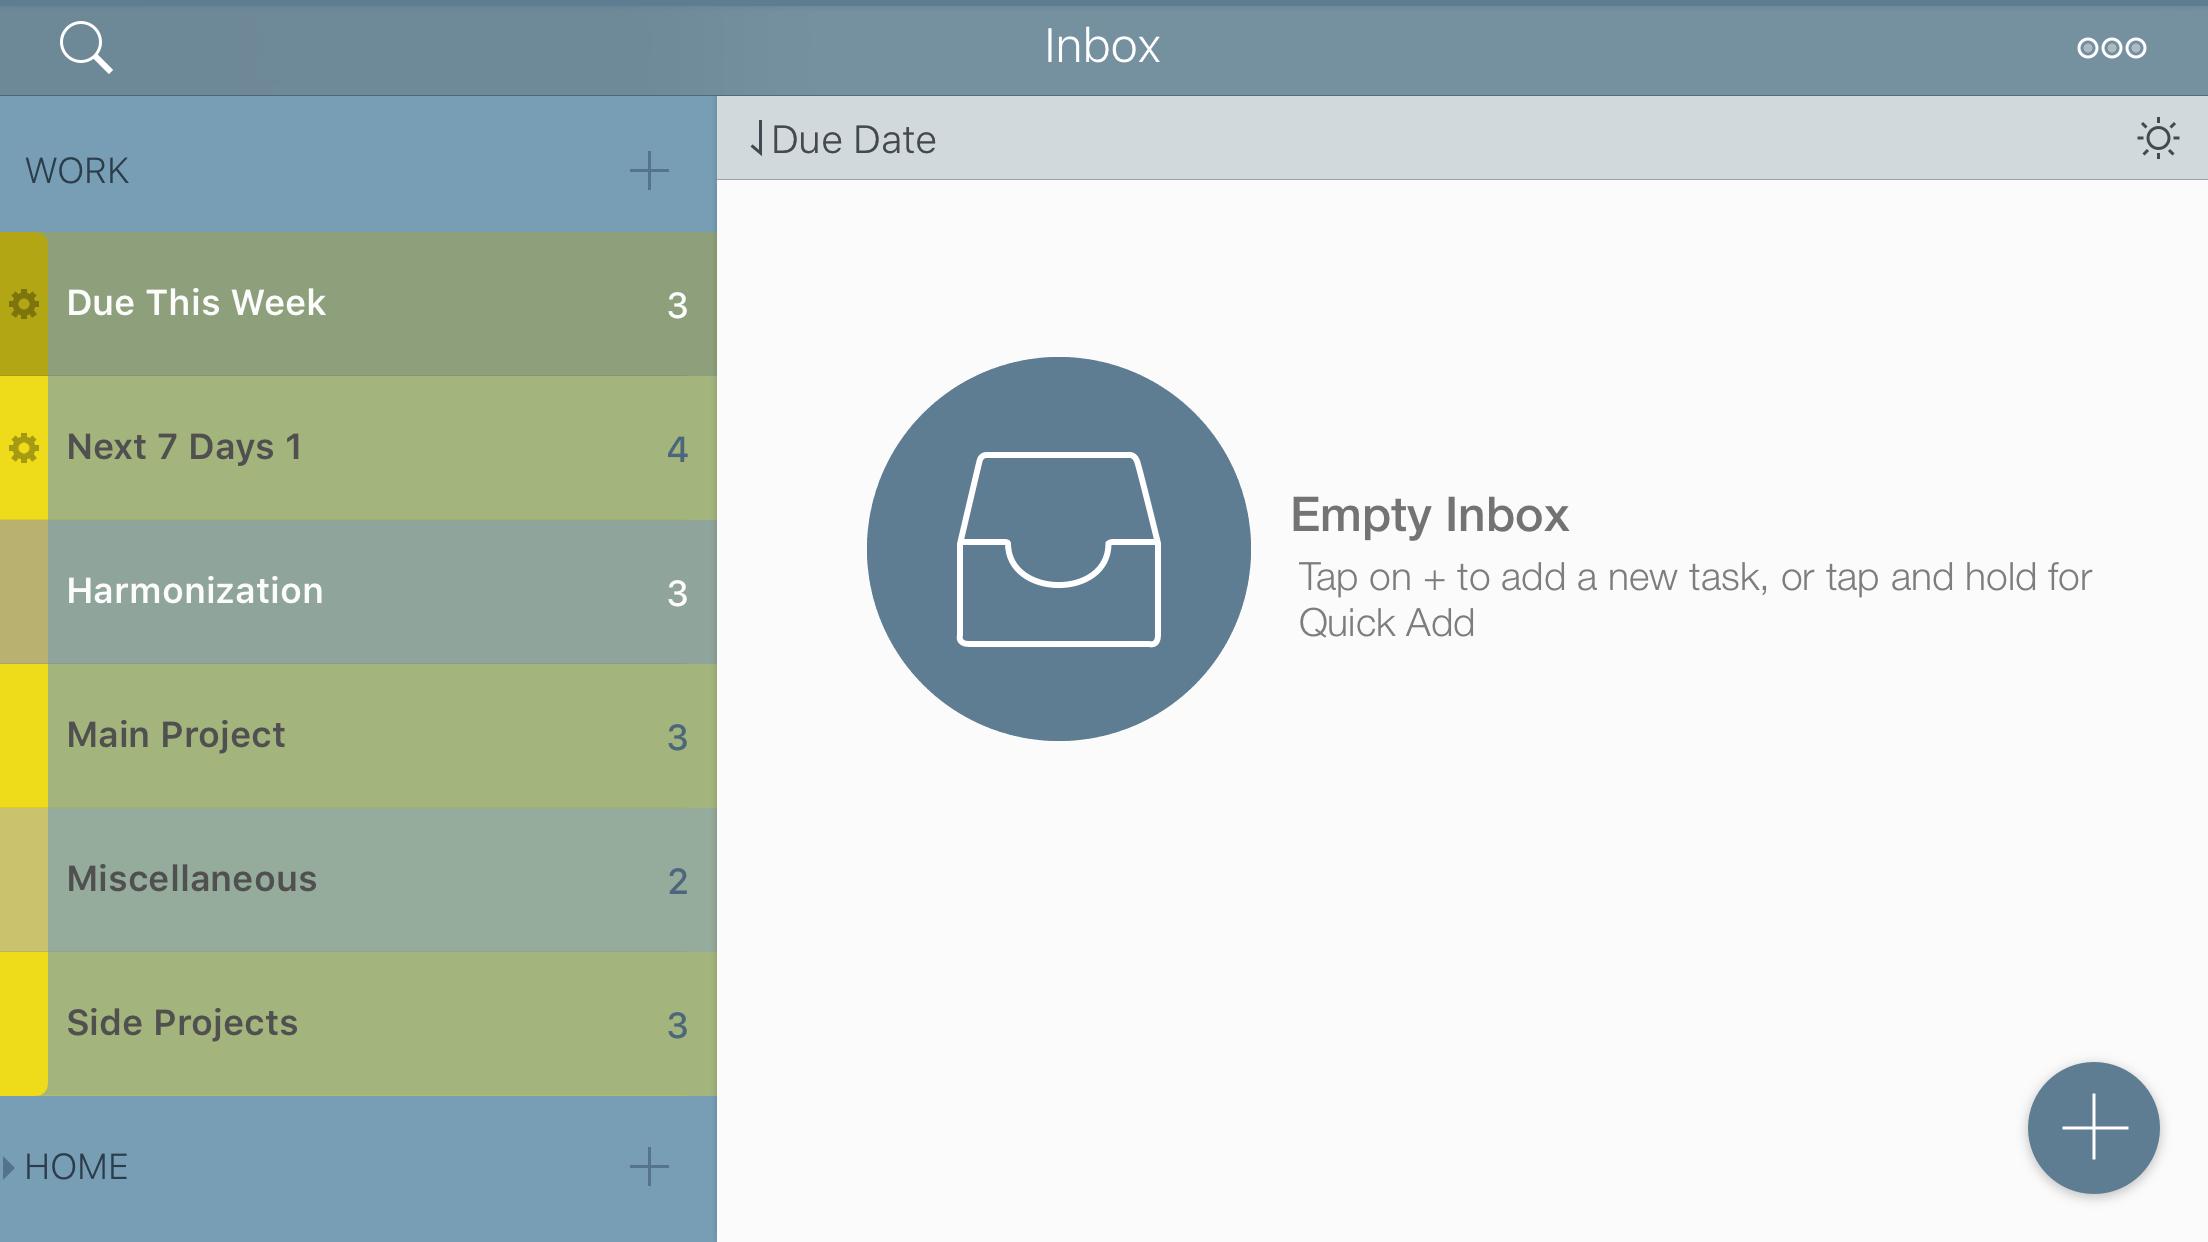
I have a Work group of a few lists. Keeping one list for me with Projects/Checklists was not helping my organization, and I needed that extra level of management. As I enter tasks into my Inbox, I can then sort them based on which list they go into. But if I want to get a look at my whole list, I need to create a search and save it as a Smart List. Here's the syntax I use for searching only items from my Work list:
groups:work type: task or proj or chck
I usually view this Smart List by list view; this way I know where I have each item located.9 Now all I need to do to save the Smart List is to press the icon, and I'm all set. I can name this Smart List whatever I want, and even place it inside the Work group I have set up.10
These work great for showing me everything, but at times I want to see just my work for this week. I can take the same search syntax, modify it slightly, and add a parameter:
groups: work type: anythisweek and proj or chck or task
This shows me everything I need to get done this week. One thing to note here is that this only shows you things due this week, and interprets the weekend as the end of the week. So if you look on a Wednesday and you know there's something due Monday, you won't see it.
So how do you get that early look ahead? This can be set up using a Date Range or Dynamic Date Range. To do this, you can apply the first syntax example, and apply a dynamic date range. In my experience, I have found it better to search for the parameters I want to see (proj, task, chck, etc.) and then apply the dynamic date range; it assures you that you're entering in the syntax correctly before applying the date.
Here, you can see the difference in the searches:
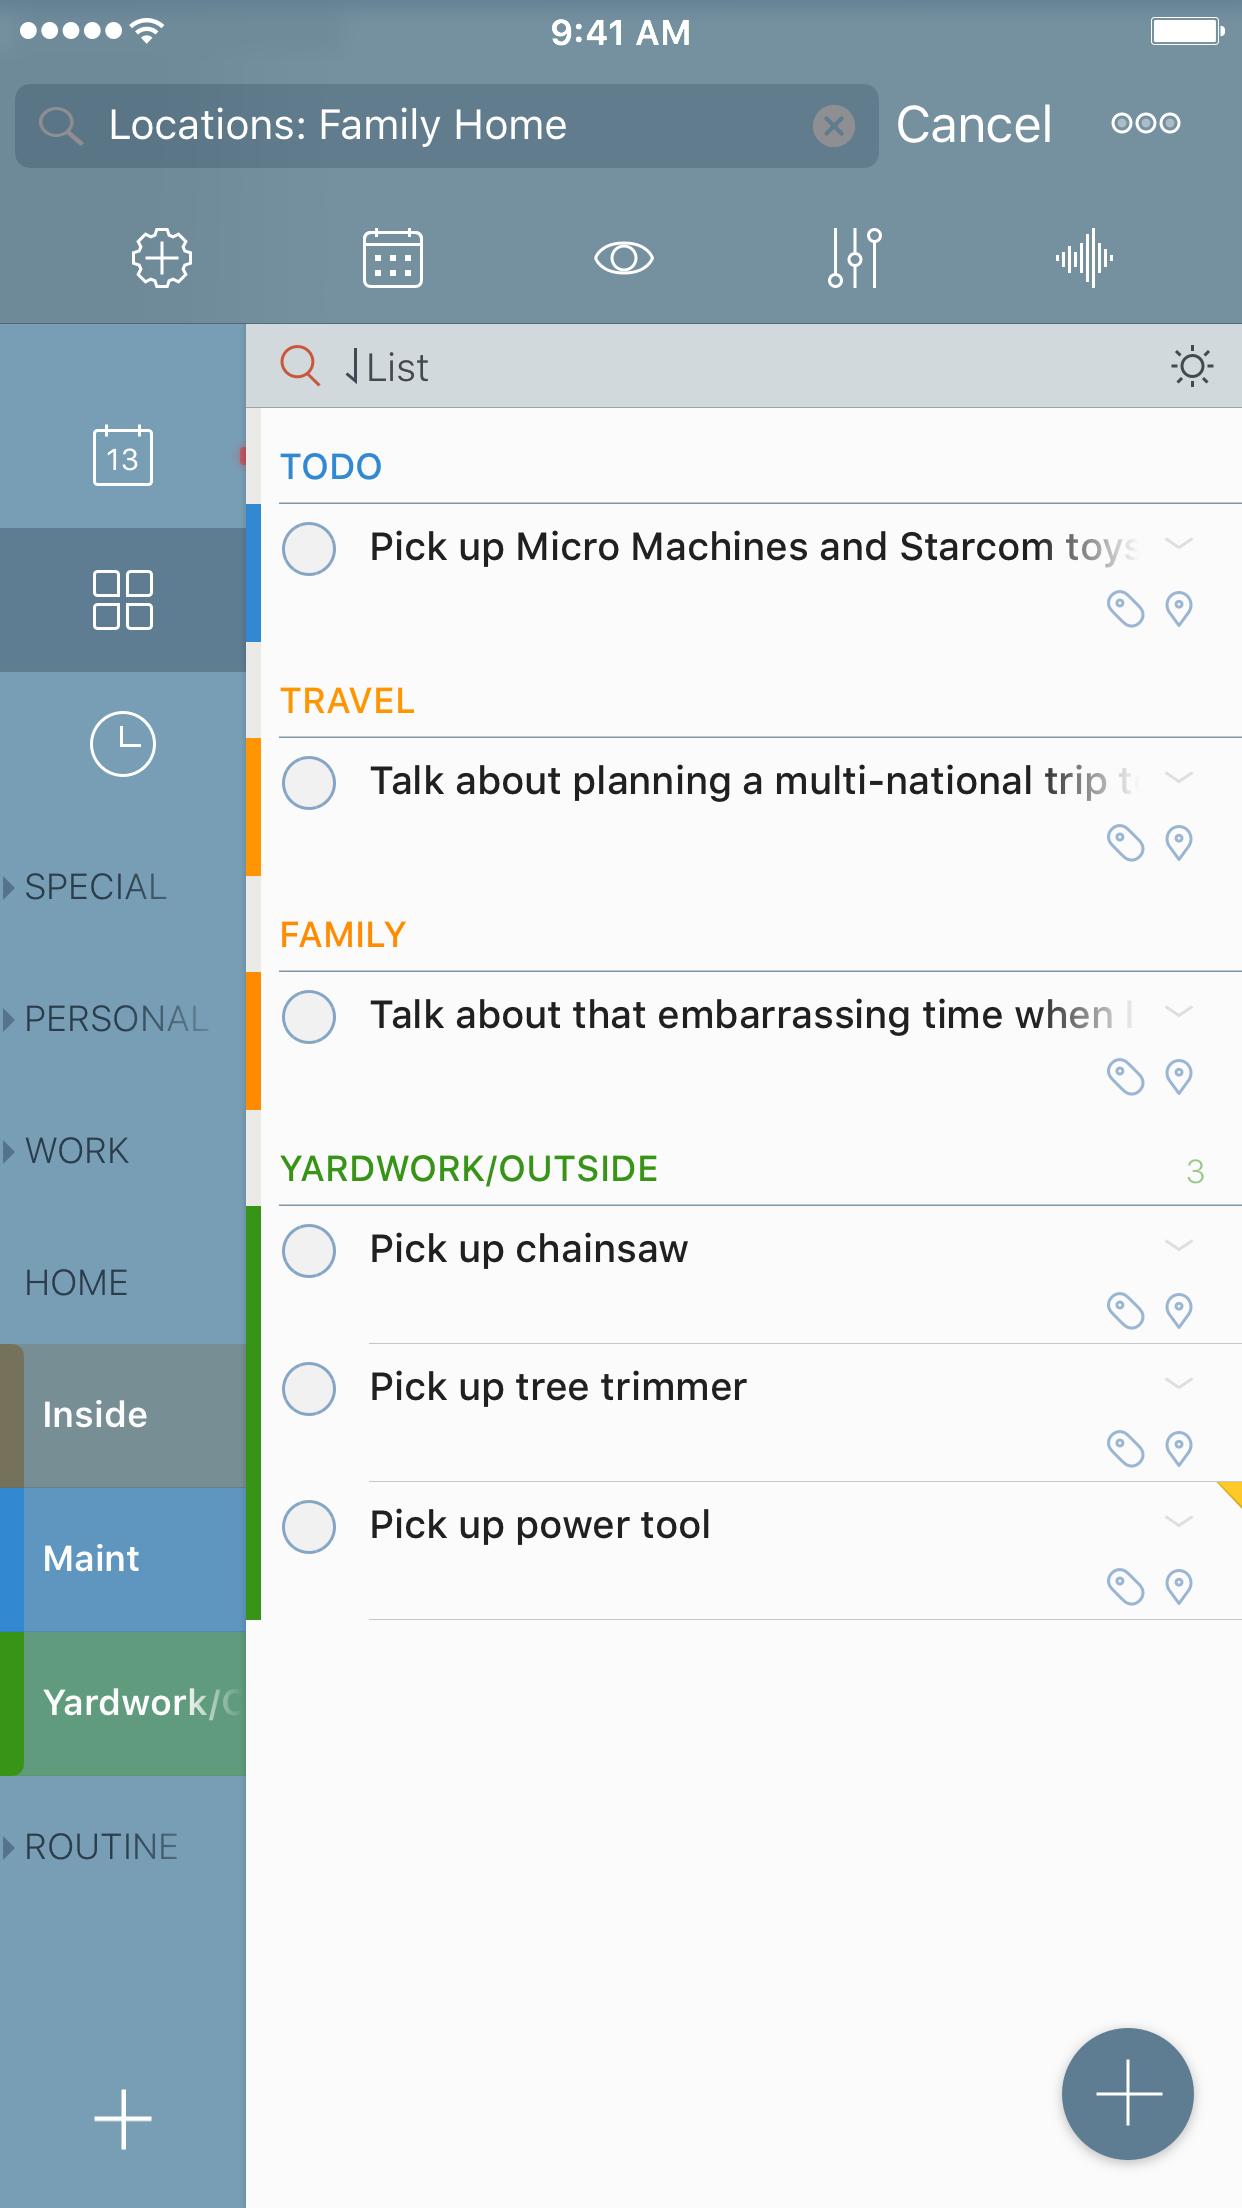
Example of Location Search
Let's say you are headed home to your family's house for Thanksgiving. There are a number of items you want to pick up or do:
Pick up chainsaw
Pick up tree trimmer
Pick up power tool (that you only need to use once every 10 years)
Pick up Micro Machines and Starcom toys
Talk about that embarrassing time when I was 6
Talk about planning a multi-national trip to Europe
These tasks can reside in any given list. But first I need to create a location where the family home is located, then create the tasks.11 This location needs to be applied to each of the tasks. You can add them to your default list or select a list to which they belong.
Next, you simply go to the All list, and search:
There you have all of your tasks for that location. You could also accomplish the same concept by utilizing a tag called family home and search tags: family home. Use what makes sense to you.
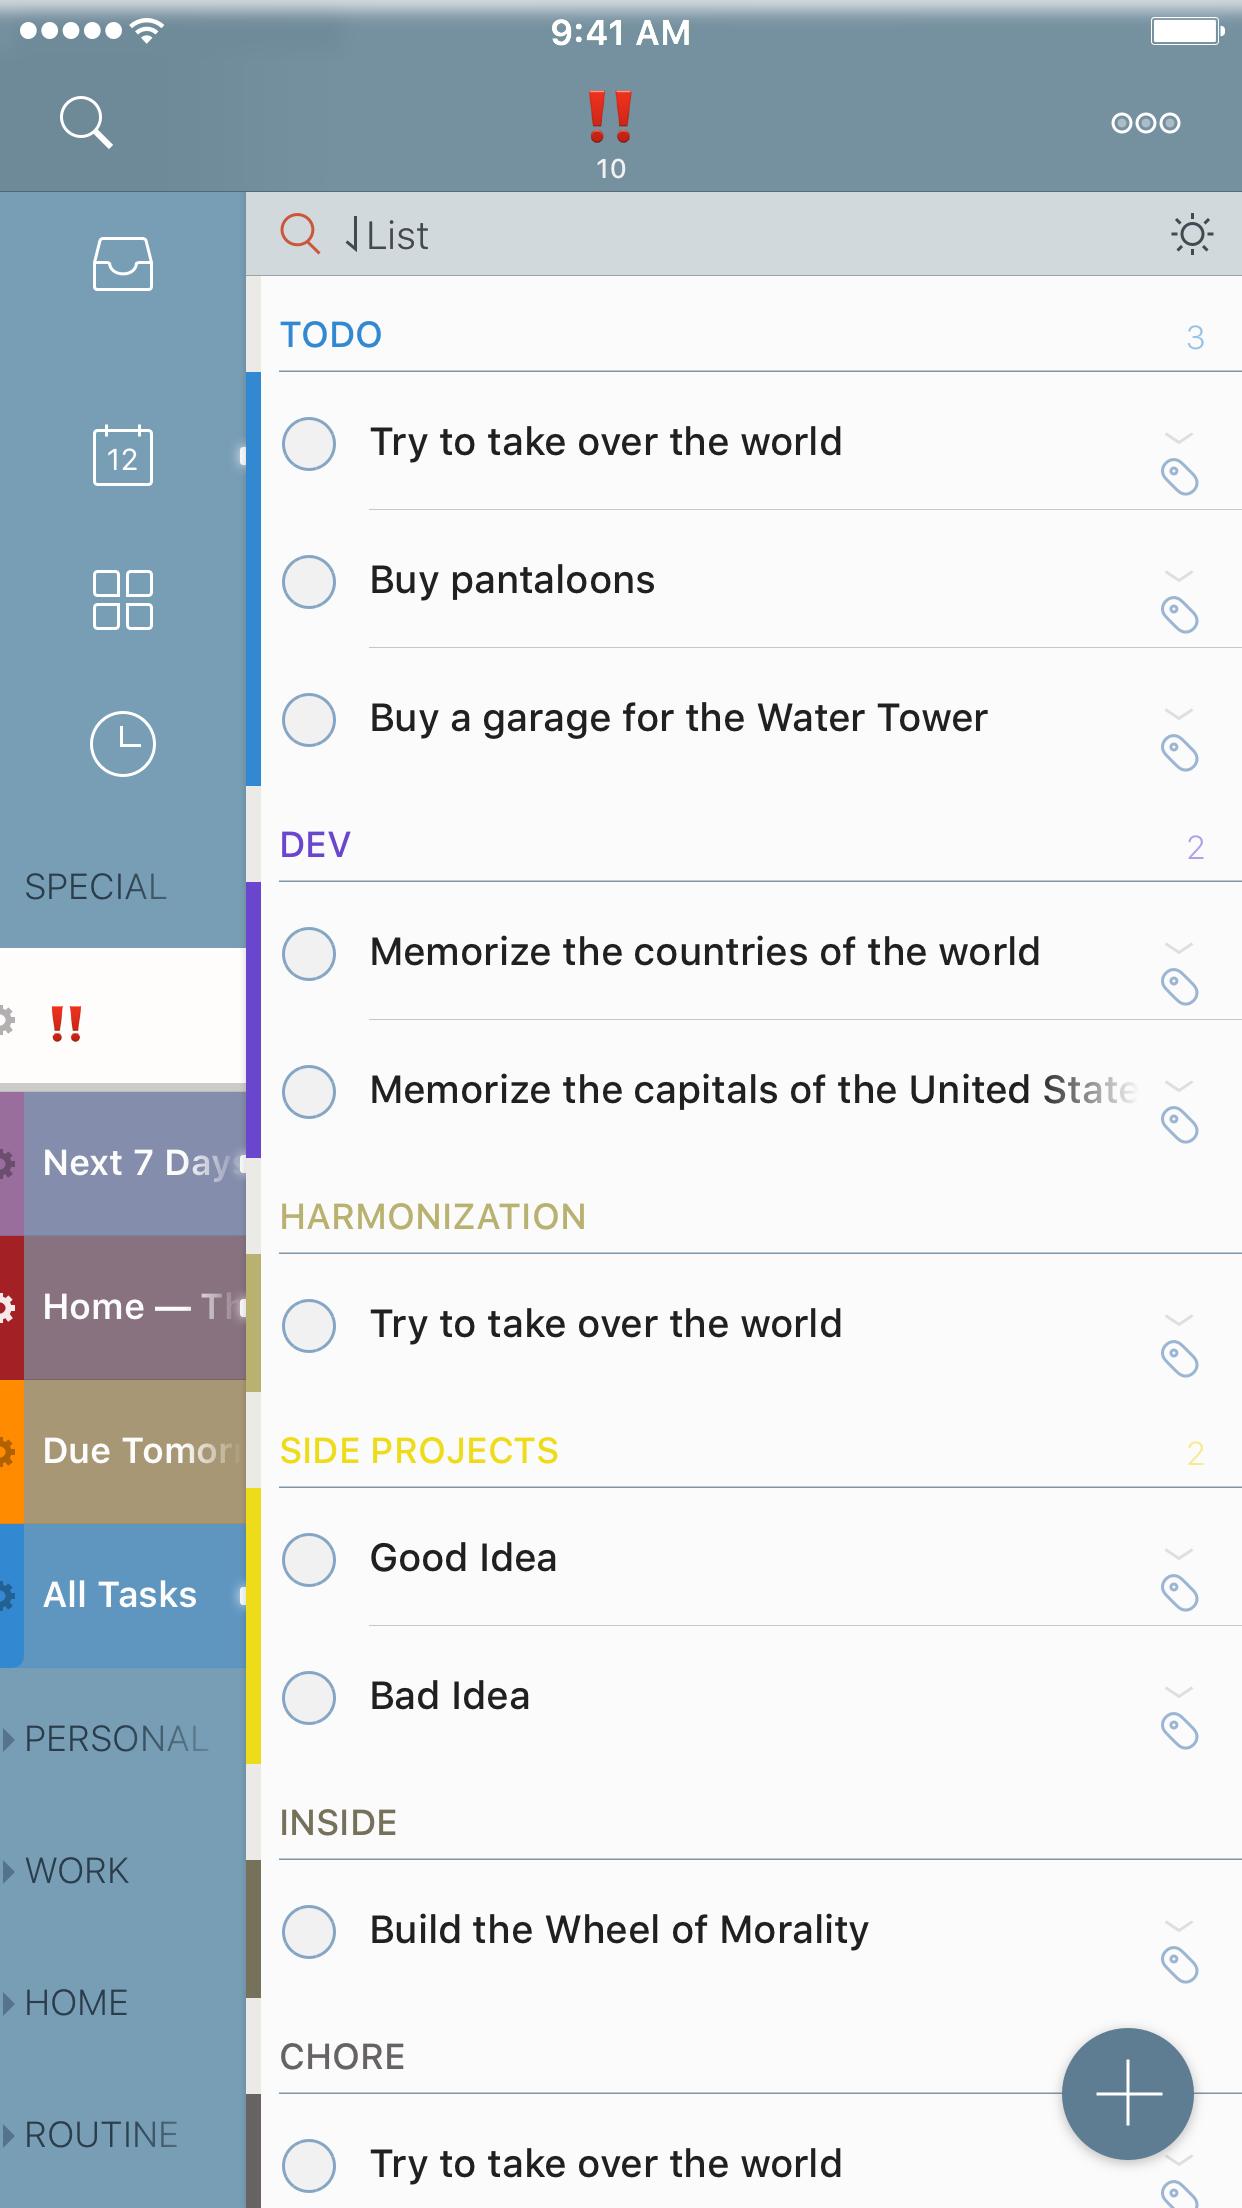
Example of Important Tag Search
If there is a task that I really need to get done and I need to visually see that it is important, I have started to use the ‼️ emoji for a tag. Yes, you can use emoji for search! Now, I can search on that emoji to see the important tasks, and save a Smart List:
tags: ‼️
I can even rename the list as ‼️ to make sure that I see it on the side.
Other Possibilities
These are some small examples of how to use this feature. There are way more complex syntaxes that can be created to look at your tasks. This is the beauty of this feature. It works for you (once you learn how to make it work), and allows you to customize how you view your entire system.
Helpful Links
If you're on the fence about moving over to 2Do, or have other questions, you may find some of the following links useful. Also, as I said previously, you really should read the 2Do User Manual and check out the 2Do YouTube channel.
There is a lot to unpack with 2Do. I admit, it can be overwhelming at first, but it takes some time, testing, and use. I didn't find 2Do useful the first time, but that's because I didn't sit down and figure out how to use it. It isn't a program in which you have to fix your mindset to use it properly; it can be simple just like Reminders, or it can be complex like OmniFocus.
This isn't a pure Getting Things Done (GTD) system, but something that adapts to a user's needs. That said, you can make this a GTD app if you so wish, but you can also break the barriers a bit so that you don't feel confined. (It's a new kind of hybrid system, with just the right rigidity, just the right flexibility…)
2Do is in my dock. It has been firmly planted in the management of all my projects and my day-to-day life. My thought process is now captured as tasks when needed, and it has helped me focus on accomplishing the complexity that is my life. I am thankful that I have finally found something to work for the way I think of my task management.
I really wish that Apple would give the developers options for this. You cannot learn if a system will work for you just by pictures alone. You need to set it up, take some time, and see how it works in your life. ↩︎
This could be any app: Things, Todoist, Remember The Milk, Clear, Reminders, etc. It just happened to me while using OmniFocus. ↩︎
If you use Dropbox, I recommend that you immediately buy the Email 2Do IAP. Start with the $2.99 option to play with the integration. The MacStories article in the Helpful Links section will help guide you on setting that up. ↩︎
In this case, I was trialing OmniFocus, and I exported the .CSV from the settings menu. ↩︎
At the time I did this, I did it in a way more inefficient manner. I'm thankful that this action has been massively improved. ↩︎
Some people think that you should keep work and personal separate, but when things get chaotic for me at home and at work, I need to see it all. ↩︎
This is what I missed; it's subtle, and I missed it for a long time. Happier now that I have found it. ↩︎
I am constantly finding new things to use my favorite app Drafts. Everything text starts in Drafts, just like this post. All of my lists, my notes, and my thoughts start here. It is a big part of how I get things done at work and at home.
I’m also in a quest to automate as much as possible. If I’m doing things over and over, I want to take away the friction no matter how small it is. I understand that this is borderline OCD, but I can’t help myself from finding joy in these little things.
New Features
With the Drafts 4.6 update today, there are several new features as highlighted on the Agile Tortoise blog:
Trash Can: instead of deleting your drafts, they are now stored for 30 days. This was apparently a big complaint of users who happened to have their default setting to delete. This is much like how Photos handles the recently deleted items.
Box.com Integration: this is just like the current support of Dropbox, and provides the same functionality.
Open in Drafts option: this uses the Safari View Controller, and is great for using a search option, such as DuckDuckGo.
Tag Helpers: an added keyboard row that gives you tag options when editing actions. Very useful.
Added Glyphs: this is something that I’ve personally wanted for a while. This update provides a lot more options for customization of your actions, and is very welcome going forward.
Include Action: gives you the ability to run actions/scripts within Actions.[1] This means you can create separate actions or scripts of a repeat nature that you can call into any action you create. For those that use a lot of scripts within Drafts, this is going to be huge.
And many more.
Include Action Step
Long-time users are familiar with how to chain actions together, adding a multitude of different action types into a single action.
I recently thought of how I enter groceries. My wife and I use a shared Groceries list in Reminders, which then gets synced over to AnyList to group the items and make it easier for shopping. Until now, I would enter the items we needed, make sure they were in the correct format, and send them over. I would open up AnyList to make sure they were imported and also to review the list. Lastly, I would then make sure to let my wife know that I added items to the list.
There have been times that I have pulled a recipe in from a website. I copy and paste the ingredients over, delete the items I don’t need to buy, and delete all of the blank lines.
I do this often enough that I should automate it. Thinking of how I would do this, I thought of the steps that could be automated, and in what order:
Remove any blank lines from the draft.
Pass the list from Drafts → Reminders → AnyList.
Send a message to my wife to let her know it has been updated.
Open AnyList.
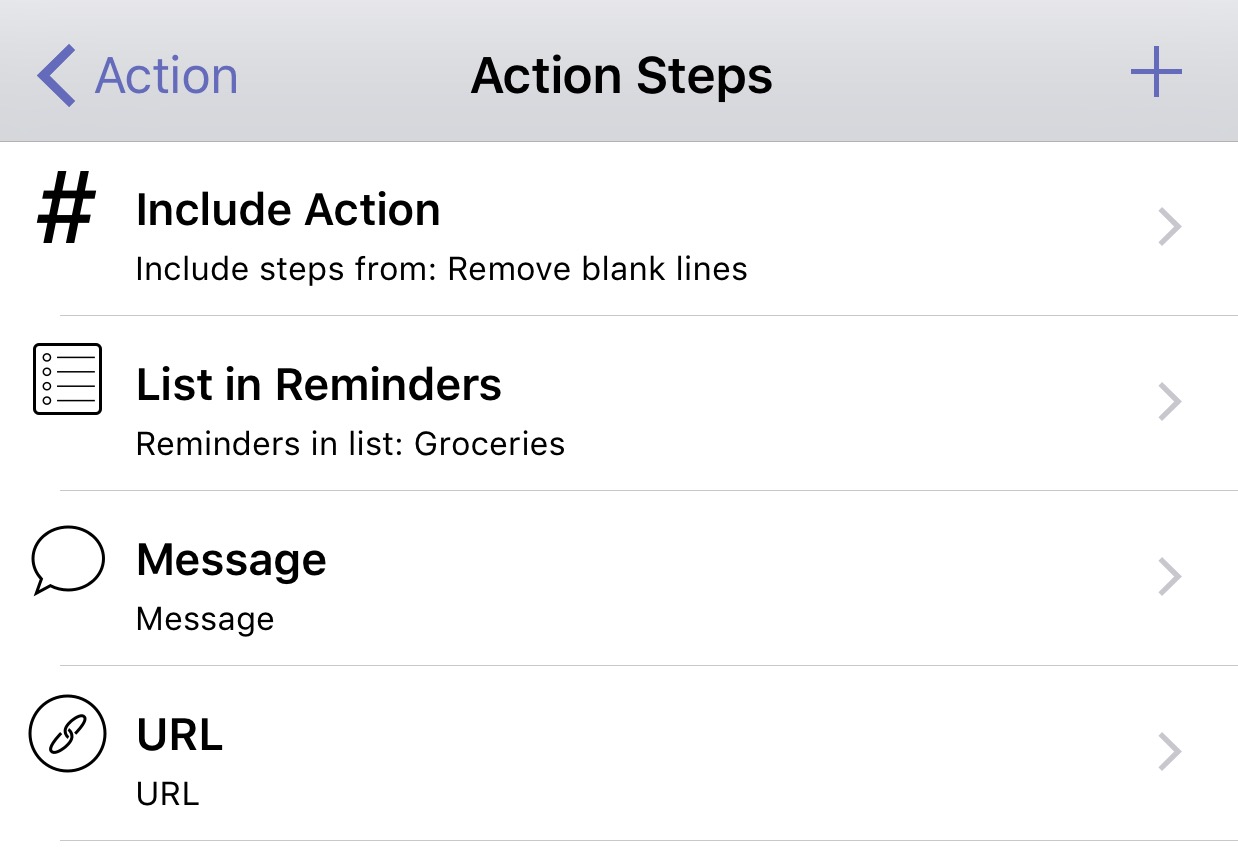
Step 1: Thanks to this action, I can run a script to get rid of them. And with the Include Action function, I can add that right to my action as the first item.
Step 2: This is a built in function of Drafts. It process each line, and you can optionally specify a delimiter for writing notes, which is helpful when adding a description to “lettuce” to give you a specific type or quantity.
Step 3: This is also a built in function; I set the number for my wife, then a canned message to let her know I updated the grocery list.
Step 4 utilizes the URL scheme of AnyList, which is anylist://.
Now that I have the action set up, I can run it on a list I have entered. My list is passed over, I hit send on the message to my wife[2], and then I am automatically taken to AnyList. The items appear, and I can go on about my business.
I’ve also created one that doesn’t does message my wife, because I don’t always need to let her know. And of course, I made an Action Set for both of them.
Could I enter the items into AnyList directly? Sure could — if I was an animal. Instead, I can freely add them in one place as I think of them, and send them where I need them to go with the press of a button. This is a simple example of how you can include different actions, especially scripts, to automate and manipulate the text as you pass it along to the next app. It has saved me time ever since it was introduced in beta, now available to all of you.
This doesn’t allow for running multiple URL actions. ↩︎
There is a limitation of iOS in this step. The system software does not allow for the automatic sending of a message. I would love to see this changed, but I’m not going to hold my breath here. ↩︎